

PureNight Frequently Asked Questions
Below are the most frequently asked questions for the PureNight Light Pollution Reduction Filter by Lonely Speck. If you have a question not covered here, please ask in the comments section at the bottom of this page or contact us directly.
How do I care for my PureNight filter?
PureNight should only be cleaned with a clean microfiber cloth and a lens cleaning solution safe for coated optical glass. We recommend Zeiss Lens Cleaner.
Please note: We do NOT recommend use of lens cleaning solution on the SharpStar, as it will damage it.
Where can I order?
The PureNight light pollution filter is sold exclusively on lonelyspeck.com by Ian Norman and Diana Southern, creators and owners of the Lonely Speck blog and the PureNight filter. Any other website or store selling a light pollution filter under the PureNight or any other name is not an authorized seller of Lonely Speck’s light pollution filter, and the product being sold is not manufactured or sold by Lonely Speck or covered by the Lonely Speck 100% satisfaction guarantee. For any questions about unauthorized sales of the PureNight filter, please email [email protected].
The PureNight filter can be purchased only through the Lonely Speck website.
How can PureNight improve my night photography?
PureNight will improve the colors and contrast of an image taken in any location impacted by light pollution.
You cannot achieve the same level of improvements with post-processing.
Why is light pollution a problem and how does PureNight help?
Light pollution is a problem that astrophotographers face across the world. Sodium vapor lamps are very commonly used in industrial and street lighting, and light pollution from these lamps can be visible in photos from a hundred miles away.
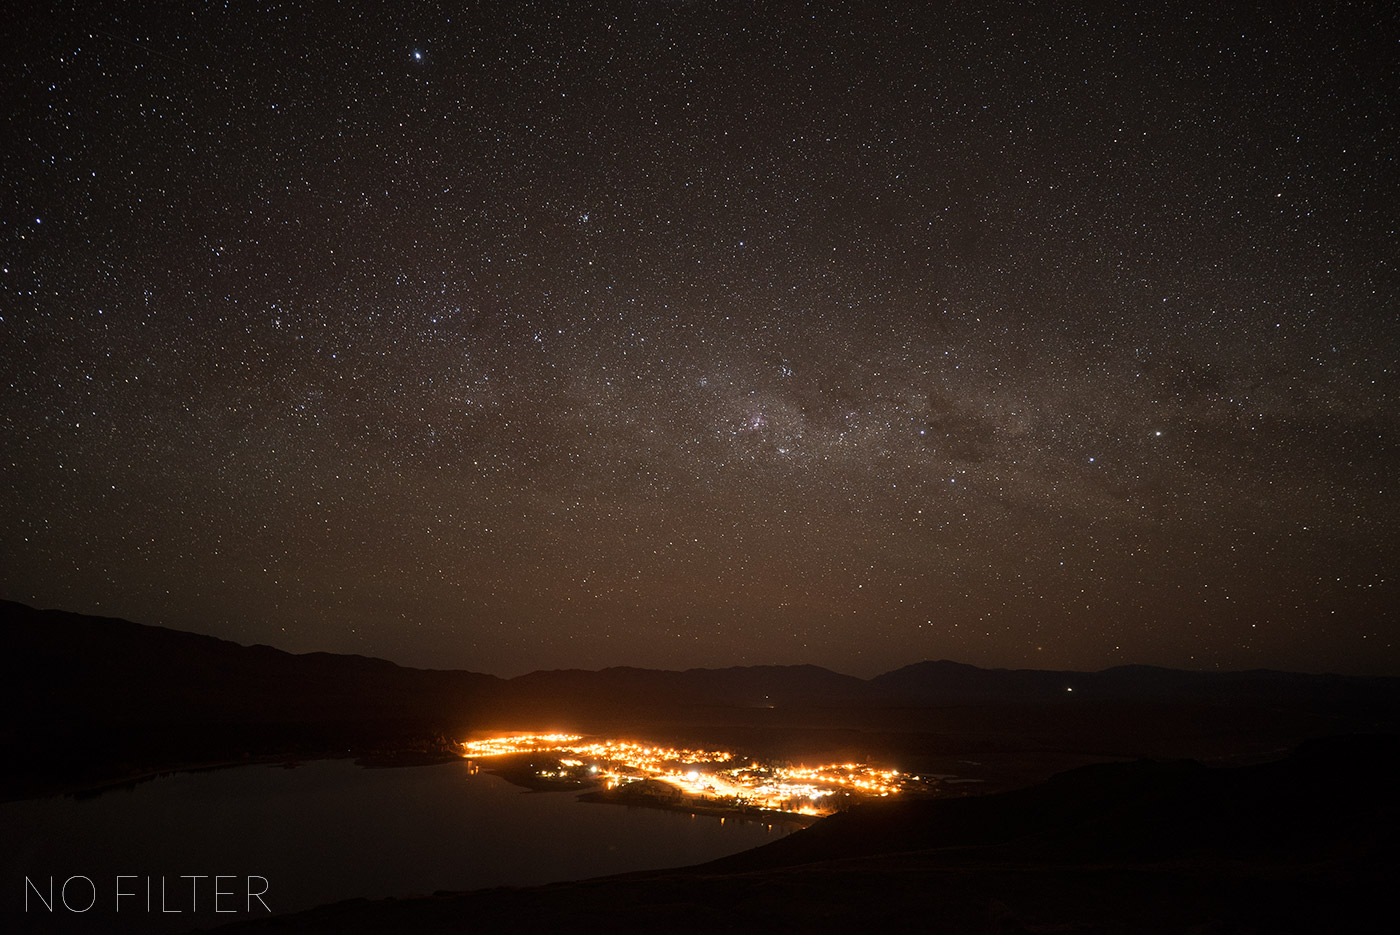
Even dark sky destinations are impacted by light pollution, as shown in the photo below of Tekapo, New Zealand.
The PureNight is made of didymium glass, which filters out sodium light to give the photographer an image vastly less impacted by any surrounding light pollution.
In what situations will PureNight make a difference?
The PureNight will make a noticeable improvement in the quality of your night sky images in any location with a city, town, or other source of light pollution influencing your image.
In today’s world, places without any influence of light pollution are few and far between. In the U.S. light pollution affects even the darkest skies, including national parks located many miles from the nearest artificial light source. Even under the extremely dark skies of Death Valley, California, light pollution is still present and will impact your photography.
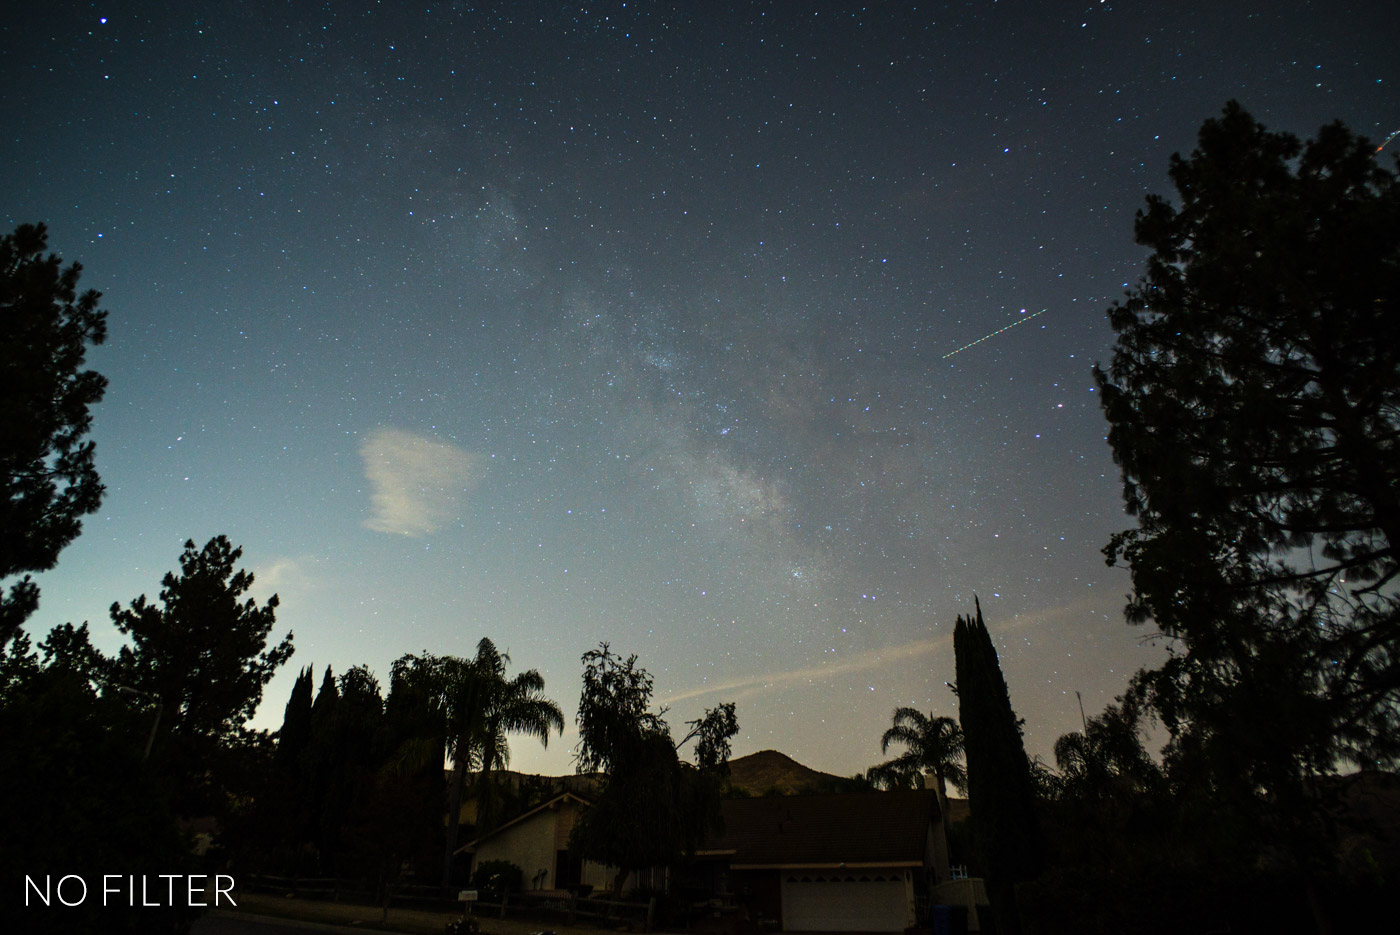
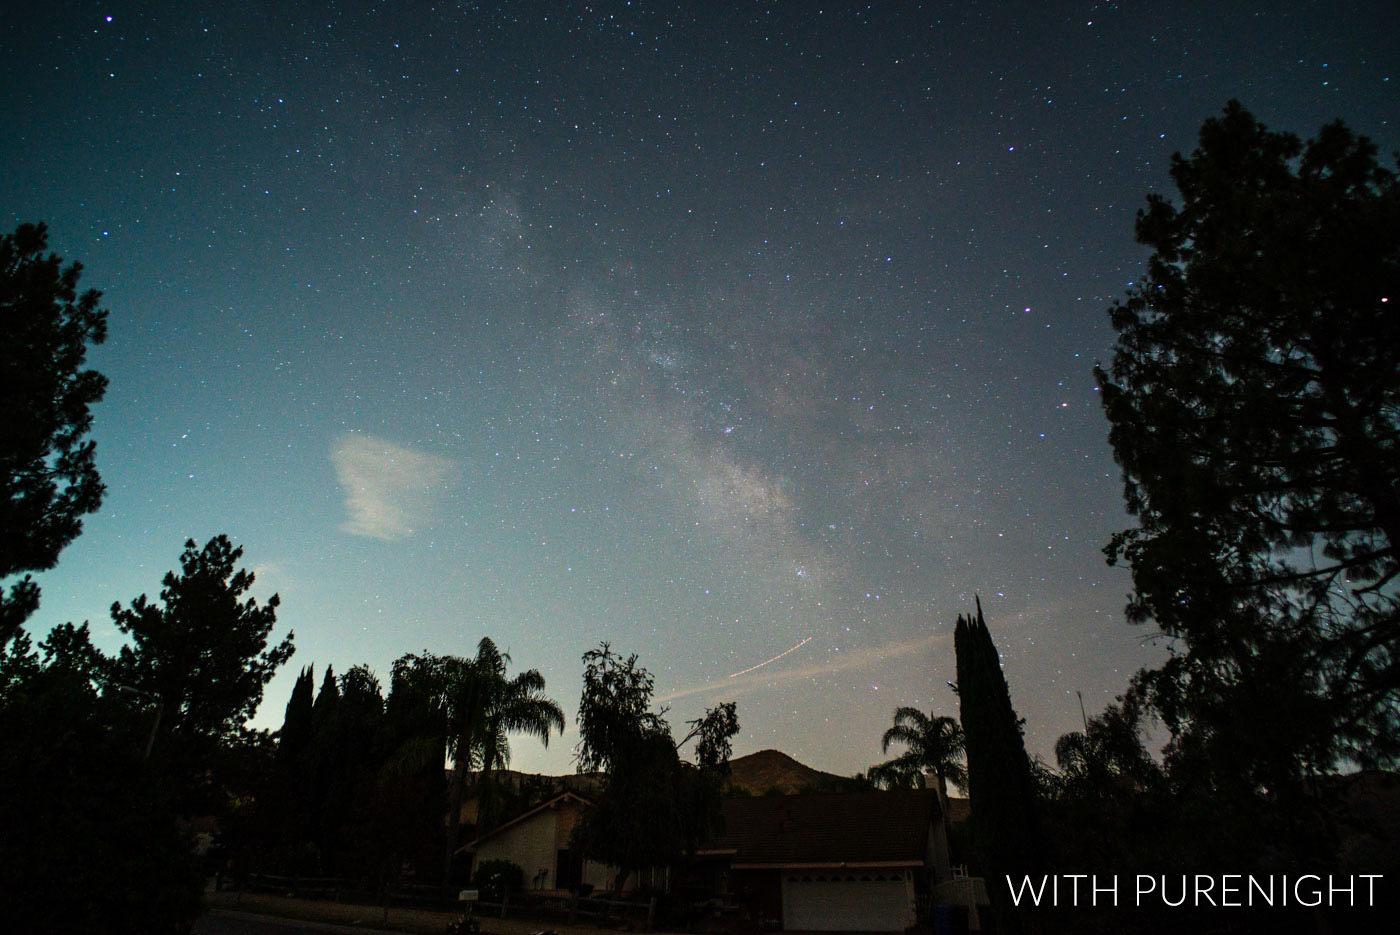
In downtown city skies, the PureNight won’t magically reveal the Milky Way, but it will filter out the ugly orange tinge of sodium lamps for more natural looking urban nightscapes.
How does the PureNight filter work?
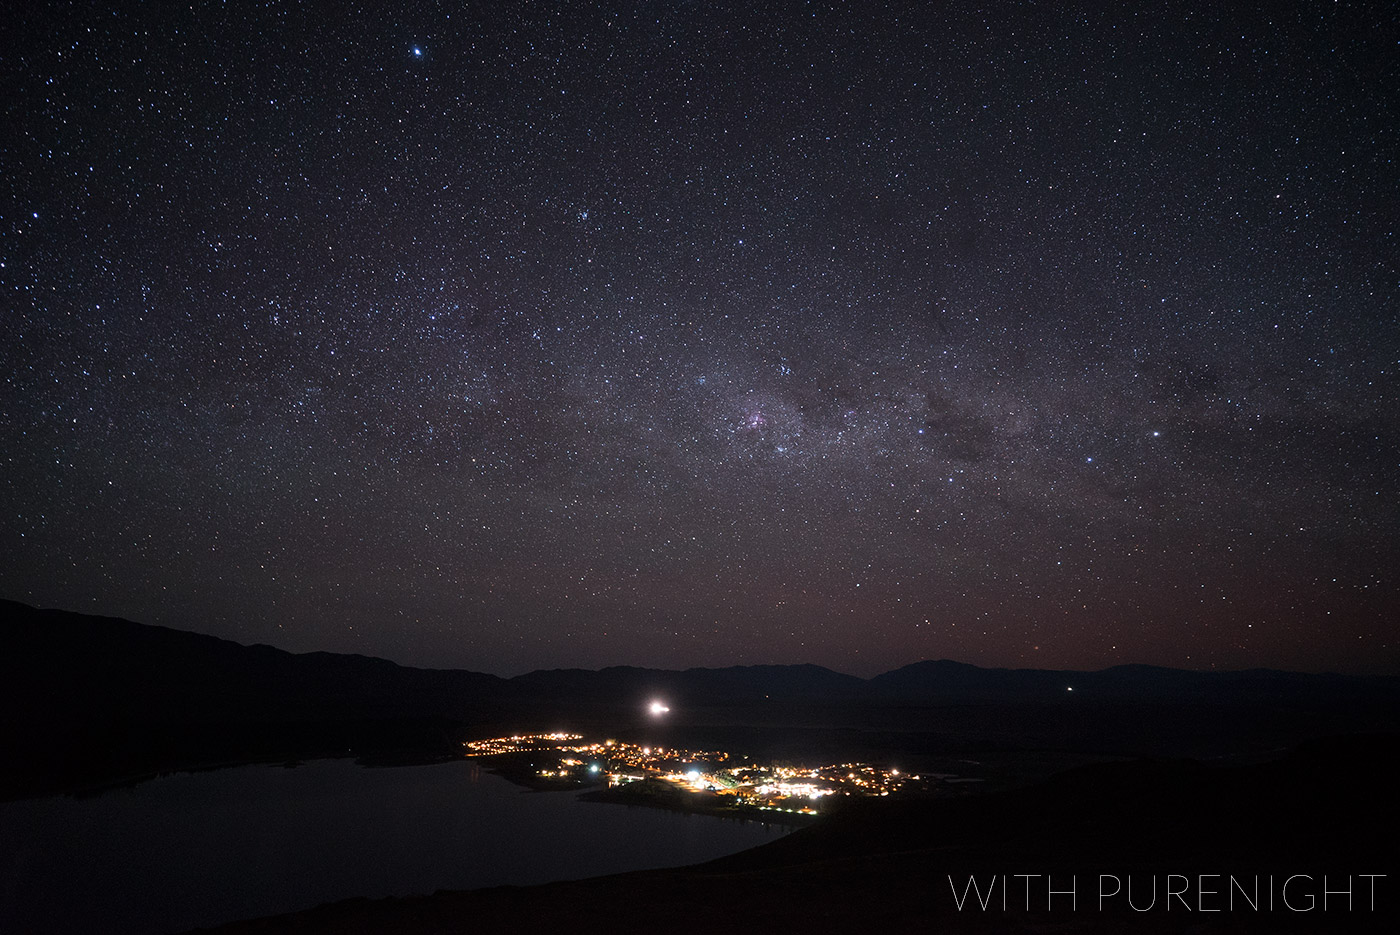
PureNight blocks the transmission of yellow-orange light between about 575nm and 600nm wavelengths, the same wavelength as sodium vapor lamps.
In the example above with the PureNight installed, notice the drastic intensity change in the yellow-orange lights of the town, resulting in a more pleasant night sky image.
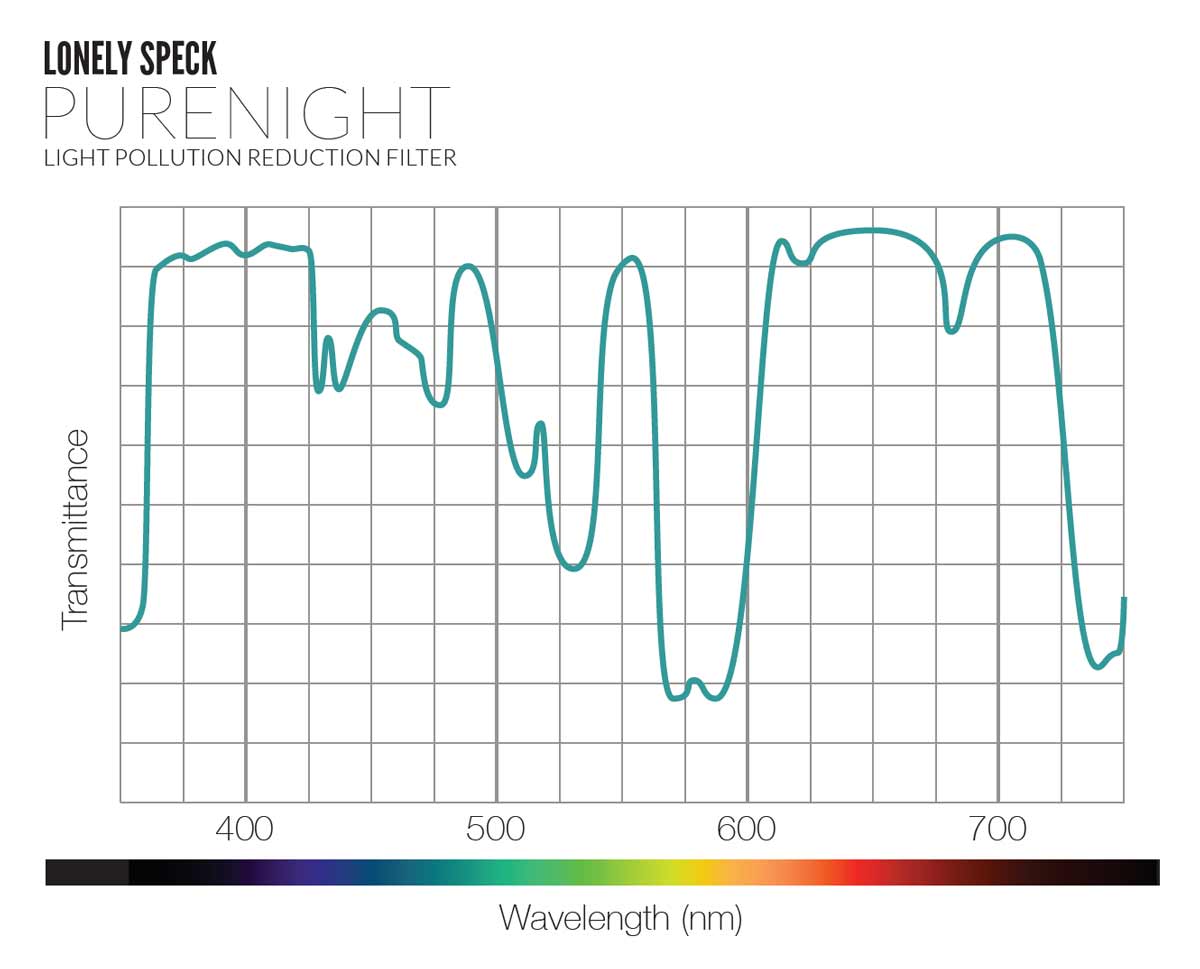
Below is a transmission curve of the PureNight.
What kind of improvements can I expect from the PureNight?
The benefits of PureNight extend beyond the noticeable improvement in the colors of the image.
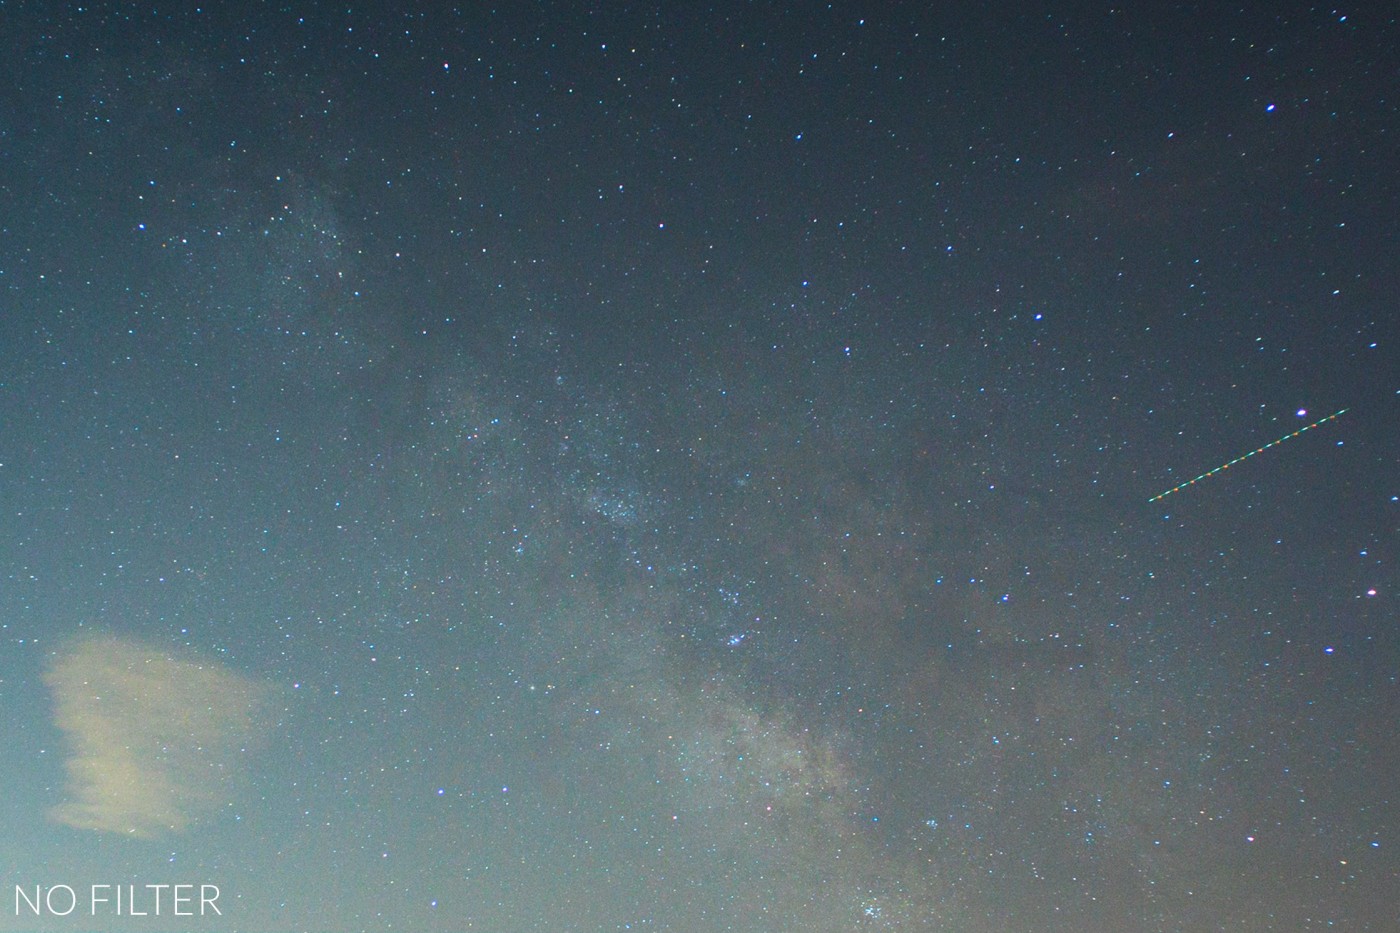
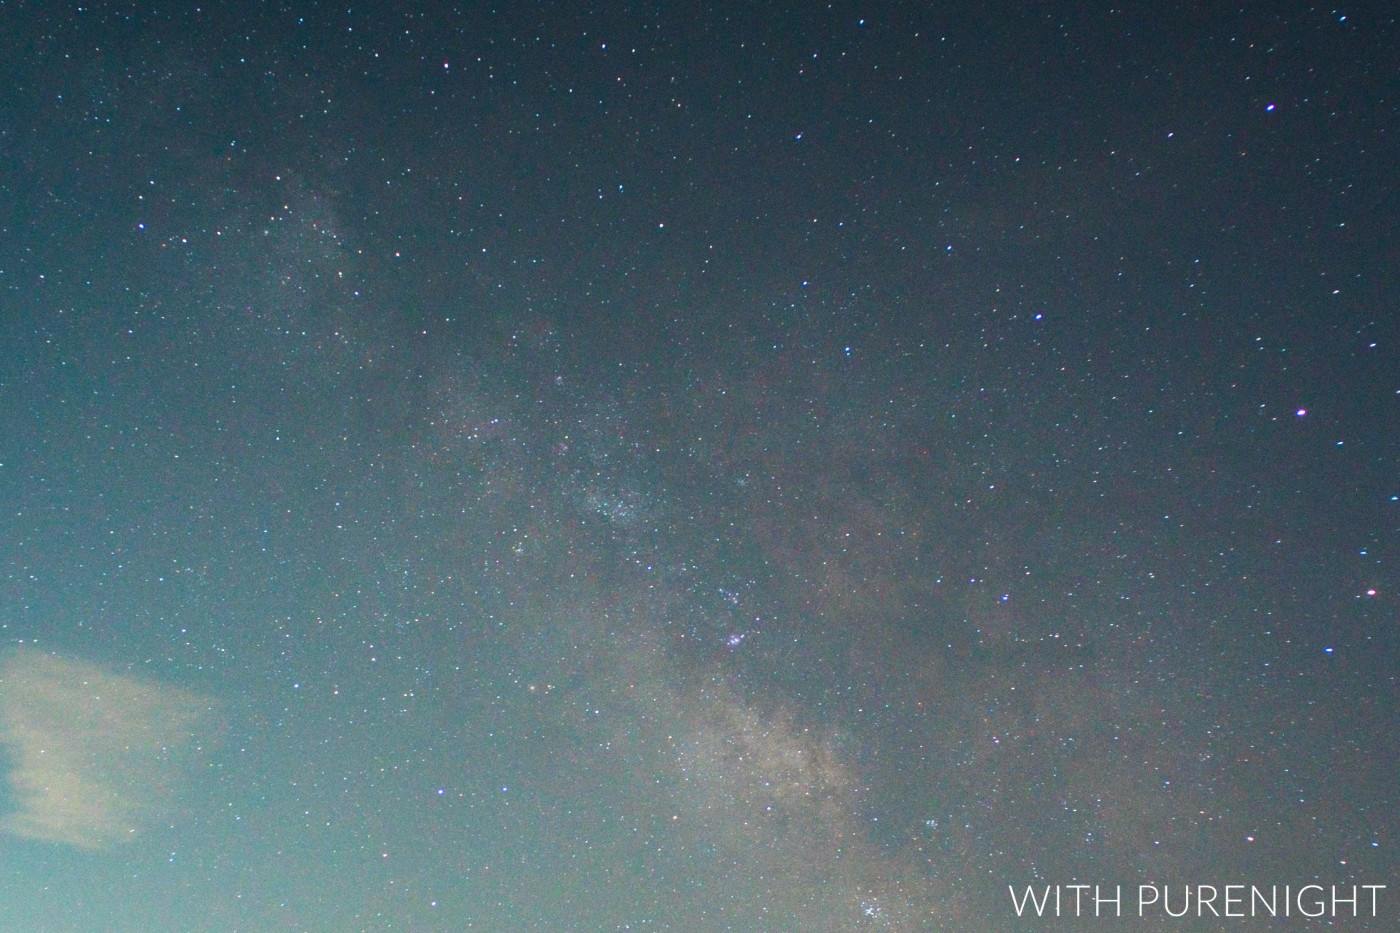
The biggest advantage of the PureNight is an increase in contrast in light polluted areas. Light pollution reduces contrast by illuminating moisture and particles in the air. Filtering out this light makes the surrounding sky darker. An example of this improvement can be made by making a comparison between a filtered and non-filtered image and adjusting them in post processing to match in both white balance and exposure.
The difference is subtle but most noticeable around the galactic center. If we take a closer, 100% magnified look at the galactic center, we can see that the image made with the PureNight retains more of the subtle reds and pinks of the nebulae and shows higher contrast around the galactic center:
The PureNight has a filter factor of about 1.5, meaning that there will be a reduction in light transmission of the image by about -0.6EV, depending on the amount of light pollution in the scene. To get a better idea of what to expect, feel free to download our sample photos in RAW DNG here. (95.6MB, .zip)
How does PureNight differ from a Red Intensifier like the Hoya Intensifier?
We love the Hoya Red Intensifier. It’s certainly an affordable didymium filter option that we recommend. Limited availability of the Hoya Intensifier and the lack of a square version led us to pursue the design of the PureNight. We use an improved filtration glass with stronger filtration properties than the Hoya Intensifier.
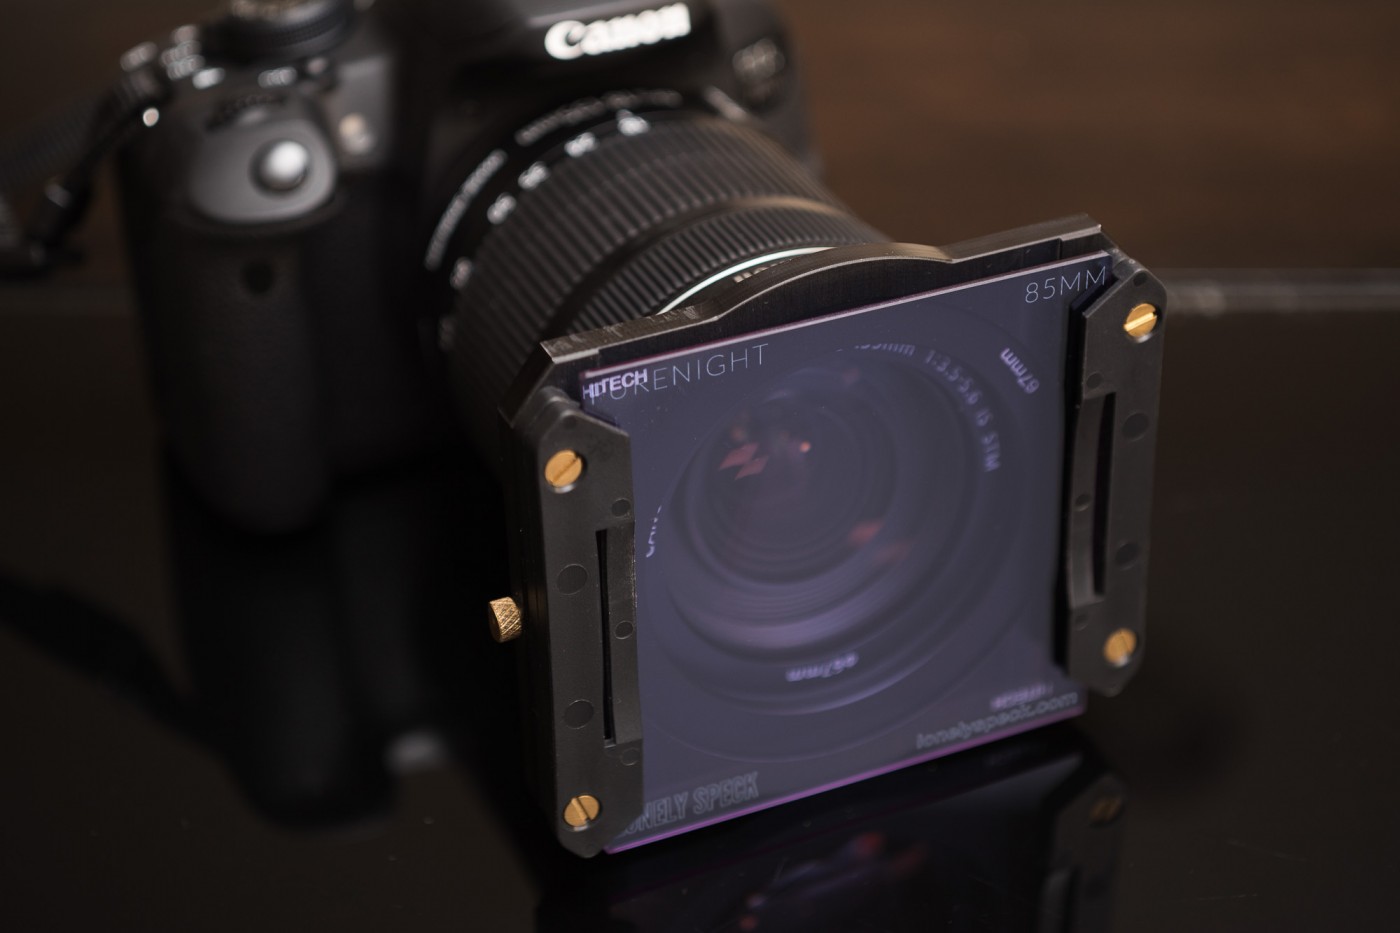
PureNight is available for square filter systems (85mm, 100mm and 150mm sizes). This allows photographers to use a single filter system across their lens collection.
The final improvement: the Hoya Intensifier is made of uncoated or single coated glass which is drastically worse in flare-inducing conditions (e.g. if there is a bright light source against a dark background). To improve upon this shortcoming, PureNight is multi-coated for highly anti-reflective properties that greatly improve contrast and reduce flare.
Which filter holder do you recommend?
To mount a PureNight you will need:
- an appropriately sized square filter holder system
- a system-compatible adapter ring, sized for your lens filter thread diameter
To determine which size filter holder system (85mm, 100mm, or 150mm) and which adapter ring you will need, you will need to know your lens’s filter thread diameter. The filter thread diameter is usually marked in millimeters on the front of your lens with a diameter (⌀) symbol like this:
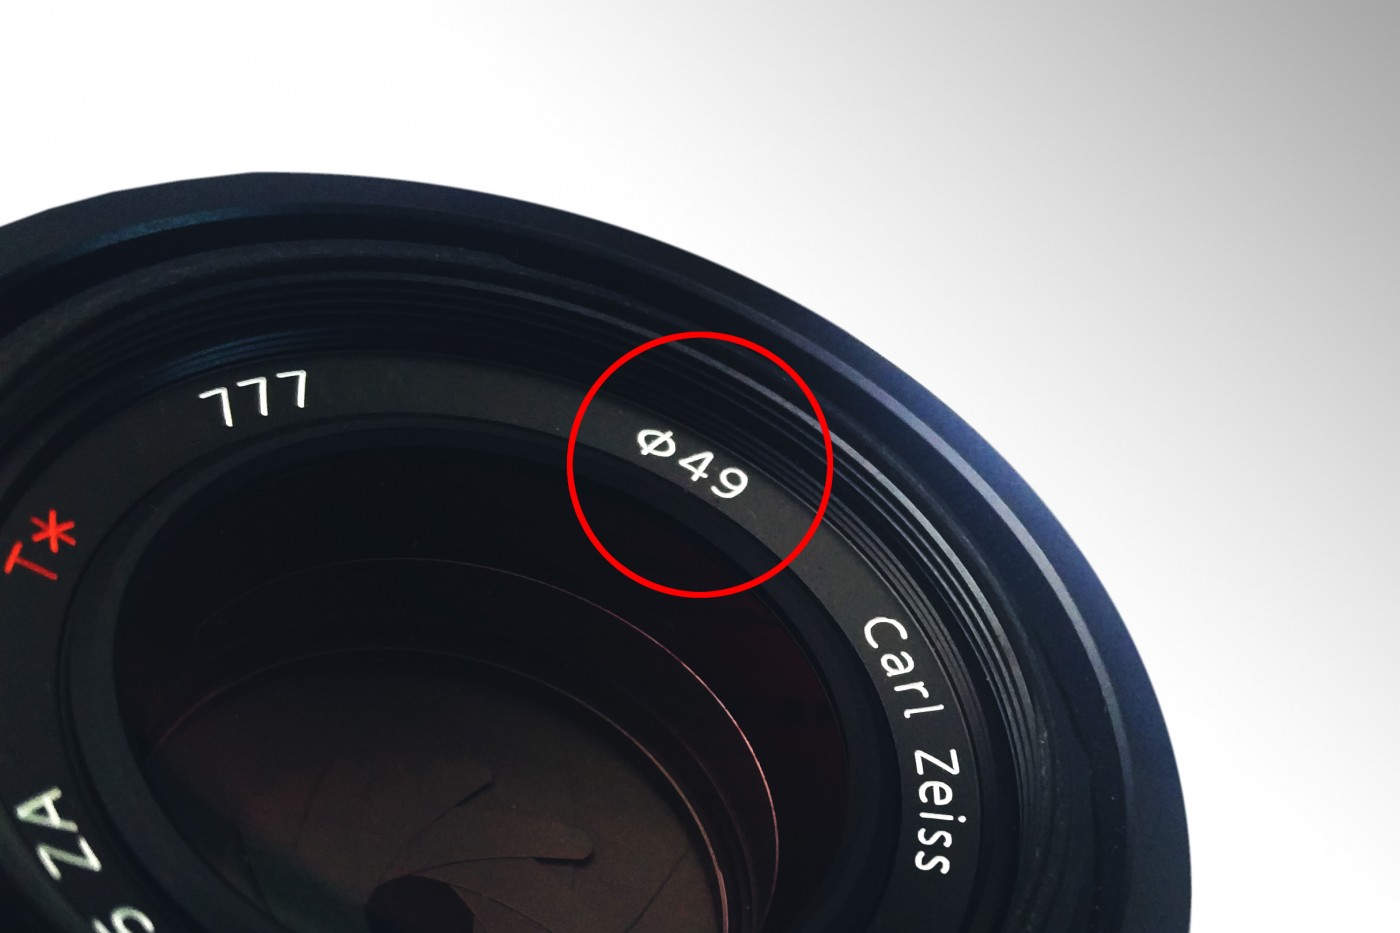
In this example, the lens shown has a filter diameter of 49mm. Depending on your lens’s filter diameter size, we recommend the following systems. (In general, pick the system size that’s larger than the thread diameter of your lens).
If you don’t already have a filter system, here are some recommendations:
85mm (lenses up to filter diameter of 77mm):
Formatt Hitech 85mm Aluminum Holder (Amazon / B&H) and Formatt Hitech Adapter Rings for 85mm Aluminum Holder (Amazon / B&H)
100mm (lenses up to filter diameter of 105mm):
Formatt Hitech 100mm Aluminum Modular Holder (Amazon / B&H) and Formatt Hitech Adapter Rings for 100mm Holder (Amazon / B&H)
150mm (certain wide angle lenses with fixed hoods):
Haida 150mm Filter Holder (Amazon / B&H)
Lee SW150 Filter Holder (Amazon / B&H)
NiSi 150mm Filter Holder (Amazon / B&H)
Do you ship outside the USA?
Yes, we ship internationally.
Shipping fees vary by country.
Our international orders are shipped via USPS first-class mail and usually take at least 7-14 business days to arrive. Tracking may or may not be available depending on the international destination. As the buyer, you are responsible for any import taxes (VAT, etc.), duties and custom fees that your country may impose at the time of receipt of the shipment.
All international shipments are marked on the customs form as “Merchandise” with an accurate description of the value and contents (“Photographic Filter”) and labeled with the proper six digit HS Tariff Code for photographic filters: 900220. Please check with your local postal service for status updates on your order once it has left the USA.
What if my question isn’t answered here?
For further questions, just ask in the comments below or contact us directly.
Hi Ian,
Congrats on the product.
How will the quality if the glass stack up to the B+W Redhancer?
I was lucky enough to track one down last month.
We are likely going to meet or exceed the standards that most B+W photographic filters are built to in terms of optical flatness. Our goal is for the PureNight to be usable on fairly long lenses on it without noticeable image degradation. This is a premium priced product and we want it to perform as such.
Can you do the same thing with lightroom and photoshop? The effect doesn’t seem to be that great. It almost looks like just WB change + contrast + selective color balance, which I need to do anyway.
A portion of what the filter is doing can be emulated with photoshop but the real advantage is the improvement in contrast from each raw frame made with the filter and the resulting retention of color details, especially in nebula when shooting in less-than-ideal conditions. My quick balanced comparison above is what I think is a fair representation of the benefit of the filter when used in a fairly heavily light polluted area (suburban Los Angeles). No doubt, the difference is subtle but tangible and that may or may not be seen as a benefit to certain astrophotographers. I’ve very much enjoyed shooting through this filter and I think it’s a tool that I will continue to use for the foreseeable future.
If you like physics and want to go into details check the clarkvision pages. The author is an MIT reseracher and knows what he is talking about. I still haven’t read all of it …
He is arguing that you can do most ‘light-pollution filtering’ in post-production unless you have a heavy light pollution which prevents you from taking longer exposures (= burned out pixels) before you get star trails. So if you can take a 20 sec exposure before you see trailing stars but the light pollution is creating an overexposure after 10 sec: Use a filter because that will give you a better signal-to-noise ratio in the raw image.
I find the redhancer filter very useful for polar light which requires short exposure times due to the rapid movements and I’m limited with the post-production as polar light also has a dim red component which I cannot separate from the orange sodium-vapor in post-production. A redhancer filter can separate them.
Please, can you give examplea of city lights in streets?
I am working on some new samples with our coated prototypes for the most accurate representation of the final product. I hope to publish those shortly.
Hey Ian,
this looks really cool, so I hope to get one in my grubby little hands. I have a couple of quick questions;
1, You mention the Rokinon/Samyang 14mm f2.8, do you have a way to mount a filter with those? I thought you had a back-burner project to get around the bulbous front element and lack of filter treads (but I could be thinking of the wrong lens).
2, Do you have any sample photos using this as more of a ‘walking around’ filter? Long exposure night photos often pickup the Orange colour cast reflecting back from the clouds, so it would be interesting to see that as a comparison. That is easier to fix in LR, but it would be interesting to see if it would make a difference.
For the Rokinon 14mm, we will be launching a 150mm version for Lee SW150, NiSi and Haida filter holders. That’s in the works and coming soon for pre-order. We’re still working out the final details.
I tend to leave mine on for night photography. It now lives in my holder. Where it might be unsuitable is if you think the 0.3 to 1.0EV reduction in light is detrimental to the ground in the photo. If the ground illumination is by scatter of light pollution, the filter will basically make it black. This is where a simple exposure composite can be very helpful. A stack of shots with the PureNight for the sky and a few longer exposures stacked without the PureNight for the foreground.
Ian,
Thanks for getting back so fast, and congratulations on funding the 100mm. Hopefully you can get them out ontime (or a few weeks early) as am planning to head out to monument Valley around March 27th in hopes of getting my first proper galactic center.
1, Thank for the info re: the Lee SW150 etc., I didn’t realize they were out. That got me googling again and I found the cheap mans option and ordered a Samyang SFH-14 Filter Holder on ebay. At $30 I am not expecting perfection, but I don’t think the 150mm would work on my timeline. So i will fallback to the 35mm f1.4 🙂
2, You make a very good point re: the reflected light off the ground, luckily a lot of what I shoot at night is memorials and stuff (living in DC) so they have dedicated light, but it will be fun playing with the filter to see what light we are really getting.
Would love to see some of your examples from Street level, with so many different types of street lighting in use today I imagine the lighting is complex.
Assuming this is the case, but I’d love to be wrong… Is this lens susceptible to interference fringes – those irritating concentric circle distortions – when photographing aurora?
That’s a really good question and one that I’m not ready to answer. I’ll try my best to do some testing on the PureNight with aurora before its final ship date to give you a better answer. (winter Alaska trip anyone?)
Do you have any resources where I can read about the root cause of the interference fringes? If it’s just due to monochromatic light passing through two bonded surfaces as with some filter constructions, the PureNight should not have the problem as it will be made from homogeneous glass. That said, I’m not totally familiar with the phenomenon so maybe that doesn’t matter.
Here’s a good image showing what the interference fringes (also called Newton’s Rings) end up looking like: http://www.ptialaska.net/~hutch/Rings.jpg
From what little I can understand of the phenomena, it has to do with the narrow wavelength of the aurora’s spectrum diffracting back & forth off of the parallel faces of the filter, causing a standing wave which leads to the ripple pattern.
I’ve seen discussions about it on http://www.alaskaphotographics.com/blog/how-to-photograph-the-northern-lights-with-a-digital-camera/ and http://www.pentaxforums.com/forums/58-troubleshooting-beginner-help/313492-weird-circular-rings-night-photos.html. Other sites go into the mathematics and physics of the optics, but that’s far above my head.
Well I see if I can get a chance to test it up north this winter!
Well, that is a typical problem for me here in Norway and I will test it as soon as I get the filter. My experience with Hoya/B+W/Marumi redhancer screw-in filters so far is: They work very well against light pollution and the red spectrum of PL is realy popping with moderat strong PL. As soon as the PL is getting strong (=yellow-green color is visible to the naked eye) the filter creates an interference pattern.
Beside of that the PL spectrum seems not to be affected by the redhancer (opposite to interference filters). The normal non or single coated redhancer filters generate reflections from strong light sources.
How does the filter go with IR modded cameras like the 5Ds R or cameras that have had the IR filter removed for Astro photography? Does it cause a reduction in the Ha spectrum access to which is why the IR filter is removed?
Hydrogen Alpha is about 656nm which is not absorbed by didymium glass so the filter should work for Hydrogen Alpha imaging.