

This calculator goes beyond the basic “500 Rule” to determine the best shutter time for non-tracked astrophotography on a fixed tripod. Rather than just focal length, this calculator also factors in the effects of sensor pixel density, declination and allows for an adjustable tolerance for star trailing. Input your camera parameters and the calculator will output a recommended shutter time that minimizes star trailing depending on where you’re pointing your camera in the sky.
How the Calculator Works
Recall: The 500 Rule
For photographers that are just learning astrophotography, I’ve very often recommended using the 500 Rule (calculator) to calculate shutter time. My tutorials here and here recommend determining shutter speed based on this “500 Rule” concept. More of a guideline than a rule, the 500 Rule tells us a rough recommendation for limiting shutter time. Limiting the shutter time with the 500 Rule helps reduce star trailing while also allowing adequate light to enter the lens. The 500 Rule is simple: Take 500 and divide it by the focal length of your lens to determine your shutter time. For example, for a 20mm lens, we would want a shutter time of 25 seconds:
Example: 500/20 = 25 second shutter
The Goal: Minimize Star Trails
The 500 Rule works relatively well for determining an approximate exposure time but it’s a little too simplified for what’s actually going on when photographing the stars, especially if we want to minimize star trailing or maximize light gathering.
There are factors other than just focal length that affect the amount of star trailing in a photograph. These factors include sensor size and resolution as well as where the camera is pointed in the sky relative to the celestial equator (declination). Finally, our own personal tolerance for how much star trailing we can tolerate (pixel tolerance) is the final factor that affect how long of an exposure we should use. Let’s take a look at each of these factors and how they affect the result.
Sensor size and resolution:
The higher resolution the camera sensor, the more star trailing that will be apparent at the pixel level. Higher resolution cameras will require a shorter shutter time in order to minimize visible star trails at the pixel level. Star trails will be 2x longer (in pixels) for every 4x increase in resolution. For example, the 50 megapixel Canon 5DSR (Amazon / B&H) will show star trails that are twice as many pixels long as the lower resolution 12 megapixel Sony a7S (Amazon / B&H). That means that in order to capture an image with the same amount of star trailing at the pixel level, the 5DSR will need to use a one-stop shorter shutter time. The calculator above takes into account the resolution of your camera to make its recommendation.
Photographers using very high resolution cameras might want to use a slightly higher pixel tolerance as a compromise so that adequate light is gathered.
Declination:
The closer the camera is pointed to the celestial equator, the more that star trailing will be apparent at the pixel level. Declination is the angular distance measurement of a point north or south of the celestial equator. (The point where we’re pointing our camera.) The farther from the celestial equator, the less star trailing that will be apparent at the pixel level. By default, the calculator is set to the equatorial declination (0°) in order to calculate for the worst-case scenario (a photograph of the celestial equator, where the most star trailing will be apparent). By contrast, a photograph of the sky at the maximum or minimum declination (-90° or +90°) has the “best case” scenario for star trailing because the apparent arc sweep of the stars is minimized near the celestial poles.
For reference, the Milky Way Galactic center has a declination of about -30°.
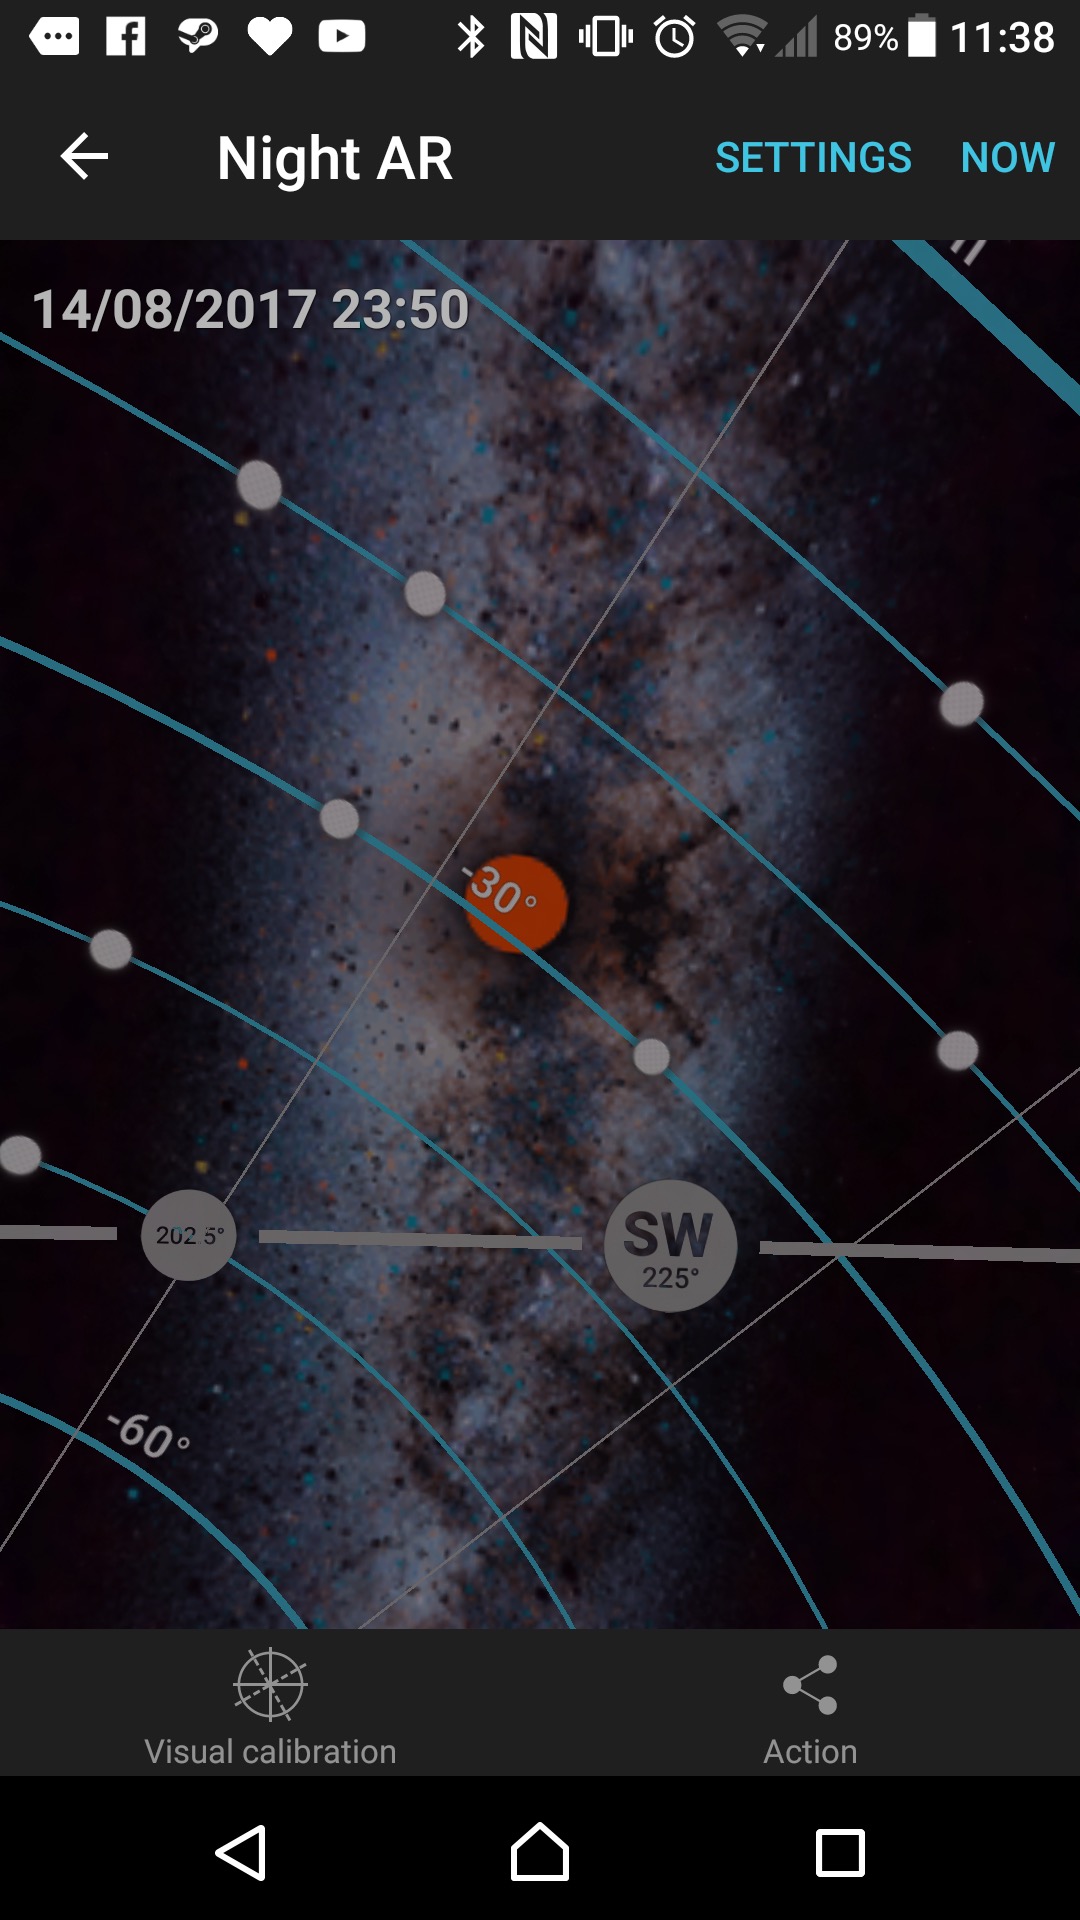
Now in order to accurately determine declination, we need to know where we are pointing our camera in the sky. My recommendation, if you want to find the exact declination of your composition, is to use a smartphone app. Declination can be found easily with the PhotoPills app, Stellarium, or Stellarium Mobile. Entering the declination into the calculator is particularly helpful for long focal length lenses (50mm+) and compositions near the north or south celestial poles (such as the Southern Cross or Polaris, the North Star). If you don’t know the declination and don’t have an app handy, you can just leave it at the default value of 0° which will minimize star trails to the fullest extent.

Pixel Tolerance:
The pixel tolerance is an arbitrary number of how many pixels of motion we choose to tolerate in our image. A pixel tolerance of 7 pixels means that the stars in the frame will move up to 7 pixels of distance for the recommended shutter speed. A larger pixel tolerance will yield longer star trails while a smaller pixel tolerance will yield shorter star trails.
My personal tolerance for star trailing is about 7 pixels. For the most common cameras resolutions (roughly 16-24 megapixels) a 7 pixel star trail is just barely noticeable when viewed at a 100% on a typical display. At normal viewing distances, 7 pixel star trails should not be apparent. Photographers who want finer, more pinpoint-like stars can use a lower pixel tolerance, but at the expense of more noise in the exposure due to the reduced shutter time. (Less light = lower signal-to-noise ratio = more noise.) A pixel tolerance of about 3 pixels will usually result in nearly perfect pinpoint stars.
Remember that if you’re making a panorama (or using an ultra high resolution camera) and don’t expect to view your 100+ megapixel result at 100% pixel level, you can use the extra resolution to “hide” your star trails. This means that panoramas can use a larger pixel tolerance in order to maximize image quality, should the photographer choose.
If your astrophotos are having issues with too much noise, you may want to try a larger pixel tolerance of up to about 10 pixels in order to gather more total light for your exposure to improve signal-to-noise ratio. Ultimately, If you don’t know what pixel tolerance to use, I recommend leaving the pixel tolerance at the default of 7.
Even More About the Calculator
Nerd Alert: The content below is a little mathy and intended for those who don’t mind some algebra. You can use the calculator above with no prior knowledge of the math behind it but I think it’s very helpful to understand in order to get the most out of the calculator.
I’m putting this information here for a few reasons: so others can understand how it works and so that you can check my math. If you notice anything funky, please let me know! I’ve tested the calculator fairly thoroughly and I’ve tried to break it in several ways and it seems pretty tolerant to extreme inputs.
There are certainly other ways that this problem can be calculated to a finer degree of accuracy but I think that my model is pretty good. Ultimately, this problem is one of personal tolerance for star trailing in an astrophoto and for that reason, I think my calculator is great for nearly any case of untracked astrophotography (basically any night sky photos made on a regular tripod).
The Model
In order to calculate the best shutter speed based on a pixel tolerance, we need to figure out a way to model the geometry of sky. There are many different ways to do this but I’ve found that a simple way is to treat the night sky like a flat disk. We’re only looking at a portion of the sky at a time, with a device that creates a flat image, so a flat disk is a pretty good model in this case. We only need to look at one hemisphere of sky at a time in order to simplify the calculation. For even more simplicity, we’ll use the northern hemisphere for explaining the example but the calculation will work for either hemisphere.
The northern hemisphere makes sense as an example because it can be drawn as a disk with Polaris, the North Star, at the center of the disk. The outer edge of the disk represents the celestial equator.
Arc Sweep
As the Earth turns, it appears is as if the disk is rotating about Polaris. If we shoot a photograph of the stars on the disk as it is rotating at a constant rate (the sidereal rate of rotation of the Earth: about 23.9344699 hours for a 360° rotation or 0.00417807456° per second), the stars closer to Polaris will visually sweep a shorter arc than the stars out near the edge of the disk. The length of the arc sweep of the stars at a certain position in the sky is calculated with this equation:
ARC = 2*pi*R(θ/360)
Where R is equal to the distance of the star from Polaris and theta (θ) is the angle of rotation in degrees. The length of that arc (ARC) is the same as our pixel tolerance. If our pixel tolerance is 7 pixels in length, the arc length (ARC) is 7 pixels. Please note that all these calculations are shown in degrees rather than radians. Solving for θ gives:
θ = (180*ARC)/(pi*R)
Modeling in Pixels
Since we want to work in pixels as our form of distance measurement, we also need a way to define the distance, R, from Polaris to the star closest to the celestial equator in our frame, in terms of pixels.
In order to do this, we need to know the resolution of our sensor and focal length of our lens. Once we know those details, we can calculate approximately how many pixels there would be from Polaris all the way to the celestial equator for our given field of view and camera resolution. The field of view (FOV°) of a camera lens, from corner to corner (diagonally) is defined as:
FOV° = 2*arctan(d/(2*f))
Where d is the diagonal dimension of the camera sensor and f is the focal length of the lens. Similarly, we can approximate the diagonal resolution (DR) of the camera sensor with the Pythagorean Theorem:
DR = sqrt((vertical resolution)^2 + (horizontal resolution)^2)
With these two pieces of information, we know that there are DR pixels/FOV° = pixels/degree. Since there are 90° from celestial equator to the celestial pole (Polaris), the number of pixels from Pole to Equator (PE) is approximately:
PE = 90°*(DR/FOV°)
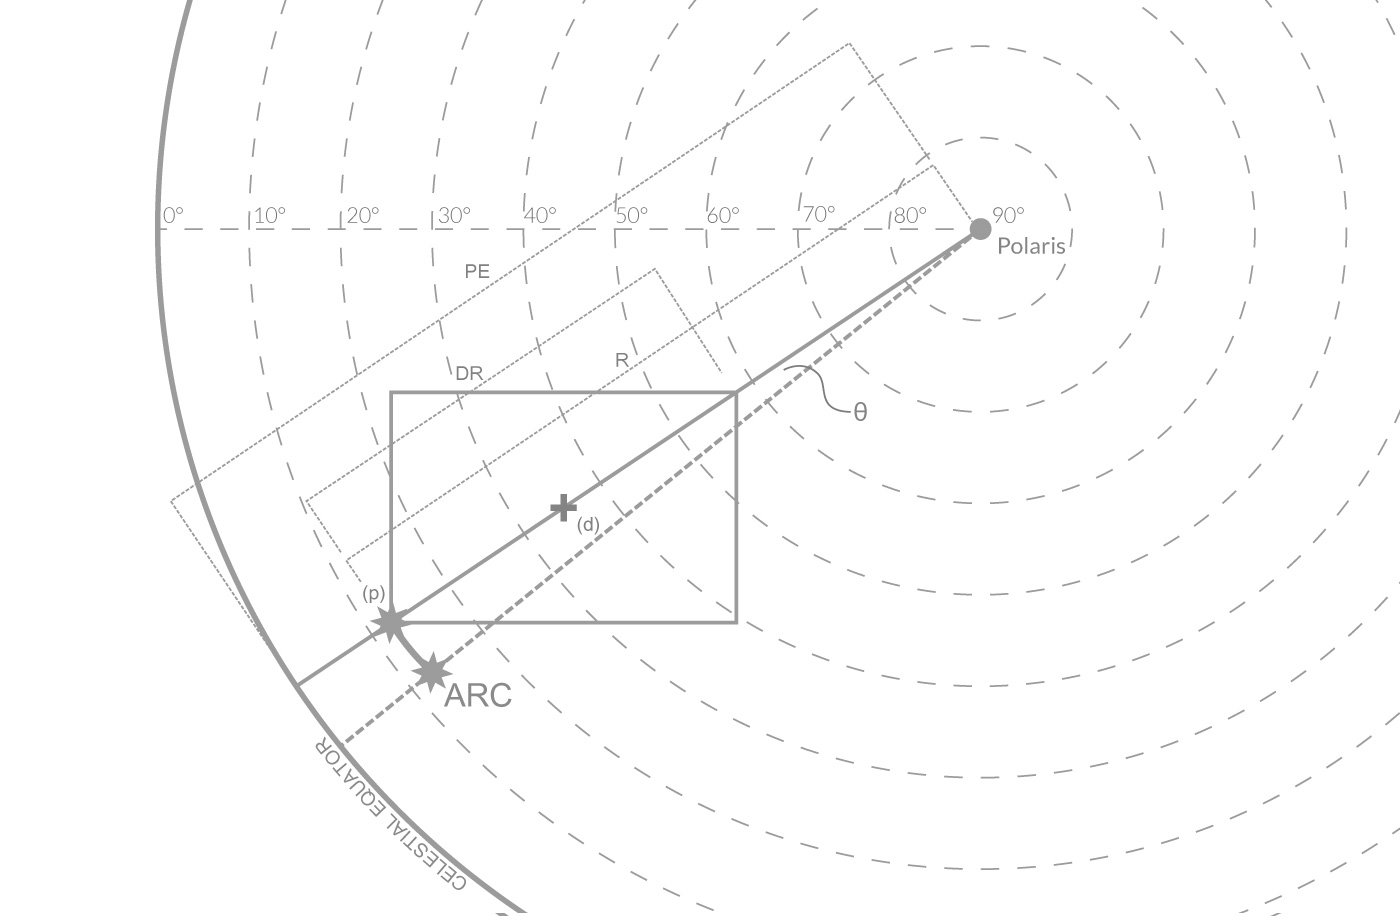
Calculation for Where the Camera is Pointing
Since we will only be pointing our camera at a single portion of the sky, the camera field of view can be simulated by placing a rectangular camera frame into our model. The center of the frame is pointed at some arbitrary point of declination (d). In order to encompass the worst case scenarios, the rectangular frame is assumed to be positioned such that diagonal corners are aligned to a meridian/longitudinal line. Ultimately, since the worst star trailing happens at declinations closest to zero, we’re concerned only with the point of the rectangular image frame that is closest to the celestial equator. The declination of that point (p) can be calculated based on the diagonal field of view (FOV°) of the lens:
(p) = |(d)|-(FOV°/2)
Making it Work for Both Hemispheres
Since declination can be negative (for portions of the sky south of the celestial equator) we use the absolute value of the declination (d) where we are pointing the camera so the the calculation works for either hemisphere. It should be noted that if the camera field of view is large enough, or the declination is low enough such that the celestial equator is already in the frame, the value of (p) will be negative. Since the celestial equator will always have longest star trailing, we should knock this value (p) down to zero so that we’re calculating for the greatest star trails visible in the image. We can do this with an IF statement:
If (p) <= 0, then (p) == 0, else (p) == (p)
Ok, so now that we know the declination point in our image that’s closest to zero, we can finally calculate the distance R, from Polaris to that point, in pixels:
R = PE*((90˚ – (p)) / 90˚)
Solving for Shutter Time Based on the Earth’s Rate of Rotation
Finally, our optimal shutter time can be defined as the arc swept in degrees θ divided by the sidereal rate:
shutter time = θ/sidereal rate
Where the sidereal rate is the rate of rotation of the Earth (0.00417807456° per second) relative to the stars. All of the above gives us exactly what we need to solve for the optimal shutter time for our camera resolution, declination (d) and any given pixel tolerance (ARC).
Conclusion
This more advanced calculator give us a relatively precise tool to gauge a good shutter time for untracked astrophotography. There are a few things that the calculator does not take into account such as lens projection method and the distortion that accompanies most wide angle rectilinear lenses but real world results should be very close to the calculator’s estimates.
By default, the recommendations output by this calculator will tend to be a bit shorter than the typical results from the “500 Rule” (for most the common cameras). But if you think that the shutter times given are shorter than you desire, you can always adjust the pixel tolerance to a larger number of pixels to yield a longer shutter time. Just keep in mind that your stars will look like trails with a length approximately the length of that pixel tolerance.
The advantage of using a calculator like this is especially apparent when the photographer wants to minimize star trailing to within a very specific number of pixels. The biggest advantage of such a practice will be most apparent when using a fine pixel tolerance combined with stacking or loosening tolerance for panorama stitching to maximize the fine sharpness of the stars or maximize signal-to-noise ratio.
Finally, there is an advantage of using this calculator when shooting with longer focal length lenses, especially those greater than 50mm, since the calculator can take advantage of the smaller arc sweep for photographs made of parts of the sky near the celestial poles (large absolute declinations).
I hope you enjoyed this post! Try out the calculator and let me know what you think in the comments below.
Disclosure
We are a participant in the Amazon Services LLC Associates Program, an affiliate advertising program designed to provide a means for us to earn fees by linking to Amazon.com and affiliated sites. We are also a participant in the B&H Affiliate Program which also allows us to earn fees by linking to bhphotovideo.com.
Learn Astrophotography
Astrophotography 101 is completely free for everyone. All of the lessons are available on the Lonely Speck Astrophotography 101 page for you to access at any time. Enter your email and whenever we post a new lesson you’ll receive it in your inbox. We won’t spam you and your email will stay secure. Furthermore, updates will be sent out only periodically, usually less than once per week.
Help us help you!
Believe it or not, Lonely Speck is my full-time job. It’s been an amazing experience for us to see a community develop around learning astrophotography and we’re so happy to be a small part of it. I have learned that amazing things happen when you ask for help so remember that we are always here for you. If you have any questions about photography or just want to share a story, contact us! If you find the articles here helpful, consider helping us out with a donation.
[button font_size=”16″ color=”#136e9f” text_color=”#ffffff” url=”https://www.paypal.com/cgi-bin/webscr?cmd=_donations&business=lonelyspeckblog%40gmail.com&item_name=These+tips+help+keep+lonelyspeck.com+running.¤cy_code=USD&source=url” target=”_blank”]Donate[/button]
Thanks so much for being a part of our astrophotography adventure.
-Ian
solution found,
please remove my entry
cs
This is great information to have. I was in the Mojave National Preserve a month ago and took a late night long-exposure photo using the 500 rule. Using my Tamron 15-30mm f/2.8 (Nikon F Mount) lens adapted to my Sony a7s. Everything except the stars was showed no movement in the 30 second exposure, but the stars were trailing a bit. I thought maybe the camera shook a little due to my footsteps or the highway being about a mile away, but that wouldn’t explain why the foreground was sharp. I guess I have to dial back the exposure time a little. I do have a question. If I’m using a fisheye lens (which I do from time to time) such as the Rokinion 12mm f/2.8 Fisheye (full frame lens on my a7s), what do I input for the “Lens Focal Length” for the calculator above. I’m assuming I input 12mm in the calculator, but maybe there’s more at play with a fisheye. Any suggestions?
Hi Kenny, ultimately the calculator is designed for “regular” rectilinear lenses. Since fisheye lenses tend to have several possible projection mappings, there’s no “one size fits all” method for calculating angle of view. That said, just entering 12mm for your lens should get you pretty close…
What kind of ISO should we be using? Base or high or somewhere in between? Thanks!
Thank You so much for the clarification on declination. When looking at the PhotoPills app and seeing the Galactic Center at -30 I was always thinking that is what I should input. But with most stars trailing in the upper parts on the photo which are above 0 degrees and at + 30 degrees. I now understand why if shooting in portrait mode and pointing the center of the lens higher than the Galactic Center and possibly above the celestial equator (I’ll have to check next spring) I have found less trailing in the upper parts of the photo. And also understand, now, how panos have less star trailing in upper parts of a photo. The celestial equator and galactic equator are two different places also.
This also explains why a 0 degree is best vs a -/+ degree.
It takes a geek and you are the best!!!
Thank You
Thanks Edwin! This is probably by far my geekiest post! But I love this stuff. It’s diving deep into the technical details of shooting astrophotography that really makes me love it so much. Glad you enjoyed my post!