

Learn how to photograph and process one of the most colorful parts of the night sky.
Introduction
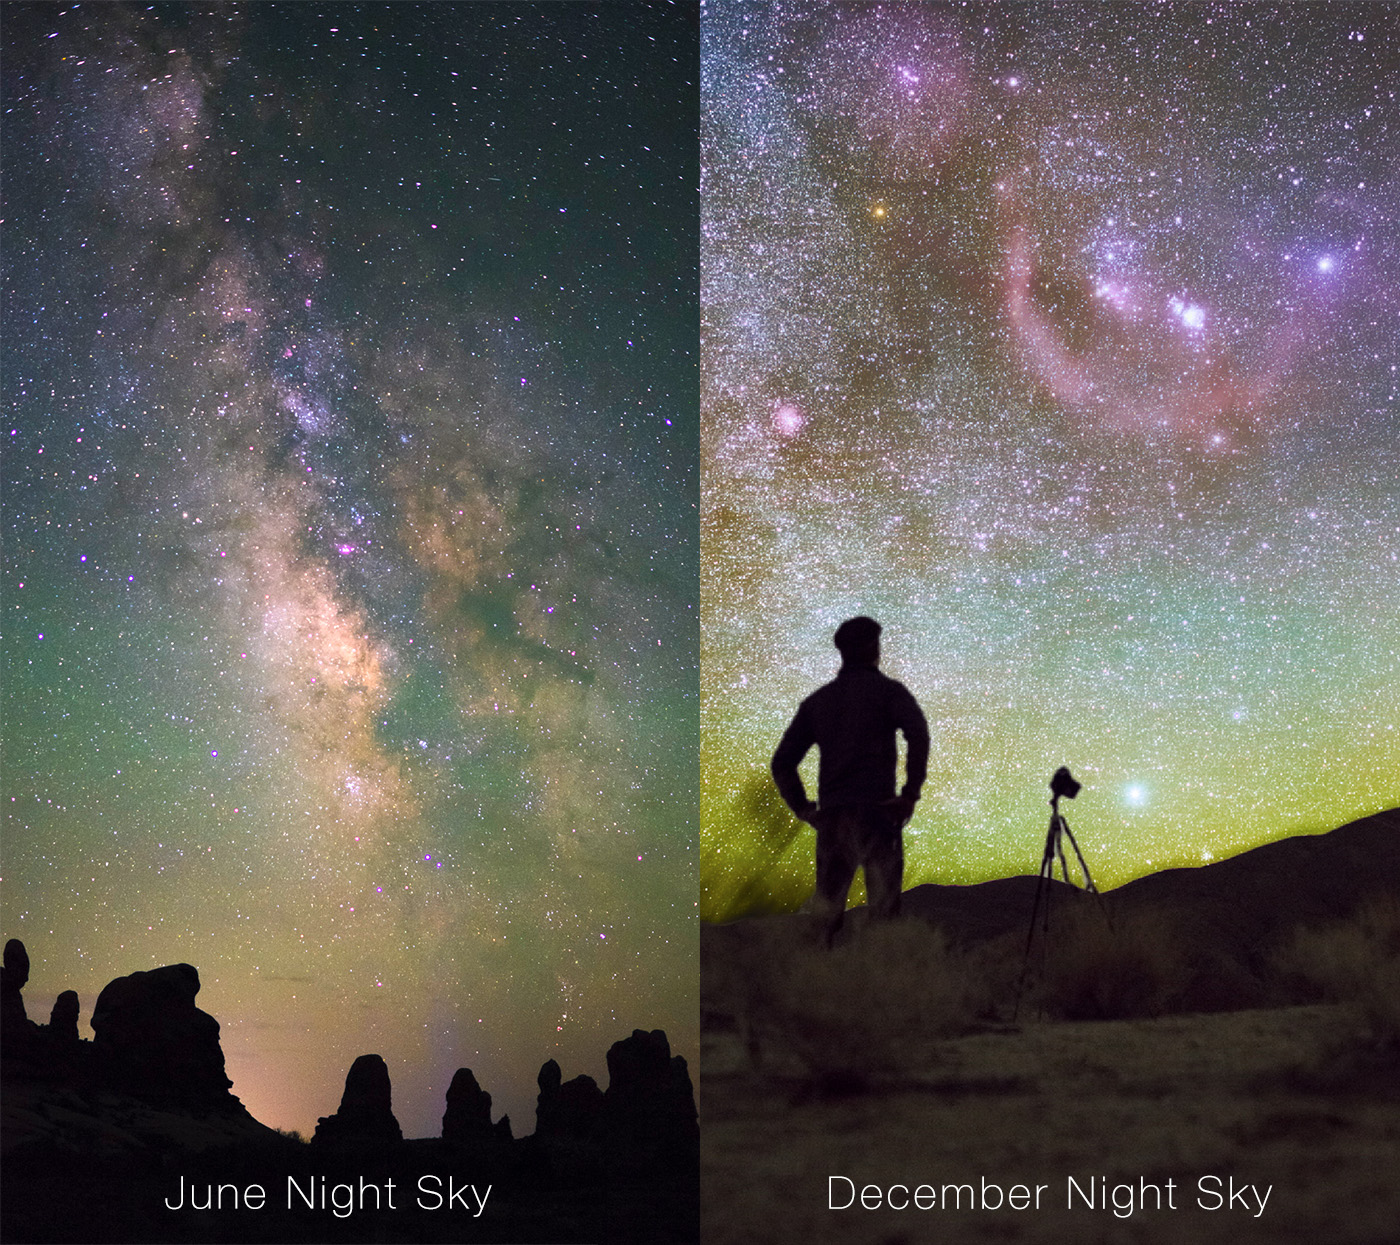
Most of the images that you see on Lonely Speck of the bright galactic center were made during the Northern Hemisphere summer. The best time of year to capture the brightest part of the sky is typically in June or July when the galactic center appears high in the sky almost the entire night. But every year, as we near the December solstice, the Earth moves into a position around the Sun where the Sun obscures our view of our galaxy’s central bulge. So from about October through April, we have the opportunity to view and photograph a different part of the night sky: the constellation Orion. This tutorial will walk you through all the steps to plan, shoot and process a photograph of constellation Orion and the colorful features in it.
Orion is positioned near the so-called “galactic anti-center” as seen from Earth. With some of the nearest, brightest stars in the sky like Betelgeuse, Rigel and Bellatrix, the constellation Orion dominates the night sky at the turn of the year. Although its nebulosity and colorful features are not nearly as bright as the Milky Way’s core, the view of our galaxy’s outer edge near the constellation Orion has some unique visual treats.
Orion contains numerous colorful features including the bright Orion Nebula, the faint pink Angelfish Nebula, Rosette Nebula, blueish Witch’s Head Nebula, Barnard’s Loop and many more features all known collectively as the Orion molecular cloud complex [wikipedia].
The Orion Molecular Cloud Complex
[himage]

[/himage]
One of the cool things about the constellation Orion is that it takes up a relatively large portion of the sky so we can capture it with a regular camera and a standard lens like a 50mm, no telescope needed!
In this tutorial I’ll walk you through all the steps that I use to photograph the Orion Molecular Cloud Complex. This tutorial is a little bit more complex than just making a single exposure of the Milky Way but it builds upon the same basic techniques. If you’re just getting started with shooting photos of the night sky, I recommend checking out my basic How to Photograph the Milky Way tutorial first.
Night Photography Equipment
Luckily we don’t need any kind of fancy equipment. At minimum, we need an interchangeable lens camera and a fast lens like a 50mm/1.8 prime and a tripod. We’ll be using two processing techniques to get the best results: image stacking for noise reduction and the luminance, red, green, blue (LRGB) processing technique for enhancing nebulosity. Let’s take a look at what we need:
- Digital Interchangeable Lens Camera
- A Fast Normal Prime Lens
- ~25mm for 4/3 sensor cameras
- ~35mm for APS-C sensor cameras
- ~50mm for full-frame cameras
- A Tripod
- An Intervalometer (optional)
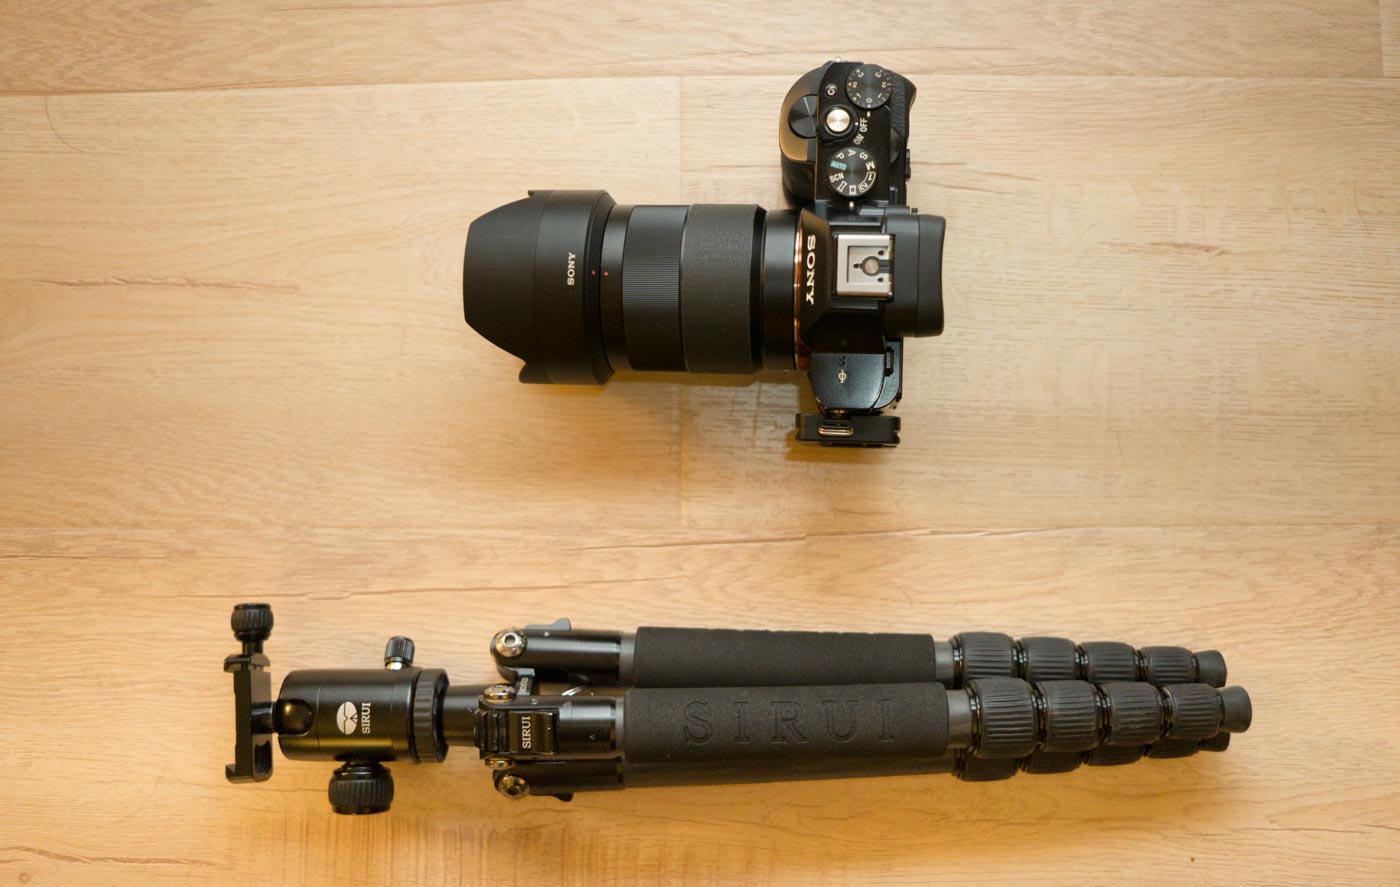
For the camera, I’ll be using the Sony a7S, my personal favorite camera for photographing the night sky.
For the lens, I used a Sony Zeiss 55mm f/1.8 Sonnar T* prime lens which is the best performing lens that I could afford. I recommend any standard prime lens. Something close to 25mm for 4/3 sensors, 35mm for APS-C sensors or 50mm for full frame sensors should work well for this application. It’s best if the lens has a relatively low f/number rating (I highly recommend f/2.0 or lower). The lower the f/number, the more light the lens can collect at a time.
Nearly every current lens manufacturer has a fast standard prime. They come in all different price levels from the uber-expensive Zeiss Otus Distagon T* 55mm f/1.4 to the cheapo “Nifty-50” Canon EF 50mm f/1.8 II. For reference, here’s a list of some of the best, fast standard prime lenses for each of the most common sensor sizes. If you’re shopping for a lens, be sure to find one that’s compatible with your particular camera.
Fast Standard Prime Lenses for 4/3 Cameras:
- Olympus m.Zuiko Digital 25mm f/1.8
- Panasonic Leica DG Summilux 25mm f/1.4
- Voigtlander Nokton 25mm f/0.95
- SLR Magic Hyperprime 25mm f/0.95
Fast Standard Prime Lenses for APS-C Cameras:
- Sigma 35mm f/1.4 Art
- Rokinon 35mm f/1.4
- Sigma 30mm f/1.4 Art
- Canon EF 35mm f/2 IS
- Nikkor AF-S 35mm f/1.8G
- Sony 35mm f/1.8 OSS E
- Sony 35mm f/1.8 DT A
- Fujifilm XF 35mm f/1.4R
- Samsung 30mm f/2 NX
- Samsung 45mm f/1.8 NX
Fast Standard Prime Lenses for Full-Frame Cameras:
- Sigma 50mm f/1.4 Art
- Rokinon 50mm f/1.4
- Canon EF 50mm f/1.8 II
- Nikkor AF-S 50mm f/1.4G
- Zeiss Otus 55mm f/1.4
- Sony FE 55mm f/1.8 Sonnar T*
- Sony A 50mm f/1.4
If you care, I personally shoot with a Sirui T-025X tripod. It’s a smaller travel tripod that’s great for compact camera systems (like my Sony a7S).
Finally, the intervalometer, an accessory that plugs into your camera to allow it to take multiple photographs, one after another on a timer. It’s optional but helpful as we’ll need to take numerous separate exposures. Most Nikon cameras and some other cameras (like the Canon 7D Mark II or the Fujifilm X-T1) have a built-in interval timer feature. Check here for a nearly complete list of cameras that have built-in interval timers. If you need a plug-in accessory intervalometer, I recommend one of the cheap Neewer brand ones. Just make sure you find one that’s compatible with your specific camera.
Night Sky Observation Pre-Planning
It’s always helpful to do some preparation for your shoot. Pre-planning is the same as photographing the Milky Way but I’ll just review it quickly here:
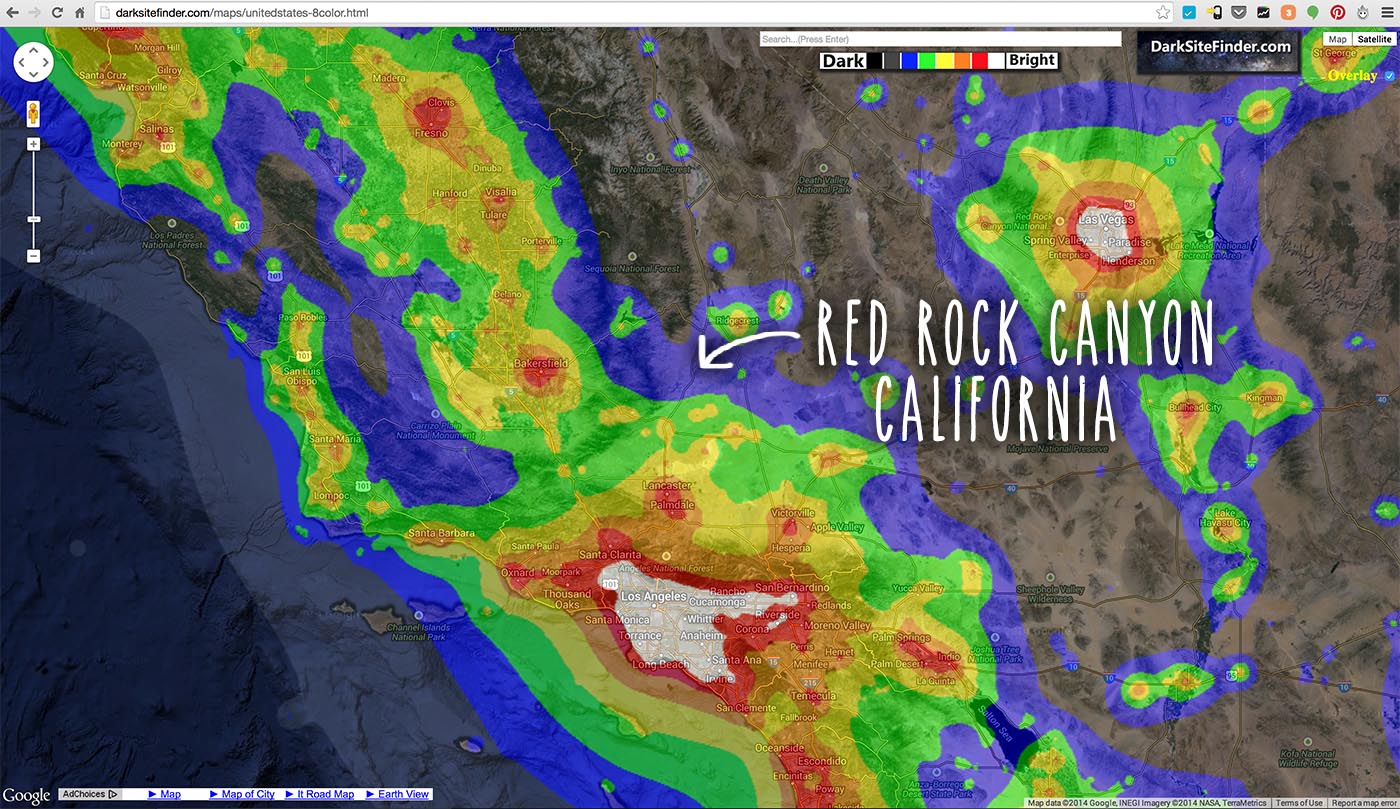
Dark Location
The first, most important thing you’ll need is a dark location. Check darksitefinder.com or blue-marble.de for light pollution maps to find a dark location. The darker the place, the better. National Parks, Preserves and Monuments tend to be good locations to choose for nice dark skies. For my example here, I traveled to Red Rock Canyon State Park in California, a two hour drive from Los Angeles.
Where to Look
I also almost always use Stellarium to pre-visualize the night sky. Stellarium is an excellent planetarium software available free for download from stellarium.org. Stellarium allows us to set the location, date and time of our planned photoshoot and displays a simulated version of the night sky. Orion tends to be visible from October through April depending on the time of night. For Example, in October, Orion will rise in the pre-dawn hours but in April, Orion will quickly set a couple hours after sunset. In this example I have used Stellarium to find out where Orion will be in the night sky on my planned date of December 13, 2014 near Los Angeles, California. Here it starts in the southeastern sky and then traverses across towards the south and finally the southwest before the end of the night.
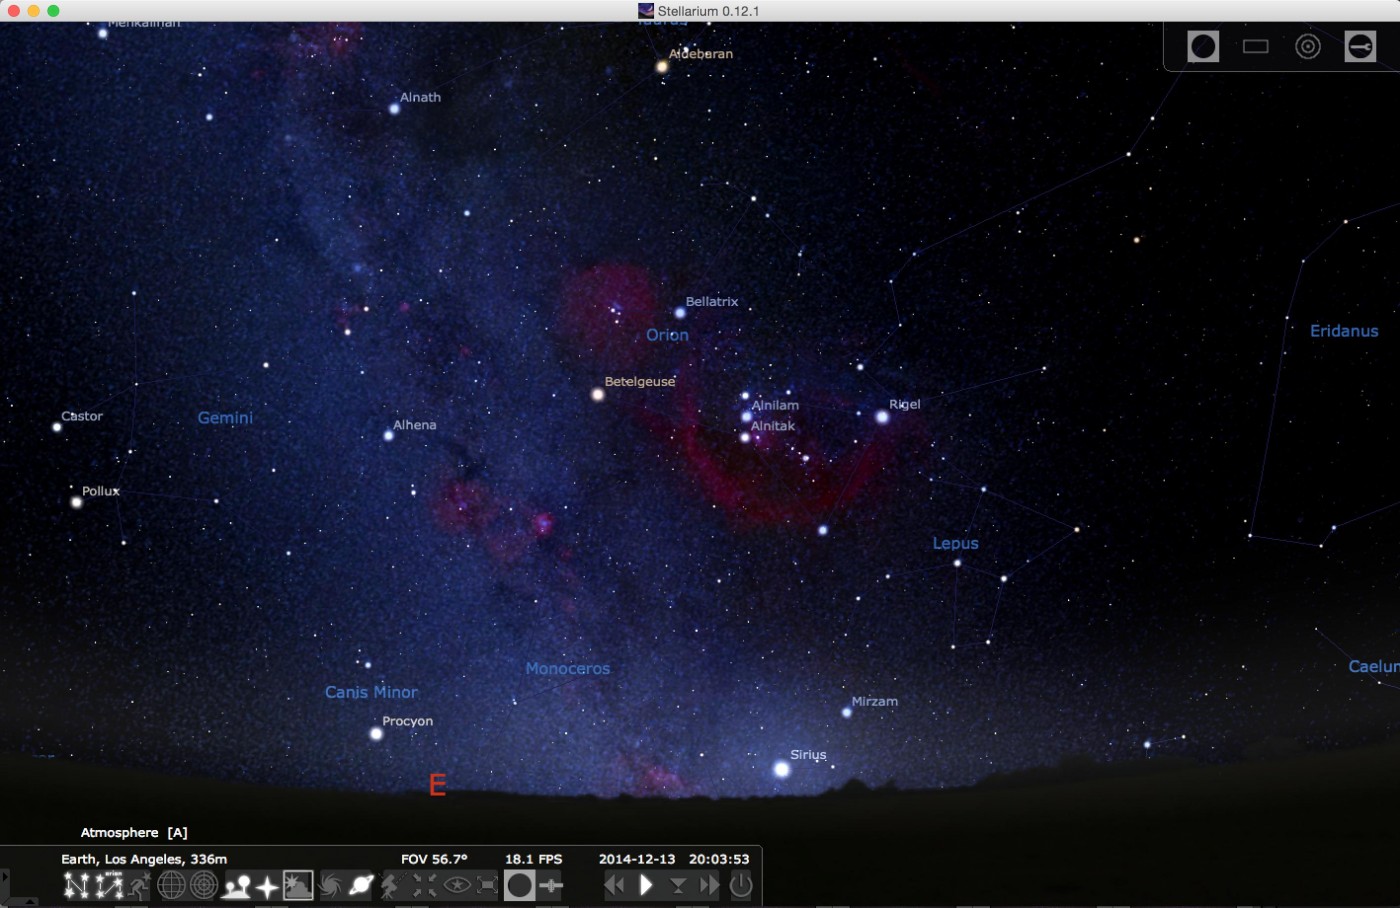
It’s also helpful to have a planetarium software available on your smartphone. I recommend Stellarium Mobile for Android or SkyGuide for iOS. Even without the help of one of these apps, Orion is a relatively easy constellation to find. I always look for the three stars of Orion’s belt, the three stars are aligned evenly in an almost perfectly straight line. If you can find Orion’s belt, you’ve found Orion.
Just like any other night, photographing the faint details in the night sky will be best on a night close to the time of the month with the new moon. The closer to the new moon, the more time we will have during the night with dark skies.
So now you should have everything you need to start shooting:
Night Photography Camera Setup
Setup of our camera is nearly identical to photographing the Milky Way but just to review here are some settings unique to this shoot that I will use:
- Manual Exposure (See the next section for determining exposure settings)
- Raw Recording
- White Balance: Daylight, Tungsten or Custom set to 3500K to 4800K
- Long Exposure Noise Reduction: On (This will double your camera’s processing time to reduce noise.)
Night Sky Exposure Settings
Manual Exposure mode is a must for shooting the stars. We’ll need to carefully select our shutter speed and aperture f/number to gather the most light possible. Here’s how:
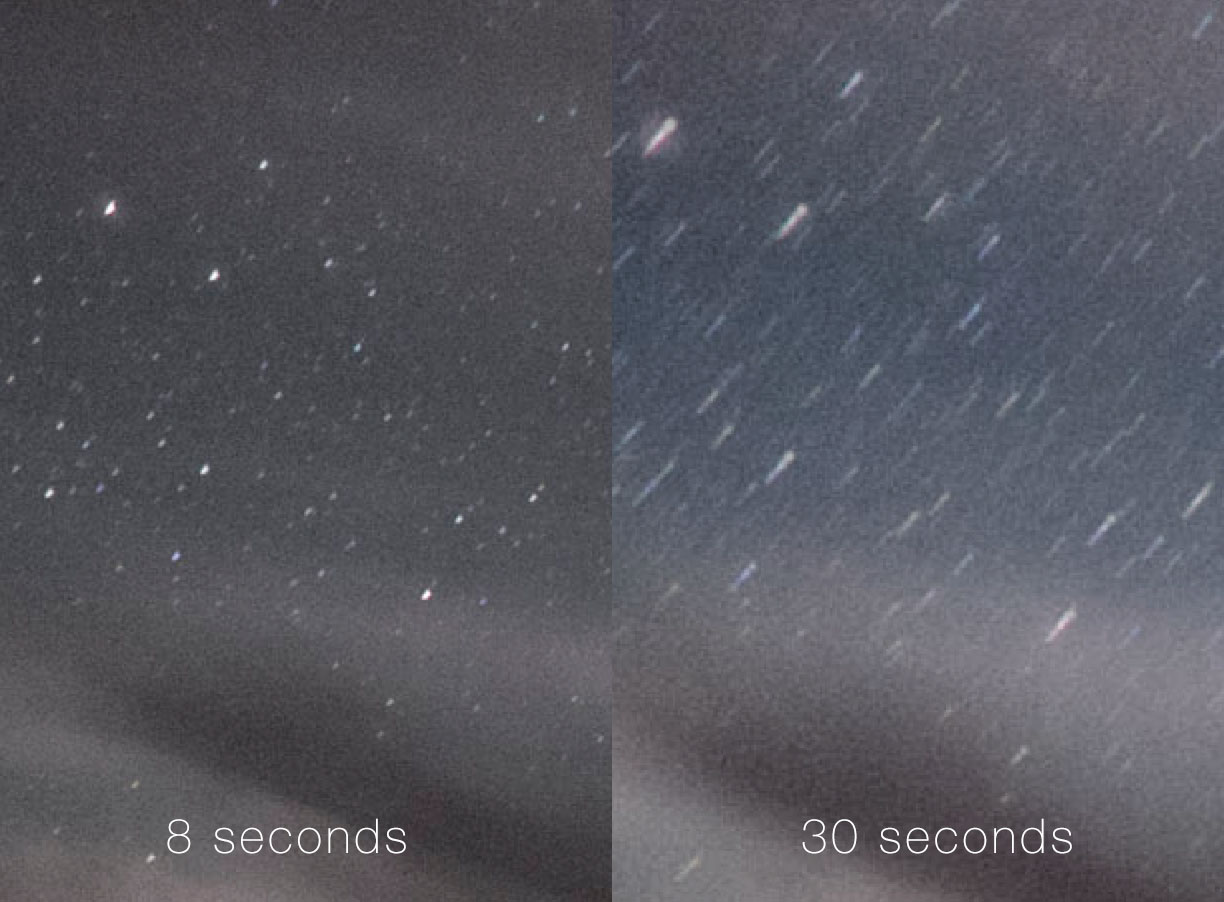
Shutter Speed
With a long enough exposure, depending on your lens, the rotation of the earth will make the stars appear like streaks or trails. We want to find the longest shutter speed that will produce an acceptable image without too much star trailing. As a general guideline for night photography, the 500 Rule rule will help us find a suitable shutter speed. Here’s how it works: take 500 and divide it by your lens focal length to determine your shutter speed. If you’re using a camera with an APS-C sized sensor or 4/3 sensor, be sure to multiply your focal length by the crop factor of your camera’s sensor (which is usually 1.5x or 1.6x, for APS-C sensors or 2x for 4/3 sensors).
500 Rule:
Shutter Speed = 500 ÷ (Focal Length × Crop Factor)
Example: 50mm Lens, Full Frame Camera (1.0x Crop Factor)
Shutter Speed = 500 ÷ (50mm × 1.0) = 10 seconds
Example: 25mm Lens, 4/3 Camera (2x Crop Factor)
Shutter Speed = 500 ÷ (25mm × 2) = 10 seconds
For lenses with a 50mm equivalent field of view, a shutter speed of 10 seconds is usually a good starting point. If the stars still look like streaks with a 10 second shutter, I recommend shortening your shutter speed. I really wanted to prevent the smallest effect of star trailing in my images so I actually lowered my shutter speed to 4 seconds for the example.
Aperture f/number
To start I recommend trying this exercise with the lowest f/number that your lens will support. The lower the f/number, the larger the opening of the lens and the more light that the camera will collect. The more light that the camera collects, the less noisy the image will be.
One caveat of using your lens’s lowest f/number is that it usually makes lens imperfections (aberrations) more apparent. Many of you will already know about coma and astigmatism aberrations from my How to Pick a Lens for Milky Way Photography article. Aberrations like coma and astigmatism will smear the shape of the stars. To prevent this from happening, it might be necessary to stop down the lens a little bit to a slightly higher f/number.
For my example, I set my lens nearly wide open to f/2.0 for a good compromise between light gathering and aberration levels.
ISO
For the ISO, we just need to adjust it such that the camera is creating a relatively neutral exposure. Don’t be afraid to bump your ISO up past 1600. Many photographers will hesitate to do so because they are afraid of noise but in practice, selecting too low of an ISO in this type of shooting can actually make noise worse on certain cameras. For my example I actually used an ISO of 25600.
Many digital cameras have a certain ISO threshold below which noise from the camera’s post sensor electronics will dominate the image. We need to try to get the ISO high enough so that the signal and noise recorded by the sensor is boosted to at least above the level of this post sensor noise. A safe ISO range so use for most cameras is about 1600 to 6400. Once again, don’t worry too much about noise from using a high ISO, we will be using a stacking technique to reduce noise in post processing anyway.
Focusing on the Stars
Focusing in a dark environment is always the hardest part. If you’ve never done it before, I outline several methods for focusing your camera at night in my How to Photograph the Milky Way article. Basically you’ll want to point your camera at a bright star or a distant light and use the Live View feed on your camera screen to focus. Check and double check your focus. Sometimes I’ll even tape my focus ring in place with a strip of gaffer tape once I’ve got it properly set so that it has less chance of being bumped in the process.
Shooting the Constellation Orion
Once we’re focused, we can frame up Orion and start shooting. For a good framing, try positioning Orion’s belt in the center of the image as if dividing the frame in two halves with the line of the stars. Keep the center most star in the belt roughly in center in the frame. I recommend shooting a collection of multiple images, anywhere between 32 and 64 frames is usually plenty. This is where an intervalometer is helpful: you can just set it to make the camera take all of the photos automatically. Be sure to take into account the extra processing time for long exposure noise reduction if you have it enabled. Either way, I recommend shooting the constellation for a minimum of about 10-20 minutes. If you have an intervalometer, it’s a good time to sit back, relax and look for shooting stars.
The more frames we capture, the more total signal and the cleaner the appearance of the final stacked image. Once again, it’s OK if your individual images are noisy because the stacking process will help reduce that noise.
Here’s an example of a straight-out-of-camera single frame from a total of 64 frames that I photographed for my example image of Orion. You can see that there is quite a bit of orange glow from light pollution, the image is mildly noisy and there is only a limited amount of nebulosity detail visible. Expect your image to look rather dull straight out of the camera too.
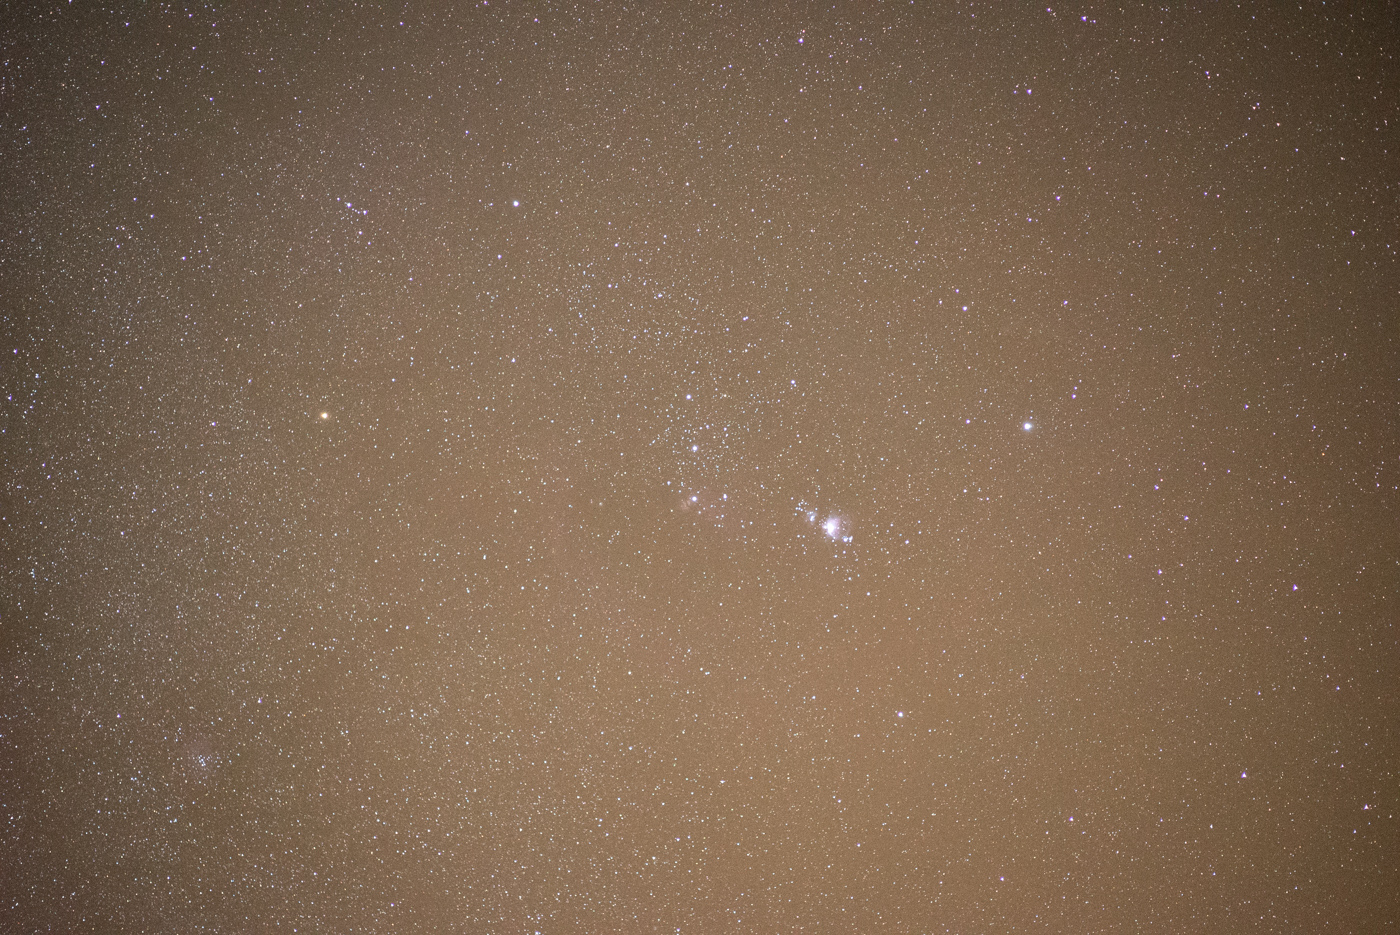
You can see the three stars of Orion’s belt in the center of the image. The bright spot you see just right of center in the image is the Orion Nebula (M42), the bright yellow star toward the left is Betelgeuse and the bluish white star to the right is Rigel. If you look really closely you might just be able to make out some of the pinkish glow of Barnard’s Loop but it’s very very faint in this raw image.
I highly recommend traveling to as dark a spot as possible for your Orion images but if you cannot completely escape light pollution, it might be helpful to use a light pollution filter, like the PureNight, to help reduce the effect of light pollution and increase the base contrast of your exposures.
Once you have finished shooting a minimum of 32 images, we’re pretty much done with the shooting process. Check and double check your frames for quality of focus, exposure brightness and star trailing.
Post-Processing in Adobe Lightroom and Photoshop
We’ll process our final images in Adobe Lightroom and Adobe Photoshop. Check out the video below for a complete walkthrough of my processing of 32 images of Orion. Post processing happens in two main steps: stacking and LRGB enhancing.
Stacking
Single exposures of the faint details in the night sky will usually have a lot of noise. Stacking multiple exposures will will help eliminate random noise in the image. There are are numerous dedicated star-stacking software packages available including DeepSkyStacker, Registax, Regim and others. I personally prefer to use Adobe Photoshop but if you don’t have the Adobe Suite you can use one of those dedicated software packages to perform the same basic function, too.
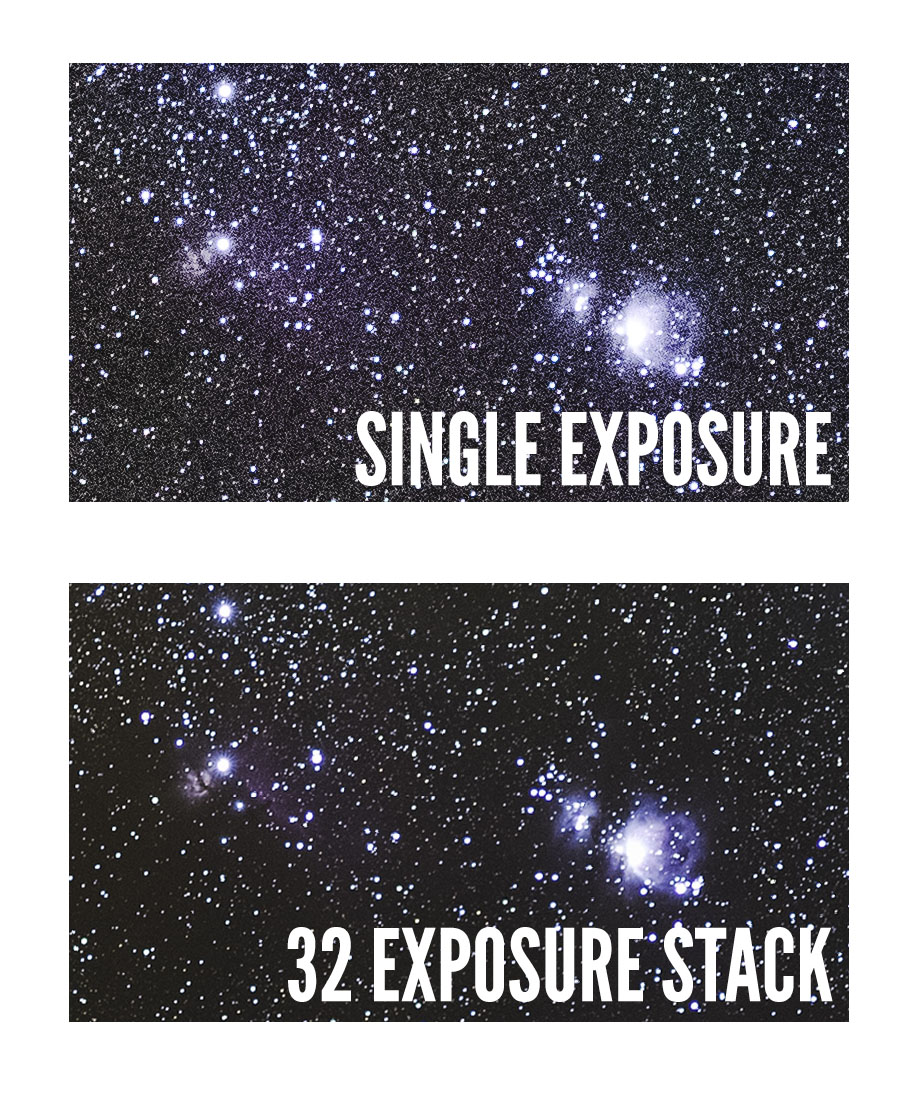
By combining many separate exposures with a median filter, it’s possible to nearly eliminate the random noise in the image. Check out the video below for a complete walkthrough and also check out our Noise Reduction Image Stacking for Landscape Astrophotography Video Tutorial for more details.
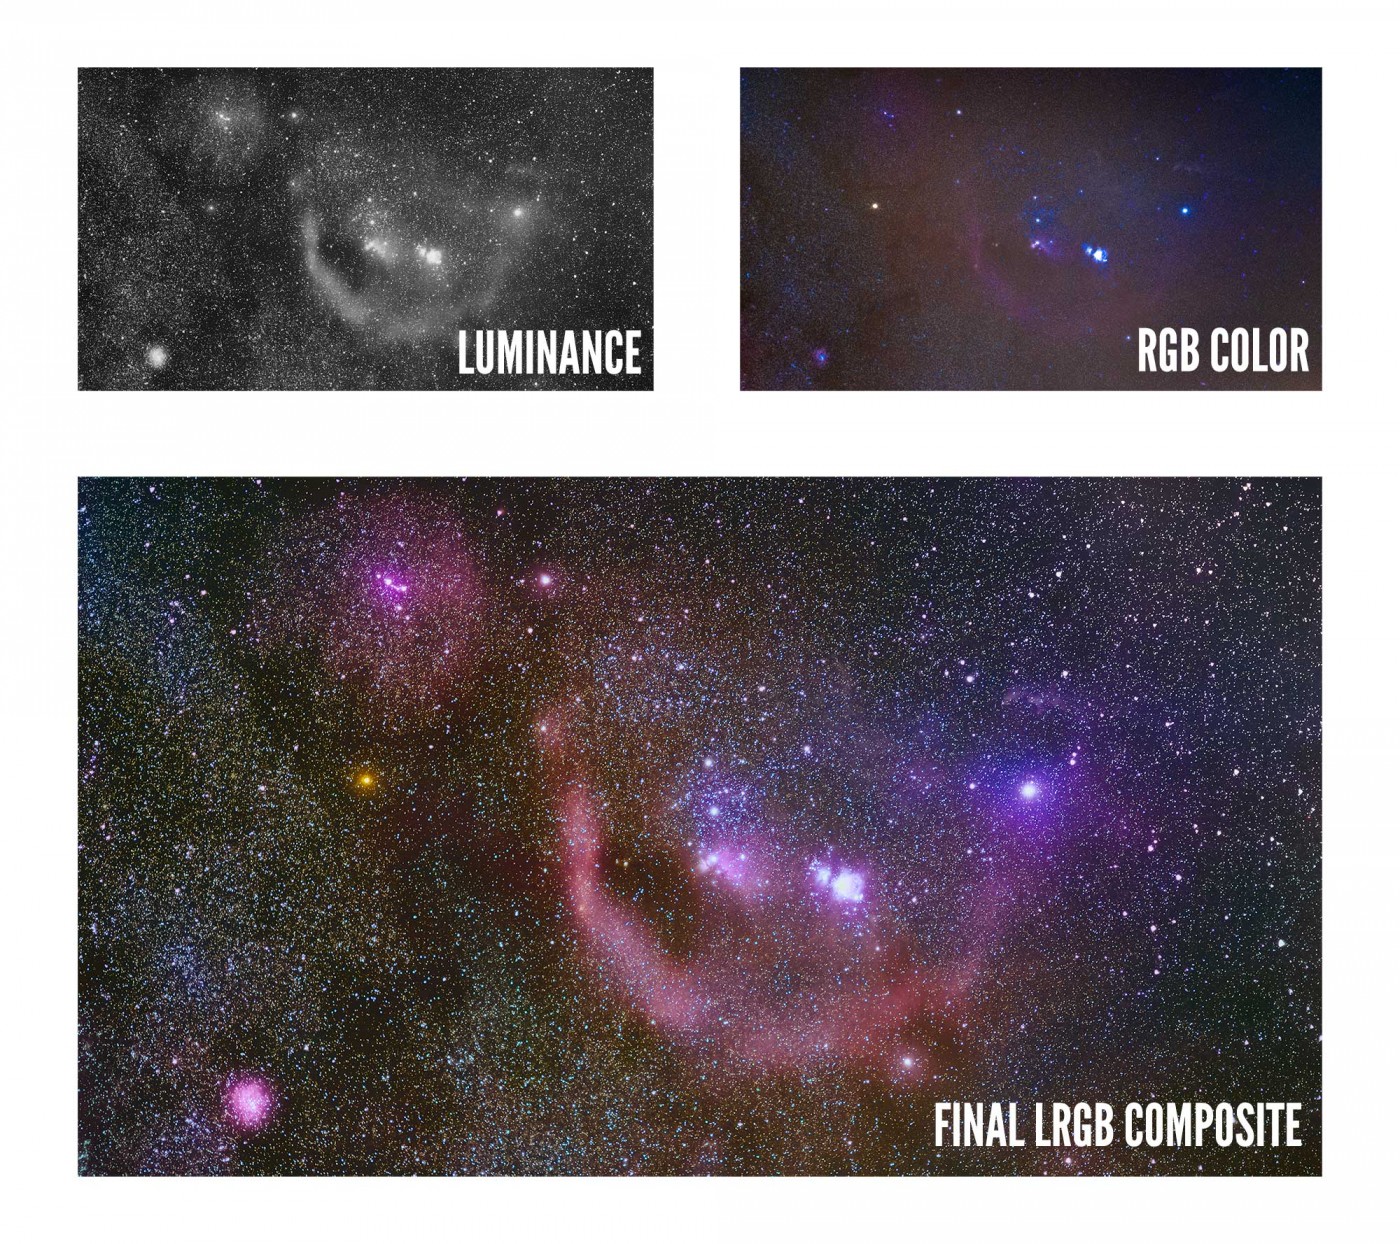
LRGB Processing
A method called LRBG (Luminance, Red, Green, Blue) processing allows us to enhance the nebulosity in the image. The technique is relatively simple: we combine an enhanced black and white image as a luminance layer with an enhanced color image to get a final result that has increased contrast and brighter colors.
Complete Post Processing Walkthrough Video
Check out the video below for the complete walkthrough of LRGB Processing. I step through the entire process from image stacking all the way to making the final composite.
Conclusion
With some patient planning, shooting and processing, it’s possible to photograph the faint detail in Orion with a standard lens and a tripod. The method I show in the walkthrough here is similar to what professional astronomers to do to process photographs of deep sky objects. Shooting large parts of the night sky is a great way to practice advanced techniques for processing without the need for expensive astronomy equipment.
Disclosure
We are a participant in the Amazon Services LLC Associates Program, an affiliate advertising program designed to provide a means for us to earn fees by linking to Amazon.com and affiliated sites. We are also a participant in the B&H Affiliate Program which also allows us to earn fees by linking to bhphotovideo.com.
Learn Astrophotography
Astrophotography 101 is completely free for everyone. All of the lessons are available on the Lonely Speck Astrophotography 101 page for you to access at any time. Enter your email and whenever we post a new lesson you’ll receive it in your inbox. We won’t spam you and your email will stay secure. Furthermore, updates will be sent out only periodically, usually less than once per week.
[email-subscribers namefield=”NO” desc=”” group=”Lonely Speck Newsletter”]
Help us help you!
Believe it or not, Lonely Speck is my full-time job. It’s been an amazing experience for us to see a community develop around learning astrophotography and we’re so happy to be a small part of it. I have learned that amazing things happen when you ask for help so remember that we are always here for you. If you have any questions about photography or just want to share a story, contact us! If you find the articles here helpful, consider helping us out with a donation.
[button font_size=”16″ color=”#136e9f” text_color=”#ffffff” url=”https://www.paypal.com/cgi-bin/webscr?cmd=_donations&business=lonelyspeckblog%40gmail.com&item_name=These+tips+help+keep+lonelyspeck.com+running.¤cy_code=USD&source=url” target=”_blank”]Donate[/button]
Thanks so much for being a part of our astrophotography adventure.
-Ian
I sign in, tick the privacy policy then hit subscribe only to be told;
You do not have permission to add subscriber.
What must I do so as to be able to read
Astrophotography 101?
Do you know if Lightroom mobile (android) is capable of stacking images and lrgb processing as described in the video?
It is not. I have not yet found a mobile app that offers the same capability as Photoshop for this type of processing.
Itreally a nice and helpful piece of information. I glad that you shared this helpful info with us. Please keep us up to date like this. Thanks for sharing.