

How I combined two of my favorite things: photography and Star Wars
Introduction
A few weeks ago I made a post on Google+ about performing a Star Wars Lightsaber photoshoot. For me, Star Wars has been the ultimate fantasy world. There is no other fictional universe that has inspired more fanboy giddiness in me than Star Wars. It has all the things I wanted to experience as a boy: spaceships, epic space battles, proton torpedoes, blasters, aliens, droids, one all-powerful Force controlling everything and, of course, lightsabers, the ultimate fantasy weapon ever created… “the weapon of a Jedi Knight. Not as random or as clumsy as a blaster; an elegant weapon for a more civilized age.”
Early Attempts
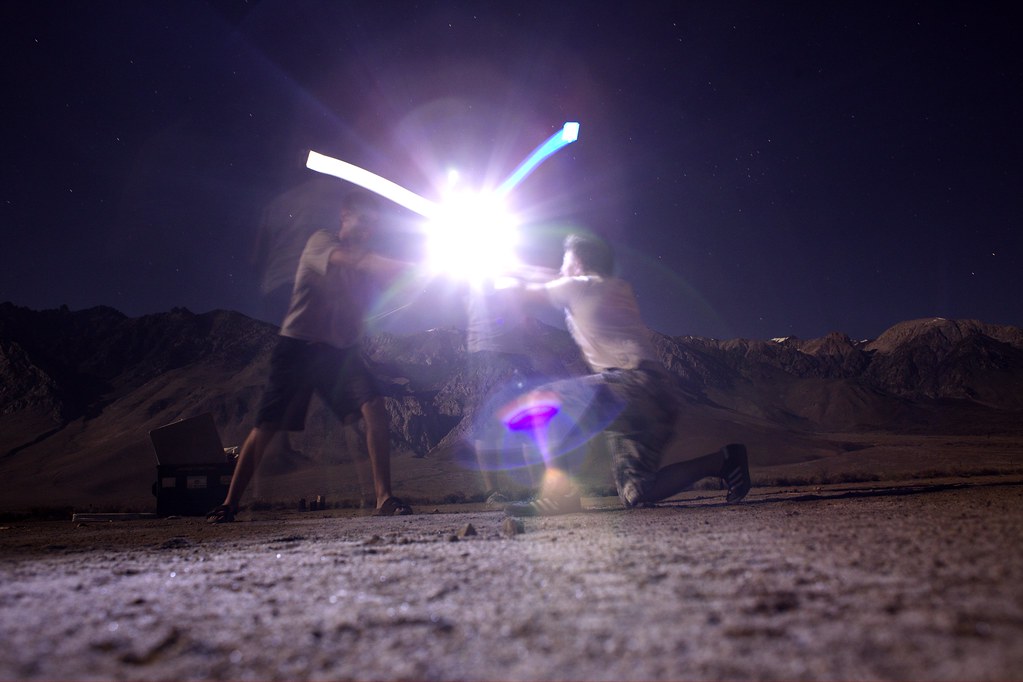
I’ve had the idea of performing a “real” lightsaber photoshoot ever since I made the below photograph in 2009 with a couple friends on a road trip along the Eastern Sierras. This particular shot was made using only the LCD screen of an iPod Touch to paint in the rather poor lightsaber representations. My friends had to stay agonizingly still for the duration of the exposure, a full 30 seconds long. The effect is apparent and certainly reminiscent of the look I wanted but it didn’t scream “STAR WARS!” I needed some “real” lightsabers and costumes.
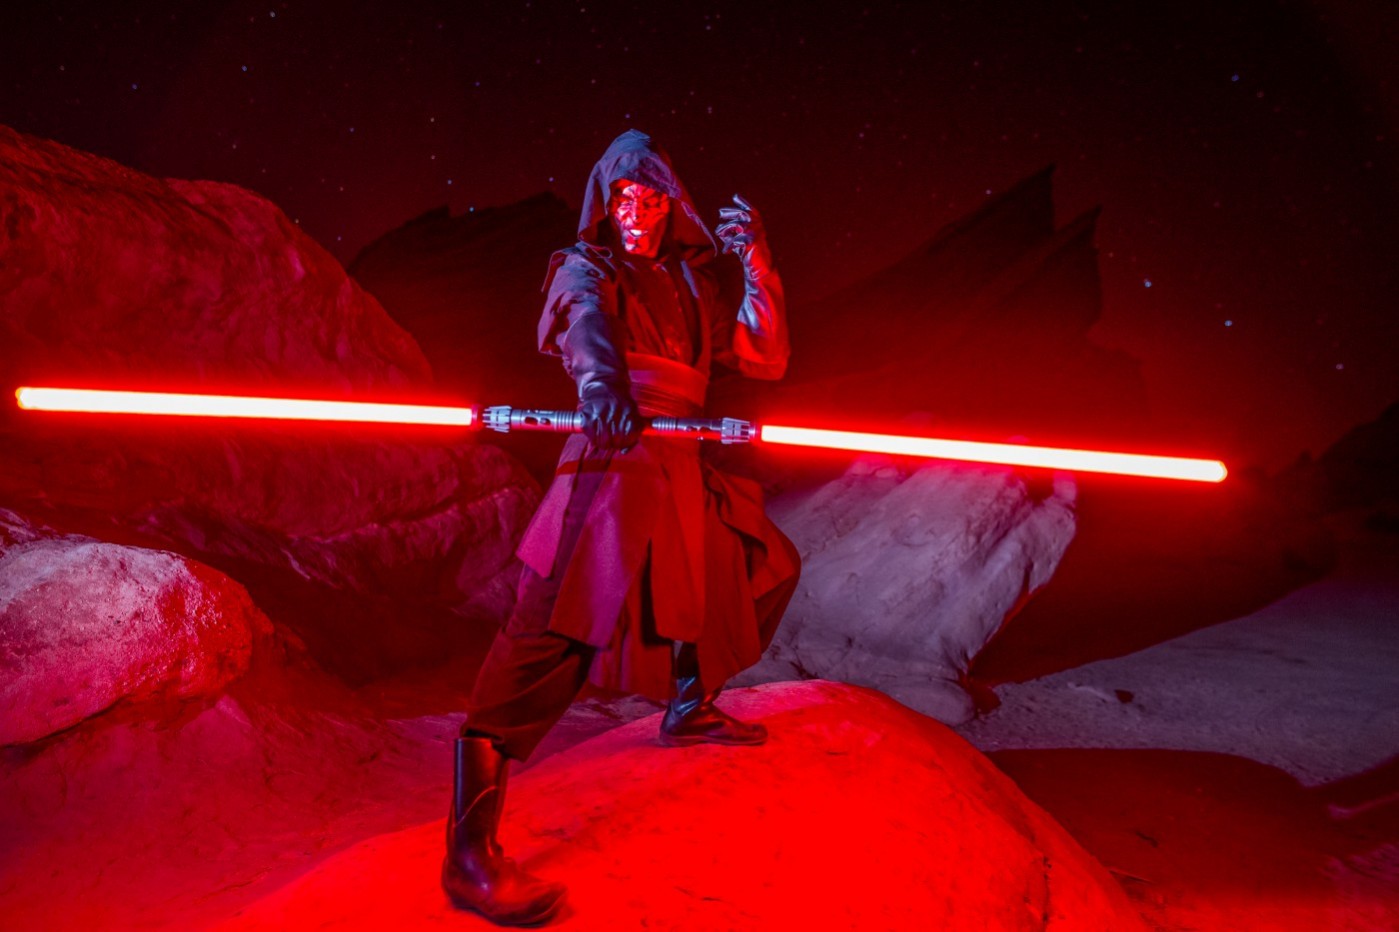
My focus since then has been almost exclusively on wide field astrophotography. I knew eventually that I had to properly combine this type of photography with the Star Wars universe. So I put up an online casting call for any Star Wars cosplayers in the Los Angeles area that might be interested in a photoshoot. To my surprise, I got a wave of responses within hours and quickly set up a time with actors Ely LaMay, Benjamin Campbell, Tony Noto, and Paul Gagliano as Princess Leia, Luke Skywalker, Qui Gon Jinn, and Darth Maul, respectively. As soon as I was scheduled, I knew I needed to test out the idea before the final shoot.
The day before the official shoot, my girlfriend, Diana and I scouted Vasquez Rocks Park near Santa Clarita, California on a late Friday night. The goal of this first scouting was to develop some understanding of the area ahead of time and try out the idea. The image below was the first test shot we made. The shot was simple. Diana held as still as possible while I started the exposure, off to the right of the frame is an off camera strobe on a lightstand used to light the foreground. She is holding a cheap plastic toy lightsaber with a built in light.
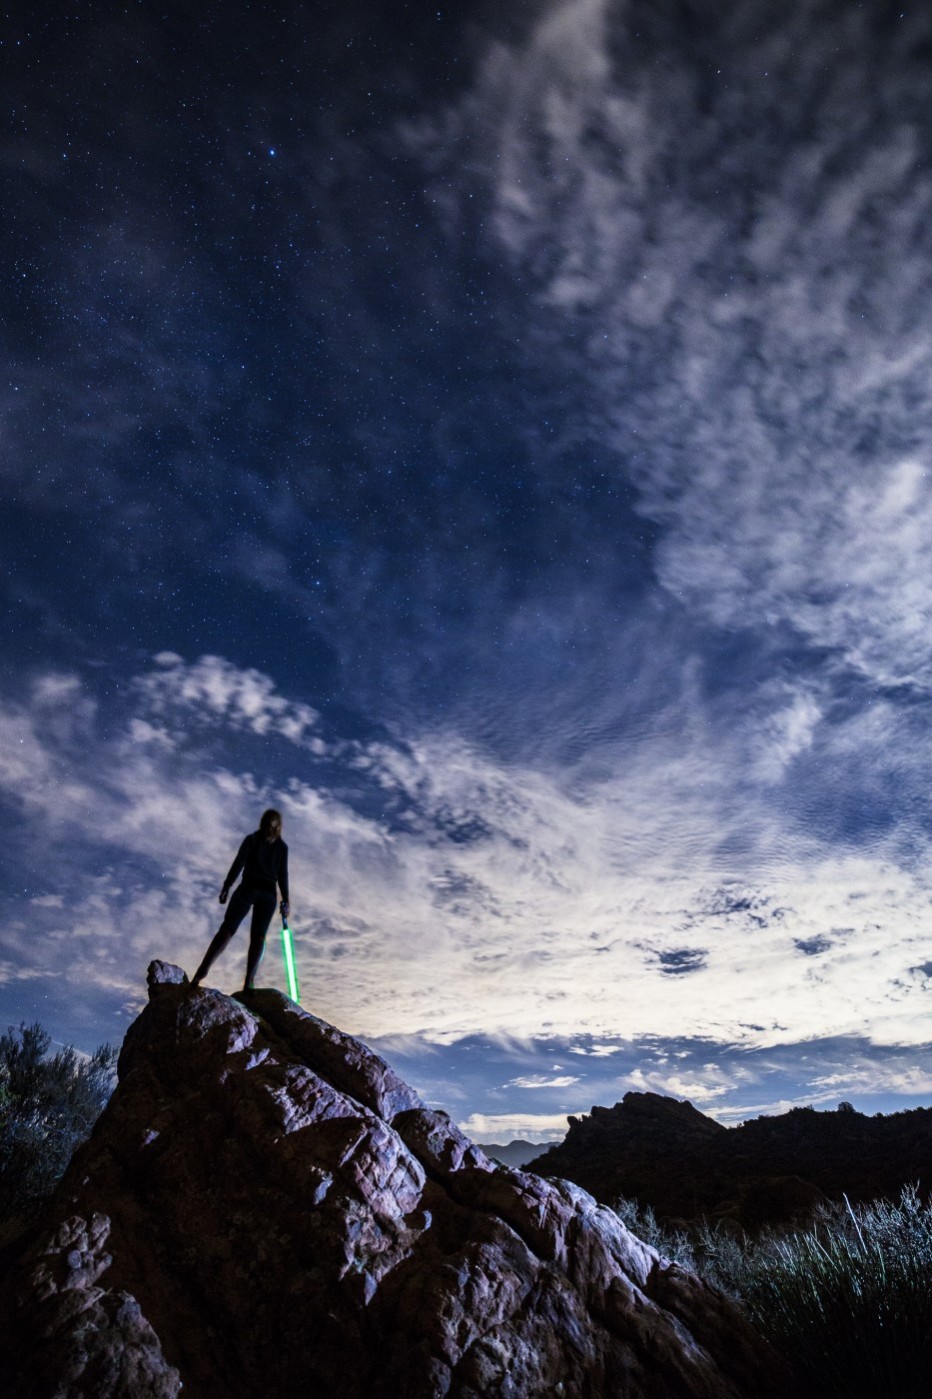
The result was nothing short of awesome and gave us a simple formula for the upcoming photo shoot the next day. When we returned the next night, we were greeted by everyone in full costume. Paul Gagliano even had the yellow iris contact lenses and full face paint of Darth Maul. Everyone looked great. Now, it’s time for the real shoot. We’ll do this one together.
Gear
What you will need:
- Camera with manual mode
- Tripod
- Toy Lightsabers
- Flash Strobe with a light stand and remote triggers or a helping hand(optional)
- A friend (or four) in their favorite Star Wars costume (optional but way more fun)
- Dark sky location (also optional but your results will be better if you can find some place “alien”)
- Orbiting Death Star
Camera with manual mode
I will be using my trusty Canon EOS 6D with a Rokinon 14mm f/2.8 lens
Tripod
Any stable tripod should be fine. I use a Sirui T-025X.
Toy Lightsabers
For the test shot above, I just used a cheapo $20 toy I found at Target. Most of the lightsabers used by the models below were the fancy ones from ultrasabers.com I highly recommend using one that lights up at the very least so that you get the colored light that spills onto the surroundings and the models.
Strobe, Triggers and Light Stand
For this particular shoot, I used one bare strobe flash (Yongnuo YN560), and some wireless triggers (Yongnuo RF-603). You can put together a wireless strobe setup for about $100 from Amazon. That said, I did have a problem with my triggers on this shoot and opted to fire them manually instead.
Star Wars Costumes
It’s not a complete Star Wars shoot without costumes!
Dark Sky Location
You don’t necessarily need to have awesomely clear night skies but it’s a lot more “spacey” if you can see the stars. Jump over to Dark Sky Finder to find a nice dark location.
Orbiting Death Star
Also optional. Actually I’m not sure you want a Death Star orbiting the planet. Remember Alderaan?
Structuring the Exposure
Expose for ambient light first
There are a number of light sources that will be present in your photograph. In the case of this Star Wars shoot, there is the ambient light of the location, the glow of the lightsabers and the strobe flash. The ambient light is something that we can’t adjust directly so we will expose for the ambient light first. If you are photographing in a dark location I recommend you start by securing your camera on its tripod and taking a test exposure in manual mode first.
Here are some initial exposure suggestions and why I chose them.
Relatively long shutter speed
I prefer to use a longer shutter speed for light gathering rather than very high ISO sensitivities so that we keep noise levels to a minimum. A long exposure also allows us to manually trigger a strobe while the shutter is open if we don’t have working wireless strobe triggers (which is what happened to be the case this time around). Start around 15 seconds and adjust from there.
Low f-stop number
If there are stars out, a low f-stop like f/2.8 or lower will help you gather more detail in the night sky. If you have a lot of light pollution or clouds, as I did, you may need to stop down a little bit. Start at about f/4.0 and adjust from there.
High ISO
You will want a relatively high ISO in order to capture details in the dark. Start at 1600 or so if you’re shooting in very low light.
Before you get your models into position, frame up your shot and take a test exposure of the background. Adjust the brightness accordingly until you have the look that you want. For this particular shot, I exposed for the clouds, making sure that they retained as much detail as possible. I tried to keep the exposures relatively short in order to make it easy on the models. This particular shot was 15 seconds at f/4.0 and ISO 1600. You exposure is likely to be different. Just use a little trial and error, that’s the beauty of digital photography.

Add in your models and your controlled light sources.
One point I need to make: lightsabers from ultrasabers.com are really really bright. In order to prevent my photographs from becoming completely overexposed, I needed to have the models turn off the lightsabers in the middle of the exposure, about 2-3 seconds in. I’m sure that it will differ when you try it because there is no standard lightsaber brightness. luckily, just have the models try a few different durations of “on-time” for the lightsabers so that they don’t ever expose your image.
Directing and Tips
Your models will need to stay very still during the exposure. Using a flash will help reduce any apparent motion blur if they have trouble standing still. If you have a wireless flash setup, place that out of the frame and adjust its power until you have your desired brightness. If you need to manually trigger the strobe as I did, it’s easiest to have an assistant trigger it while the shutter is open.
I directed each photograph as such:
- “Positions!”
- Tell the models to get into position.
- “Starting exposure!”
- Call out when you are starting the exposure so that everyone can hold still.
- “Three, Two, One, Off!”
- Count down the time until the models need to turn off the lightsabers. This time may vary depending on the brightness of the lightsabers.
- “Flash”
- Call out to your assistant when to manually trigger the flash.
- “Relax”
- Call out when the exposure is finished.
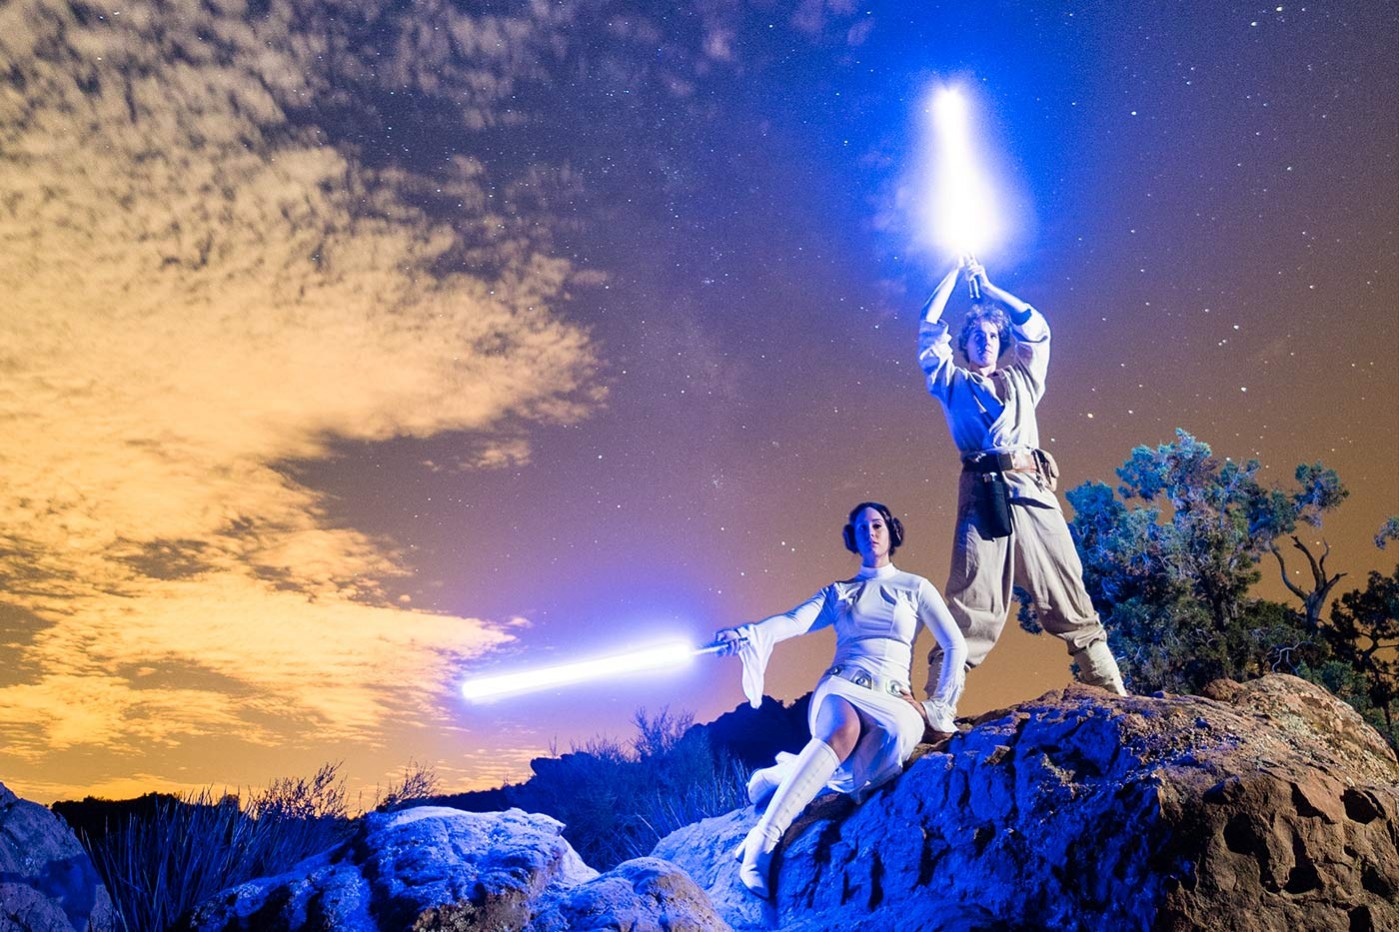
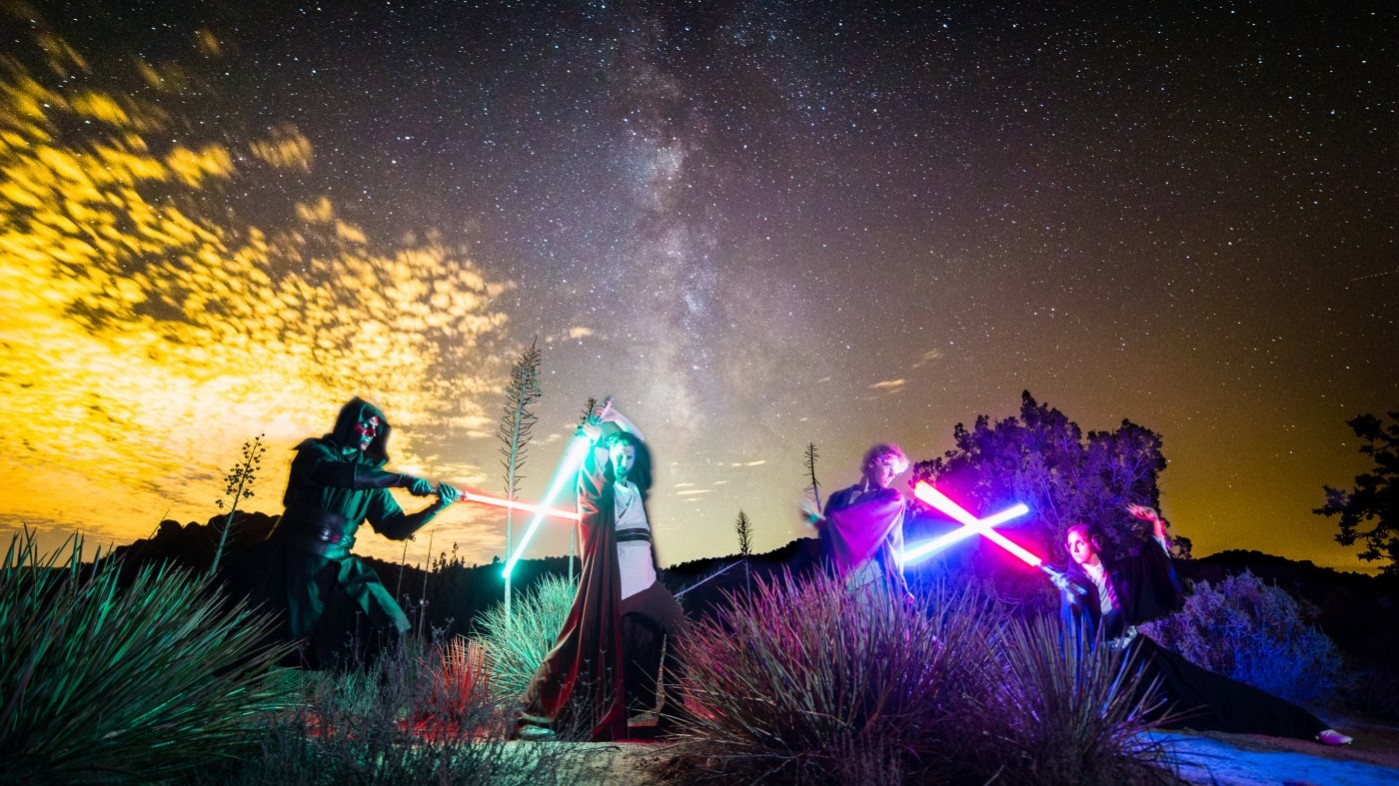
It usually took a couple of tries to get each shot right but a little practice will help a lot. In general I also found it easiest to keep the lightsabers away from the models faces as it tended to overexpose details in their faces. This image is a good example of that problem: you can see that the lightsaber has over exposed Princess Leia’s face and shoulders but Luke Skywalker has more even tones since his lightsaber is at his side.

I also recommend keeping your strobe far to the left or right of the models, rather than near the camera in order to create the most dynamic and detailed lighting. If it’s too close to the camera, your light will look very flat. Once you have the formula for your exposure, you can likely re-use it for the rest of your shots, unless your lighting conditions change. This particular shoot had a lot of variation because the clouds constantly moved, changing the amount of light pollution they reflected.
Now you’re limited only by your imagination! I hope this tutorial was helpful and that you enjoyed my photographs.
More Examples
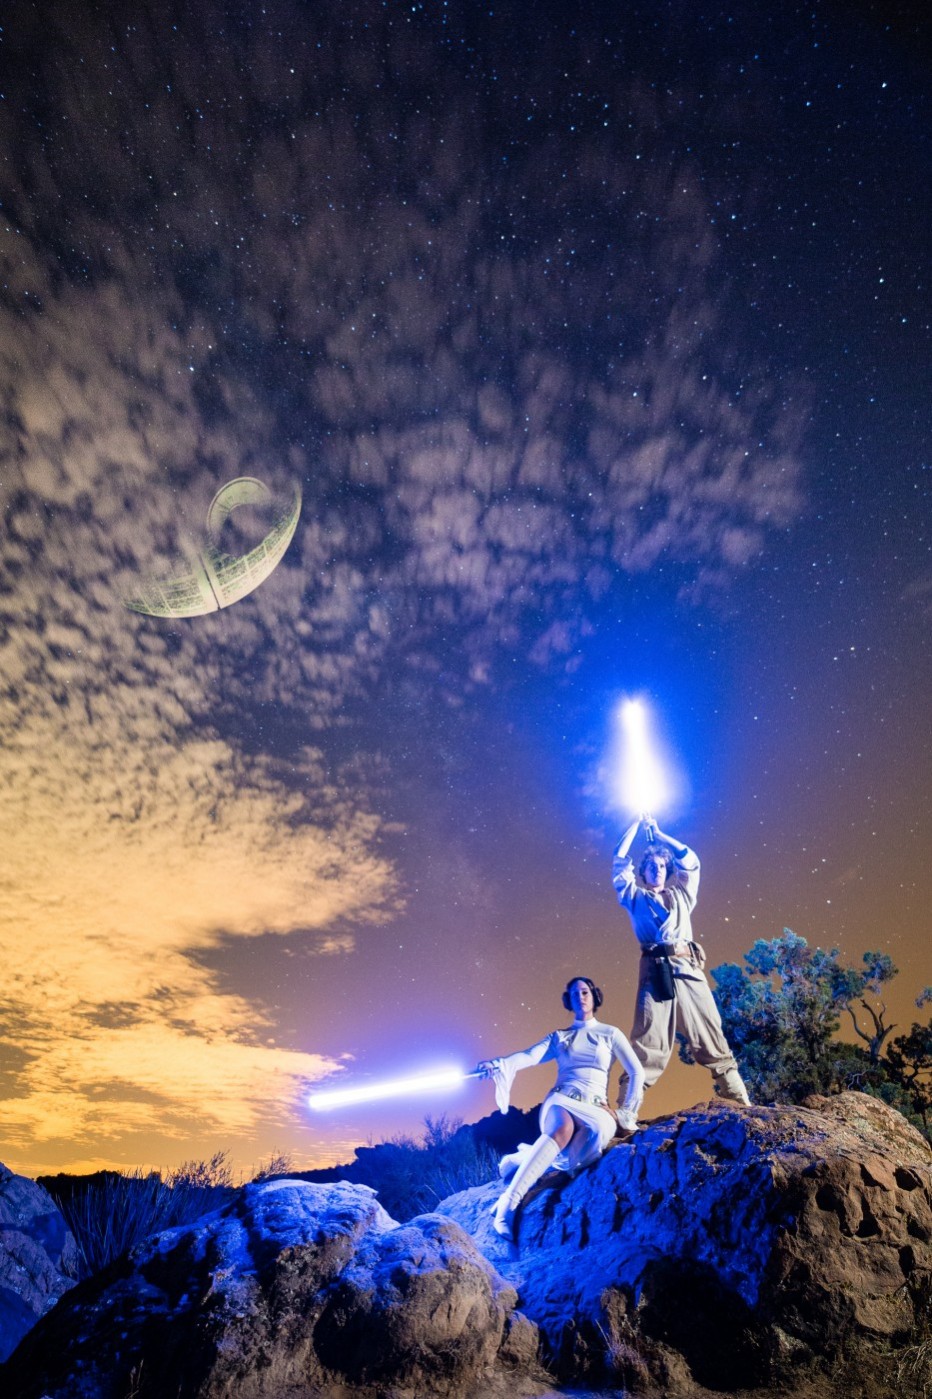
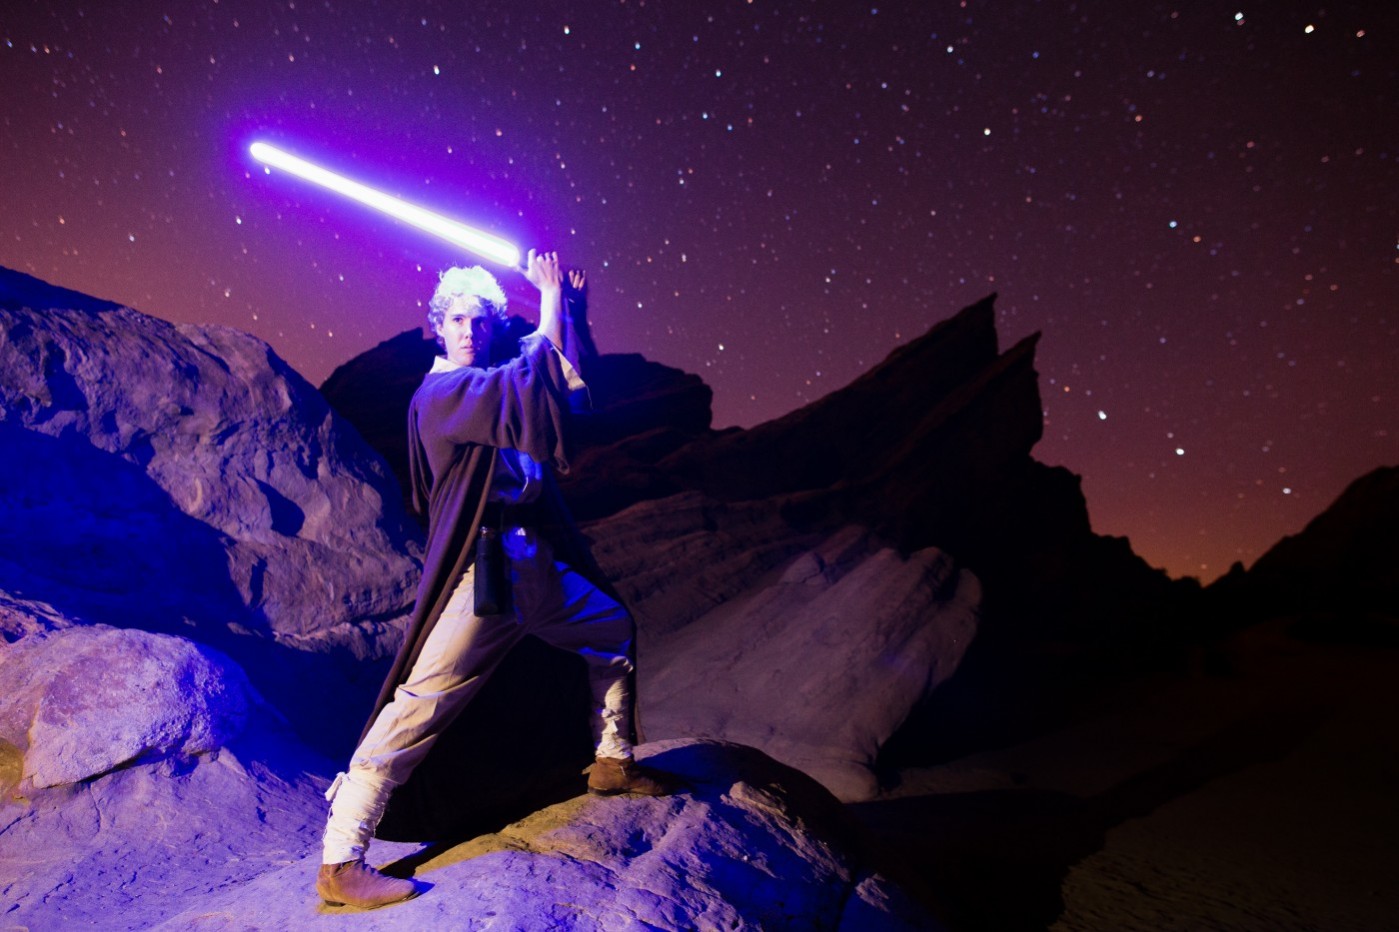
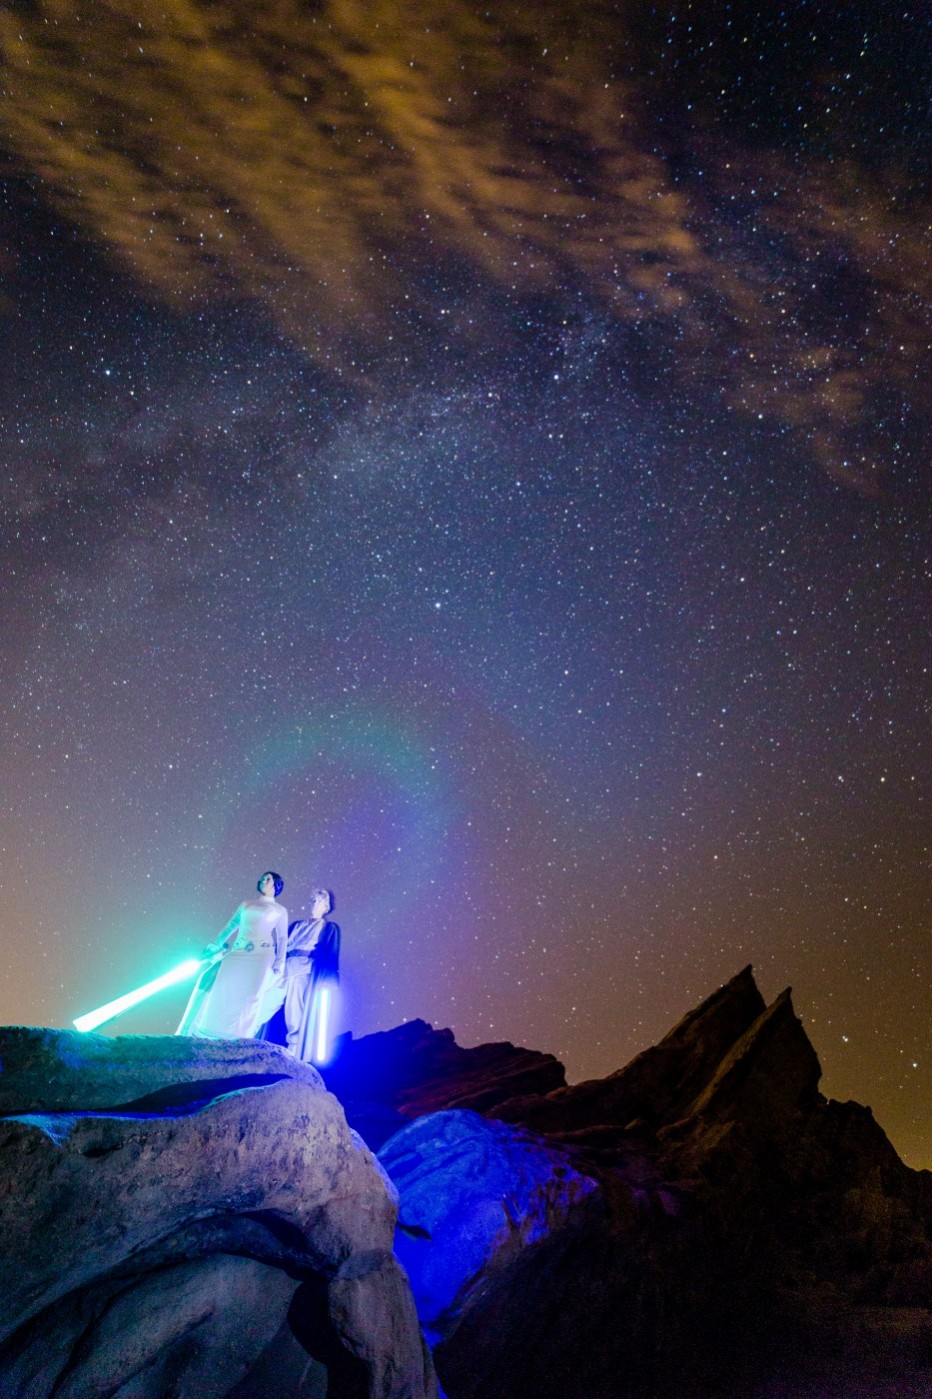
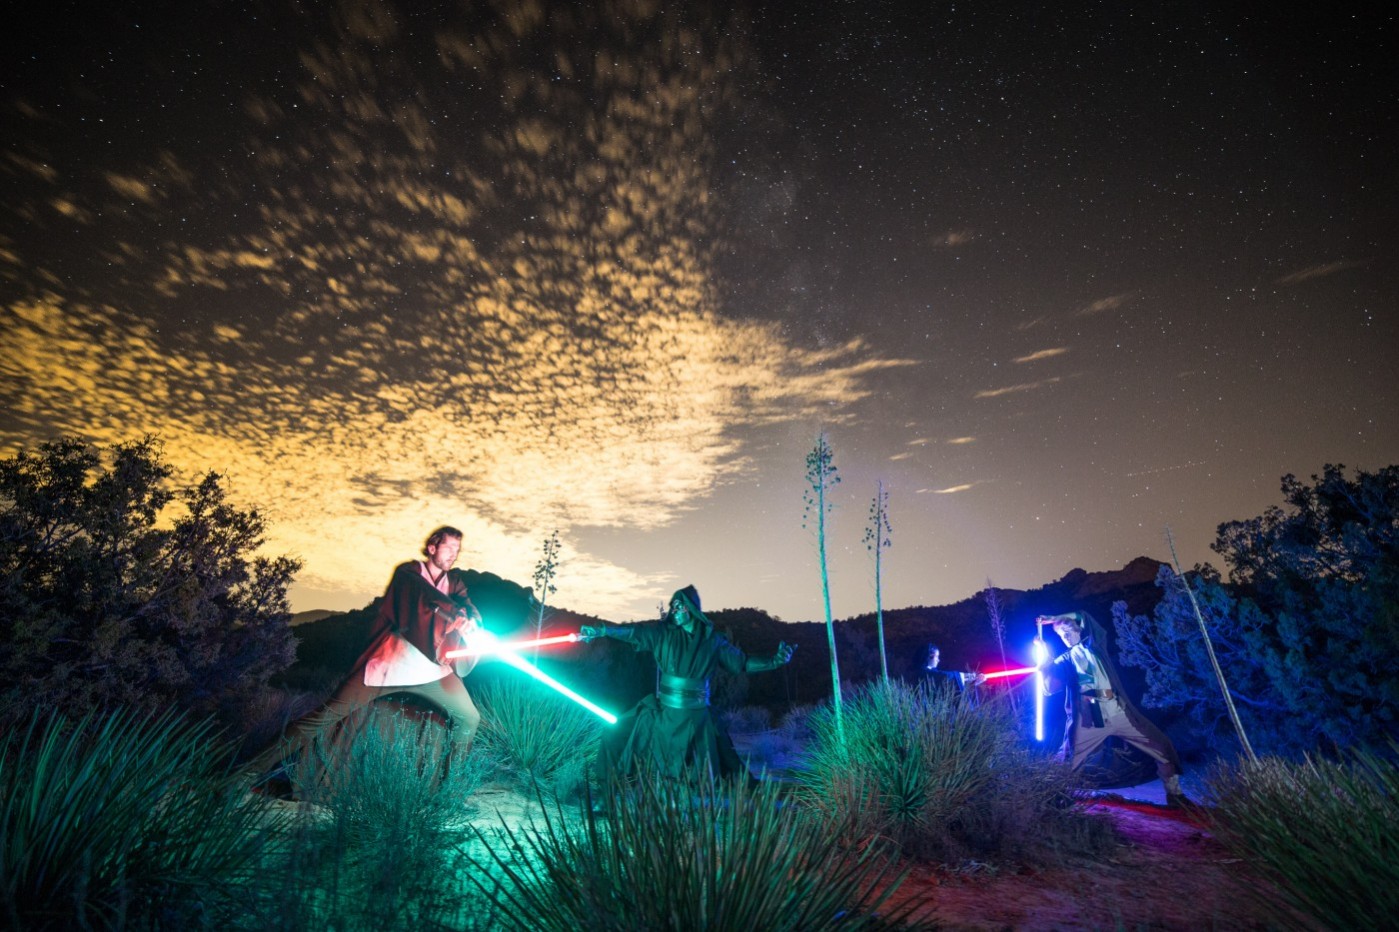
We made a whole slew of photographs that night. They’re not all super “accurate” in terms of Star Wars lore/canon but I had so much fun making each one of these shots.
Thanks so much to Diana Southern for being my awesome assistant and thanks to Ely LaMay, Benjamin Campbell, Tony Noto, and Paul Gagliano for their talents. Leave any questions or comments that you may have below!
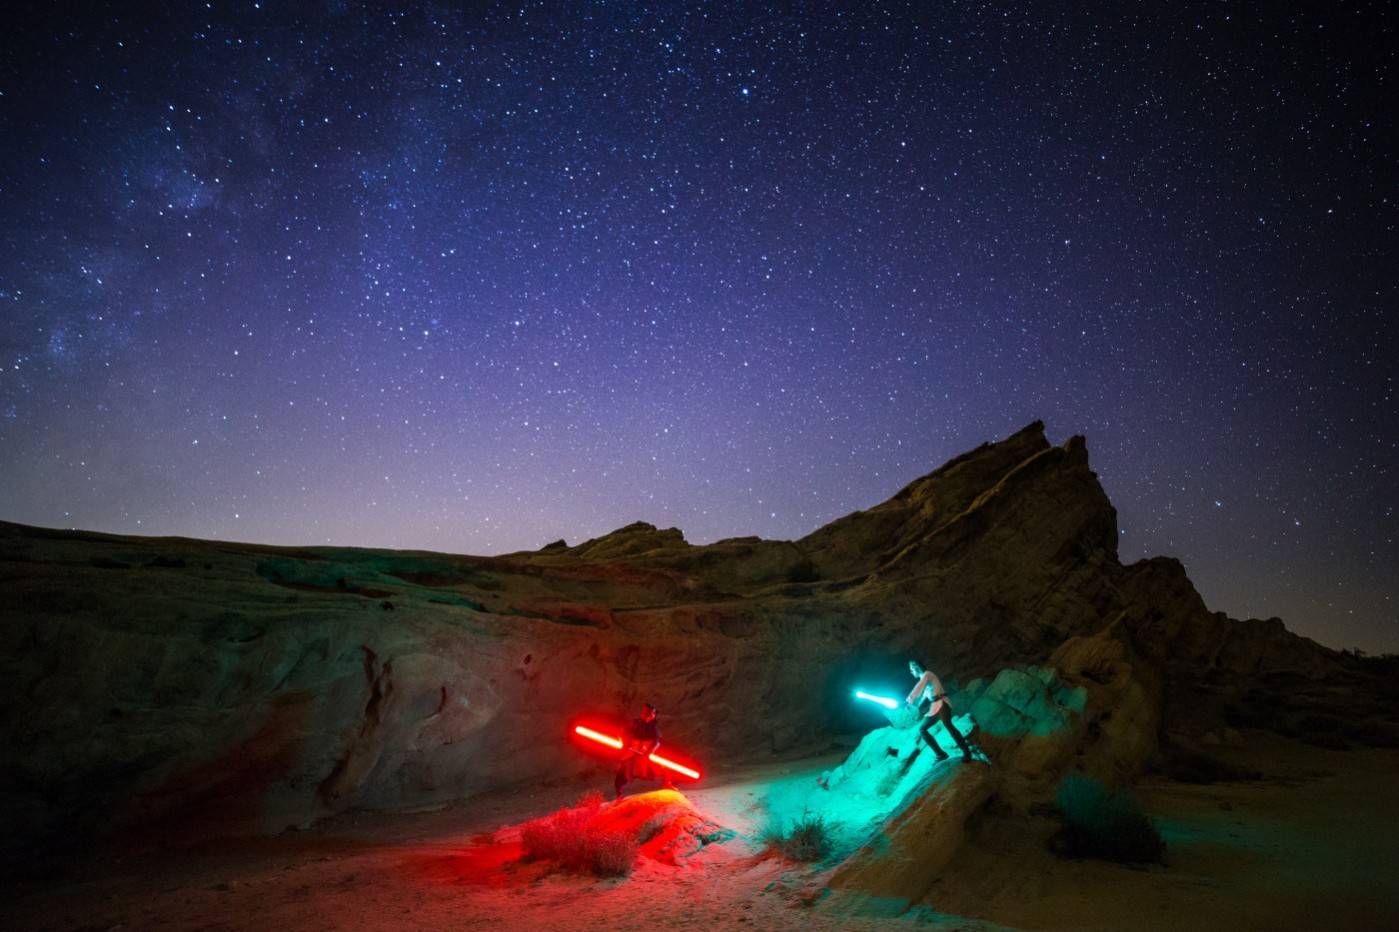
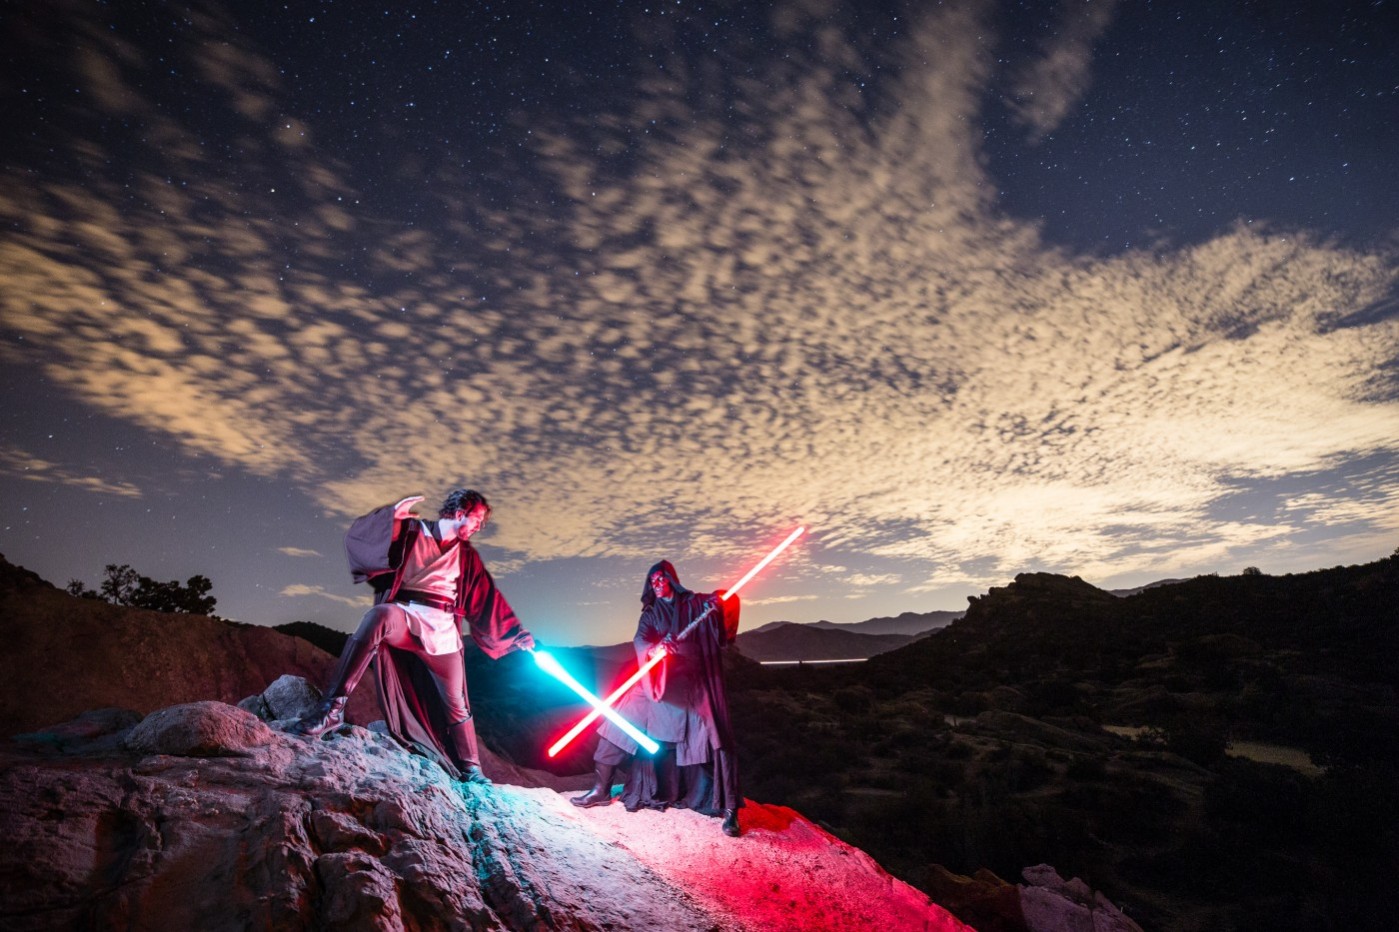
One of my favorite shots from the night is the above battle between Qui Gon Jinn and Darth Maul among the rock formations of Vasquez Rocks State Park… errr… I mean Tatooine. We did a whole slew of lightsaber battle shots and portraits alike that night. It was a bunch of fun.


Conclusion
Thanks for checking out this quick post on how I made my Star Wars photos! I’d love to hear from any more Star Wars fans and night photography enthusiasts that have tried similar shoots.
Equipment
- Canon EOS 6D (Amazon / B&H)
- Rokinon 14mm f/2.8 lens (Amazon / B&H)
- Sirui T-025X (Amazon / B&H)
- Yongnuo YN-560III (Amazon / B&H)
- Yongnuo RF-603II (Amazon / B&H)
- Light Sabers from Ultrasabers.com
Disclosure
We are a participant in the Amazon Services LLC Associates Program, an affiliate advertising program designed to provide a means for us to earn fees by linking to Amazon.com and affiliated sites. We are also a participant in the B&H Affiliate Program which also allows us to earn fees by linking to bhphotovideo.com.
Learn Astrophotography
Astrophotography 101 is completely free for everyone. All of the lessons are available on the Lonely Speck Astrophotography 101 page for you to access at any time. Enter your email and whenever we post a new lesson you’ll receive it in your inbox. We won’t spam you and your email will stay secure. Furthermore, updates will be sent out only periodically, usually less than once per week.
Help us help you!
Believe it or not, Lonely Speck is my full-time job. It’s been an amazing experience for us to see a community develop around learning astrophotography and we’re so happy to be a small part of it. I have learned that amazing things happen when you ask for help so remember that we are always here for you. If you have any questions about photography or just want to share a story, contact us! If you find the articles here helpful, consider helping us out with a donation.
[button font_size=”16″ color=”#136e9f” text_color=”#ffffff” url=”https://www.paypal.com/cgi-bin/webscr?cmd=_donations&business=lonelyspeckblog%40gmail.com&item_name=These+tips+help+keep+lonelyspeck.com+running.¤cy_code=USD&source=url” target=”_blank”]Donate[/button]
Thanks so much for being a part of our astrophotography adventure.
-Ian
[button font_size=”16″ color=”#136e9f” text_color=”#ffffff” icon=”arrow-left” url=”https://www.lonelyspeck.com/astrophotography-101/” target=”_self”]Back to Astrophotography 101[/button]
Holy crud this is so awesome. After reading this tutorial, I clicked on your links to amazon and bought the lens, flash, and trigger. I can’t wait to try these. Ha ha I’m such a nerd.
Very epic. Congrats on seeing your dream through. I’m starting to think about light in terms of 15-30 seconds now instead of the instantaneous time frame.
Those are wonderful and amazing. Thanks so much for sharing!
The first and the last photos are awesome. I wish I had the patience to do something like this but I don’t even like using flash.