


This video tutorial will take you through the entire process of shooting a professional motion timelapse of the Milky Way, from planning to settings, shooting, processing in Lightroom and compiling in After Effects.
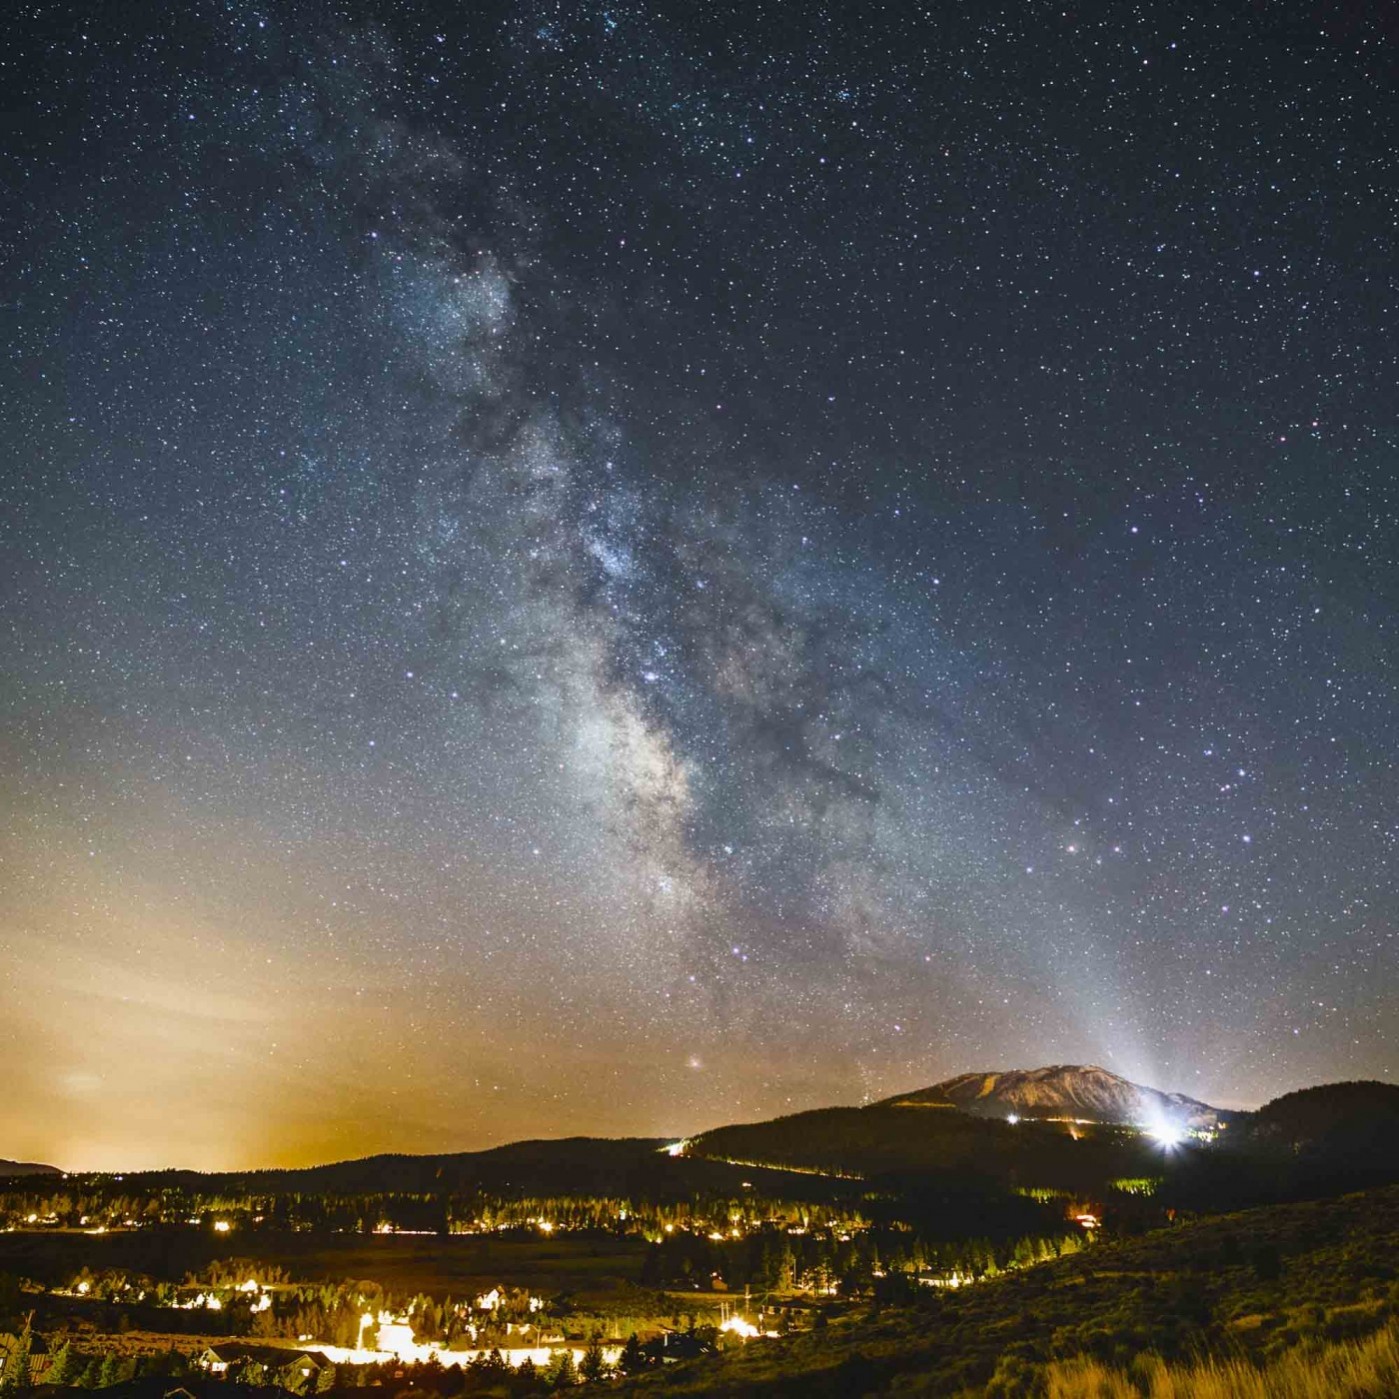
After learning how to photograph the Milky Way, learning to shoot timelapse is the logical next step. Astrophotography is already a slow and patient form of photography: we use super slow shutter speeds, and planning for a shoot is a careful and selective process. If you’re looking for a new way to use your astrophotography, timelapse is a great challenge, and the results can be breathtaking.
It’s an amazing thing to be able to see the the slow and elegant motions of the night sky and watch the galaxy progress across it. It’s an even more amazing feeling to capture it on your camera and share the results with others. I hope this video will help all of you just getting started with timelapse of the night sky and make it as easy as possible to understand.
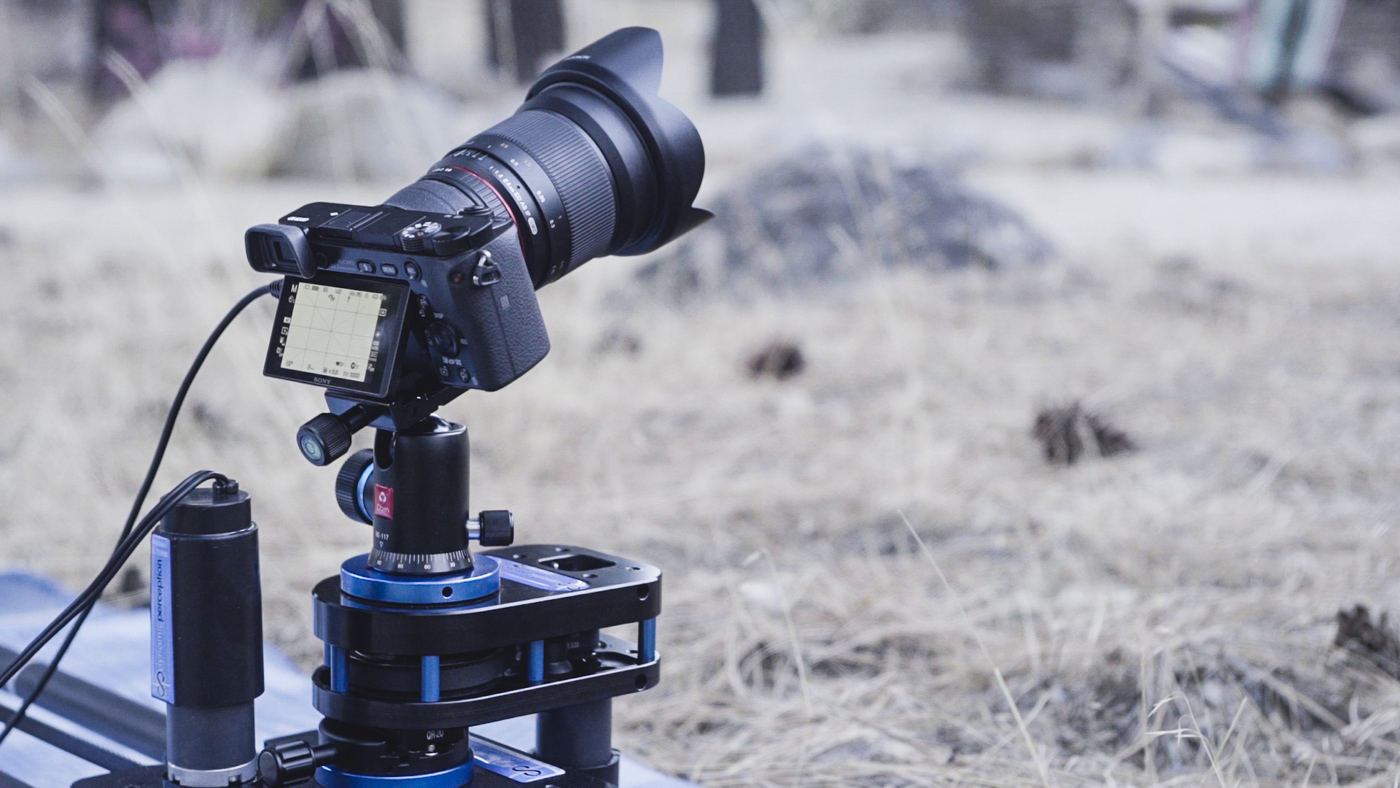
To get started with timelapse, all you need is an intervalometer (B&H / Amazon) that’s compatible with your camera. For a more advanced technique that yields more spectacular results, a motion control rig slider can add a lot of depth to the timelapse.
For the video above, we paired up with Dynamic Perception to bring you a concise yet detailed overview of all the steps necessary to shoot a complete motion controlled timelapse of the Milky Way. We used a 2 axis combination with their linear motion slider, the Stage One, and their rotary axis, the Stage R. Both of these tools are perfect for making timelapse of the Milky Way because the Stage One gives use side to side motion and the Stage R lets us perfectly track the Milky Way as the earth rotates.
Even if you don’t have one of Dynamic Perception’s amazing timelapse rigs, the video above walks you through each step of shooting timelapse of the Milky Way including the basics of making a great exposure of the Milky Way, so you can get started with just your tripod.
I would love your feedback on the video and to see if any of you have questions about shooting timelapse. We will be writing a lot more about astro-timelapses in the future, so let us know what you want to see!
About the Video
Equipment:
Here’s a list of the following equipment used in the making of this video. Most of the filming was made with the a7S and the 40mm while the a6000 stood in as the demonstration camera. It is shown fitted with the Rokinon 24mm f/1.4.
- Motion Control with the Dynamic Perception Stage One, Stage R and MX3 Controller
- Video and Stills with the Sony a7S (B&H / Amazon)
- Demonstrations with the Sony a6000 (B&H / Amazon)
- Rokinon 24mm f/1.4 (B&H / Amazon)
- Rokinon 14mm f/2.8 (B&H / Amazon)
- Voigtlander 40mm f/1.4 Nokton (B&H / Amazon)
- Voigtlander VM-E Adapter (B&H / Amazon)
Locations:
- Reno, Nevada
- Mt. Shasta, California
- Death Valley National Park, California
- Lassen Volcanic National Park, California
Thanks to:
Jay Burlage of Dynamic Perception for providing the Stage One and all accessories for the creation of this video.
Disclosure
We are a participant in the Amazon Services LLC Associates Program, an affiliate advertising program designed to provide a means for us to earn fees by linking to Amazon.com and affiliated sites. We are also a participant in the B&H Affiliate Program which also allows us to earn fees by linking to bhphotovideo.com.
Learn Astrophotography
Astrophotography 101 is completely free for everyone. All of the lessons are available on the Lonely Speck Astrophotography 101 page for you to access at any time. Enter your email and whenever we post a new lesson you’ll receive it in your inbox. We won’t spam you and your email will stay secure. Furthermore, updates will be sent out only periodically, usually less than once per week.
[email-subscribers namefield=”NO” desc=”” group=”Lonely Speck Newsletter”]
Help us help you!
Believe it or not, Lonely Speck is my full-time job. It’s been an amazing experience for us to see a community develop around learning astrophotography and we’re so happy to be a small part of it. I have learned that amazing things happen when you ask for help so remember that we are always here for you. If you have any questions about photography or just want to share a story, contact us! If you find the articles here helpful, consider helping us out with a donation.
[button font_size=”16″ color=”#136e9f” text_color=”#ffffff” url=”https://www.paypal.com/cgi-bin/webscr?cmd=_donations&business=lonelyspeckblog%40gmail.com&item_name=These+tips+help+keep+lonelyspeck.com+running.¤cy_code=USD&source=url” target=”_blank”]Donate[/button]
Thanks so much for being a part of our astrophotography adventure.
-Ian
Hi Ian
I am a great fun of sony’s mirrorless cameras. I have 2 nex 5 R and bunch of e-mount lenses. Also I use Nikon’s prime lenses with adapter as well. I have Nikon 24mm f 2.0 – Nikon 35 mm f1.4 and Nikon 50 mm f1.4.
I am about to buy a new camera soon sony a6500. I have some e-mount lenses of this camera as well. like 16mm f2.8 pancake lens of it. Are those lenses good enough for astro photography or Samyang 12mm f2.0 could be better than over all e mount lens choices of this camera.
Also I have an other set up chğce with Canon 40D and Canon 17-55mm 2.8 IS. Should I use this set up for astro photography.
Could you please correct equpment statement for the begining
Thanks
Ian – Outstanding tutorial, very informative and helped me with the camera settings to start with. You mentioned DarkSkyFinder which is a nice tool to find dark sites. To help me schedule my photo sessions, I use cleardarksky.com, it has the light pollution map that’s used for darkskyfinder, but it also has a wide range of seeing conditions, broken down hour by hour for the area you are in. I know you can only put so much info in a tutorial, just wanted to share this with you and the other viewers. Cheers!
Hi Ian, very good & knowledgeable tutorial you have there. For milky way time-lapse, if you would like to see the movement of the milky way from east to west, what is the duration for all those shot? 3 hr or more? What is the interval between each images? Thank you!
I was wondering if you have looked at the NMX module from dynamic perception. I’m not sure, but it seems like it is a digital version of the MX3 with smartphone capabilities. Is there any advantage of the NMX system other than the smartphone capabilities?
can the dynamic perception setup be used to capture star trails?