


If you want to photograph the Milky Way, the first thing you’ll need to know is how to find it. In this article, I share some of my favorite tools and tips for finding the Milky Way’s galactic plane and more specifically, the bright galactic center. Using either smartphone apps or by memorizing important constellations, you’ll be able to find the Milky Way with or without the use of technology.
I remember my first failed attempts at trying to shoot the Milky Way, and I recall one of the most basic and obvious challenges: I didn’t even know where to point my camera. One of the most important factors that contributes to the visibility of the Milky Way is the time of observation. It moves across the sky throughout the course of the night and the position of the Milky Way will differ depending on the time of year.
Seasons of the Night Sky
Still today, I receive the occasional email from a reader asking for help with finding the Milky Way or from photographers who have set out on their first excursion in the dark only to find that the bright galactic center, the part of the sky we all expect to see when trying to shoot the Milky Way, was not visible at that particular time of year. As it turns out, the night sky has seasons.

The best times to observe the bright galactic center of the Milky Way, in any part of the world, tends to be from about mid-March through mid-October, the “Milky Way Season,” as I and many of my fellow astrophotographers have started calling it. Technically, you can see some part of the Milky Way at any time of the year, but when shooting in the time period from September through April, you’ll be limited to the dimmer parts of the night sky as the Sun obscures the bright galactic center.

Similarly, where you’re located in the world will determine where the Milky Way will be in the sky. In the northern hemisphere, the galactic center is visible in the southern half of the sky while in the southern hemisphere, it can be positioned directly overhead, particularly in the peak of the “Milky Way Season” around the time of the June Solstice. Most of my photographs are made in the Northern Hemisphere so the Galactic center never rises too far above the horizon.
When you embrace astrophotography as your hobby and you really want to produce the best results possible, the thing on your mind most often is not what lens to use or what camera to buy, it’s the awareness of where we are in the astronomical sense: the position of the Earth and the Moon and the Sun as we slowly dance in the heavens. With some practice and observation, it’s possible to track the motions of the heavens and use it to help plan your astrophotography excursions.
I’d like to share with you some of my favorite tools and tips for finding the Milky Way’s galactic plane and more specifically, the bright galactic center. Below are my absolute favorite smartphone apps and computer software for finding the Milky Way, as well as techniques for locating it without technology.
The Best Smartphone Apps for finding the Milky Way:
These apps are my absolute favorite tools for finding the Milky Way. I’ve searched high and low and these are the best in my honest opinion. There are many free apps available that try to do the same thing but I’ve not yet found a free one that really excels like these do.
PhotoPills for iOS and Android
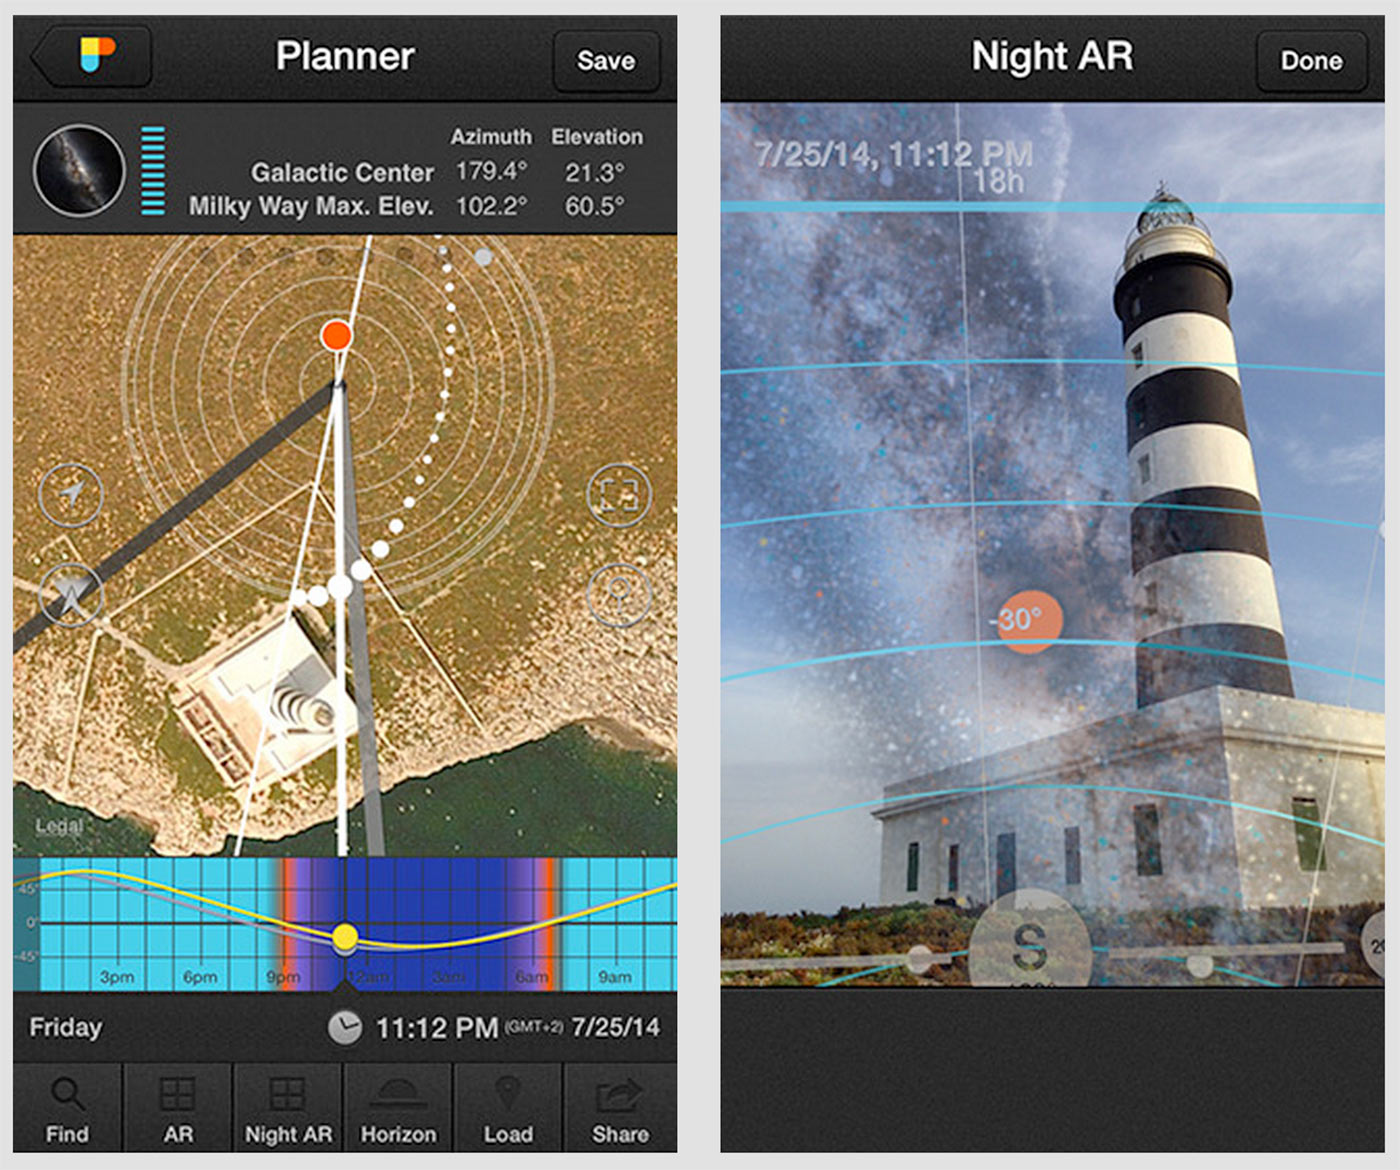
PhotoPills is a standout application for all types of photography planning. It’s also now available for both Apple iOS devices or for Android devices. Most notable for night photography is its augmented reality mode and 2D Milky Way planner, both of which are unique to PhotoPills.
The 2D Milky Way Planner in particular will allow you to simulate the arch of the galactic plane as an overlay on top of a map. I like this feature in particular because it makes it easy to plan your shooting position in order to align your landscape with the Milky Way.
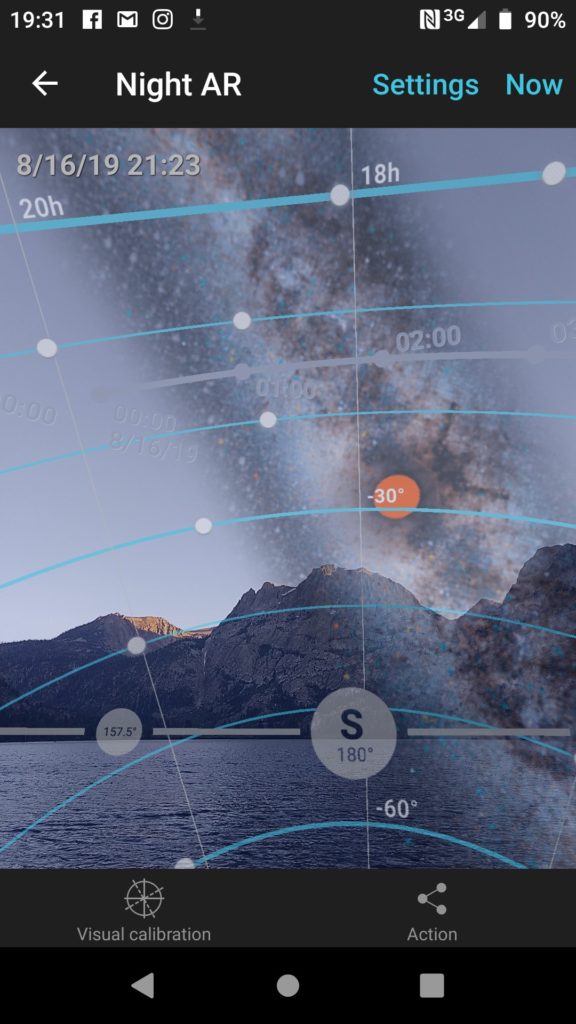
Even cooler than the 2D Milky Way projection is the PhotoPills Night AR function, which allows you to see where the Milky Way will be at any given time of night in augmented reality. Simply point your phone’s camera around your environment to see where the Milky Way will be at night.
The PhotoPills Night AR plan before sunset. 
The actual view of the Milky Way at night.
The AR tool allow you you nearly perfectly visualize where the Milky Way galactic center will be at any time, making it possible to pre-visualize your photographic composition, even hours before the sun sets.
No other app has these combinations of tools and for that reason I think PhotoPills is arguably the best overall Milky Way planning app. The PhotoPills team has also put together an extensive guide for planning and photographing the Milky Way that complements a lot of the content available here on Lonely Speck.
SkyGuide for iOS
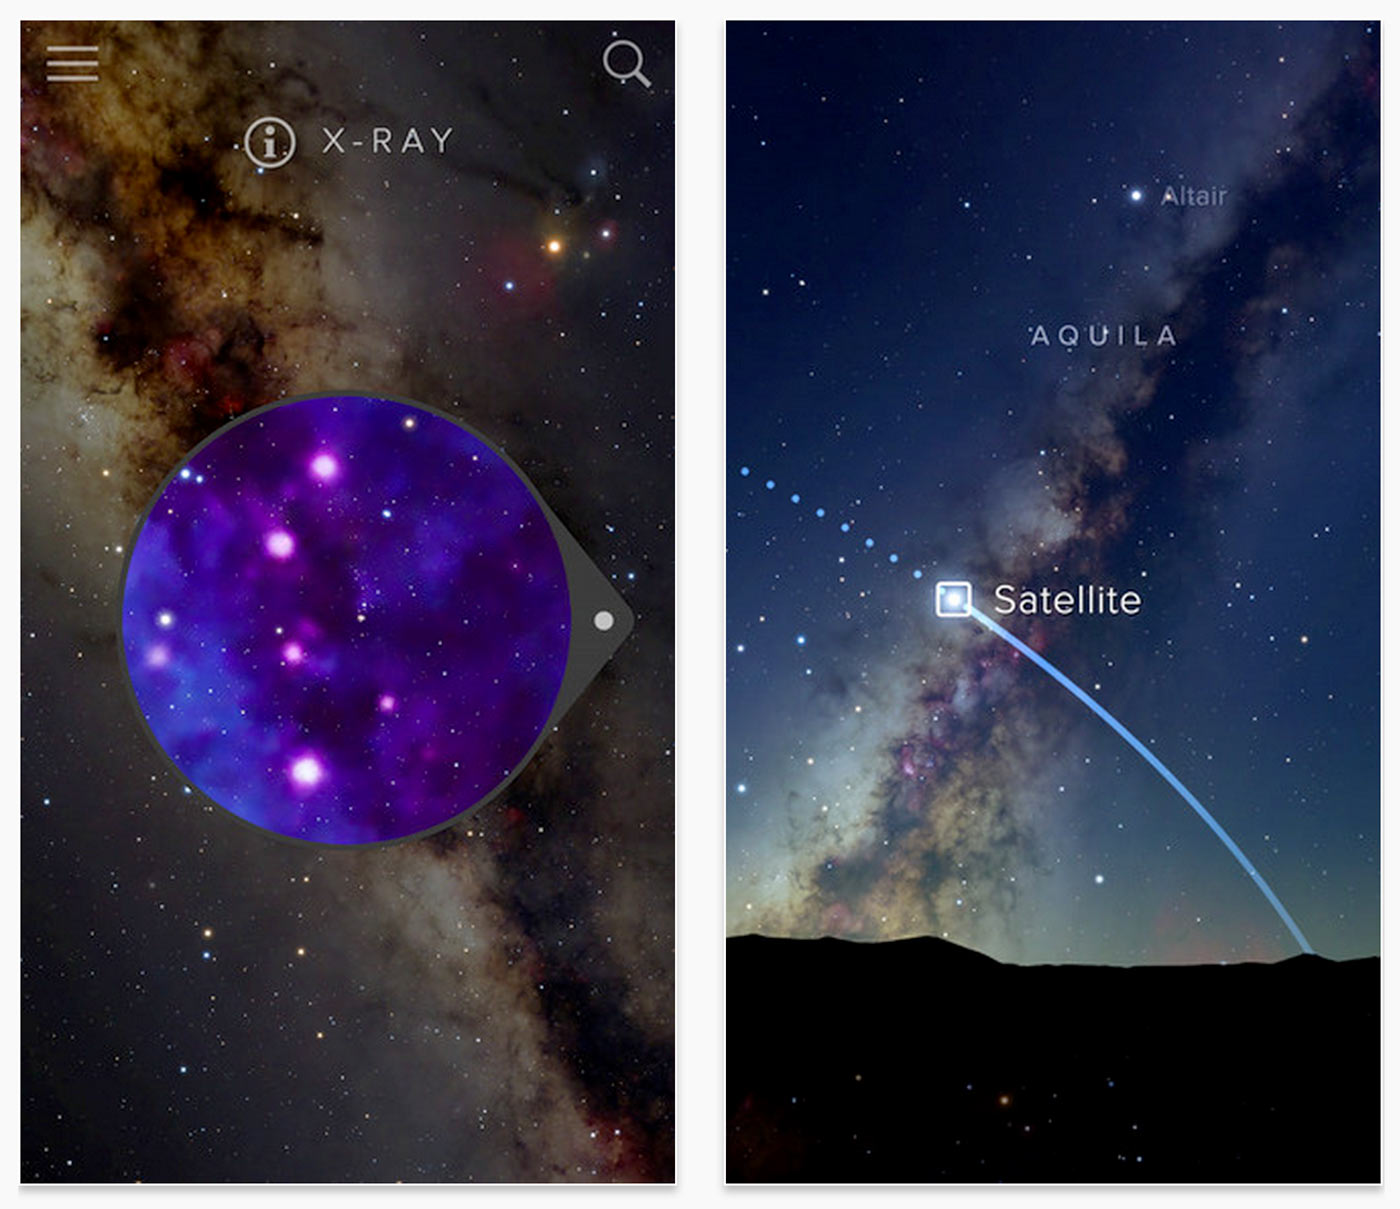
While PhotoPills is the undisputed champ for planning Milky Way photography, sometimes you might want to learn more about what you’re seeing in the night sky. Constellations, nebula, planets, and even satellites. That’s where SkyGuide and Stellarium come in.
I have a particular preference for SkyGuide because it has the most photorealistic representation of the night sky. It was made by Nick Risinger, creator of skysurvey.org. Nick traveled to two different corners of the globe to capture more than 30,000 exposures to create the most complete and detailed mosaic of our night sky. That mosaic is fully represented in Nick’s SkyGuide iOS app and that makes it one of my favorite apps. It allows you to orient your phone to see where the galactic plane will be.
Stellarium Mobile
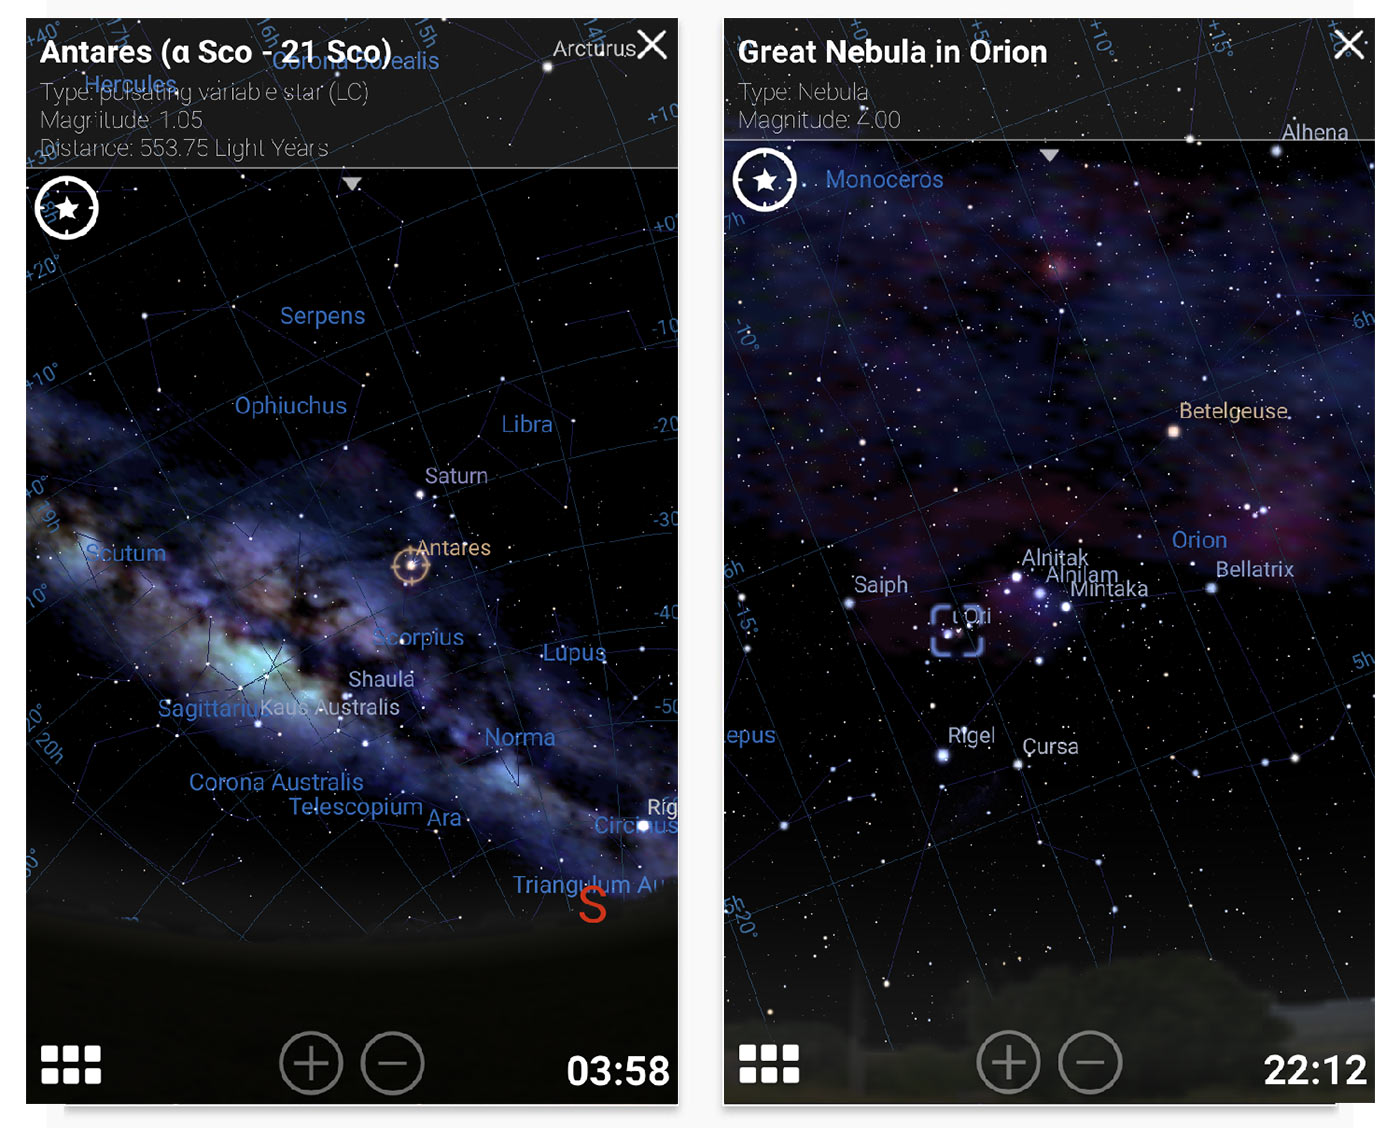
Unfortunately, SkyGuide is not available for Android. Stellarium Mobile, which is a commercial port of my favorite planetarium software for the computer (stellarium.org), is my favorite sky map app on the Android Platform. It too uses the skysurvey.org mosaic for representing the Milky Way but it’s much lower resolution than the graphics available in SkyGuide. One trick if you’re using Stellarium Mobile: open the “Advanced” settings and turn up the Milky Way brightness. Just like the PhotoPills Augmented Reality mode and SkyGuide, Stellarium Mobile can use your phone’s compass and accelerometers to allow you to see where the Milky Way will be as you reorient your phone. Stellarium Mobile is also available for iOS, but again I prefer SkyGuide for iOS devices.
The Best Desktop App for finding the Milky Way
Stellarium.org
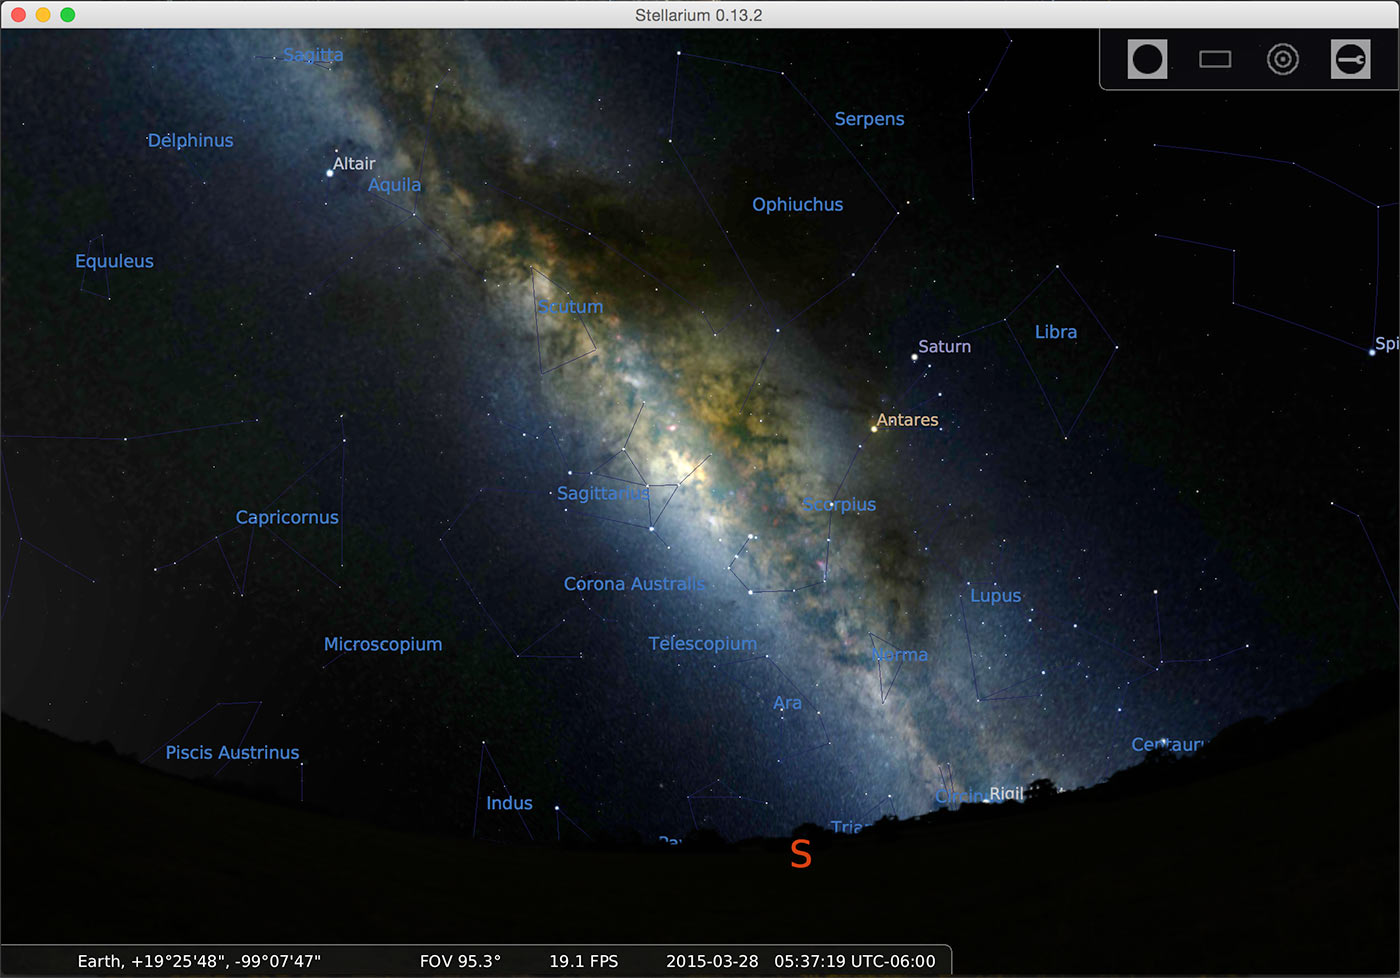
Last but certainly not least in my list of tools for finding the Milky Way is Stellarium.org. It’s an open source desktop computer app available for free on Mac, Linux and Windows. There’s even a browser version if you’re using a chromebook. It’s the core application that Stellarium Mobile is based on and it’s my personal favorite app for planning on the computer.
Finding the Milky Way without Tools
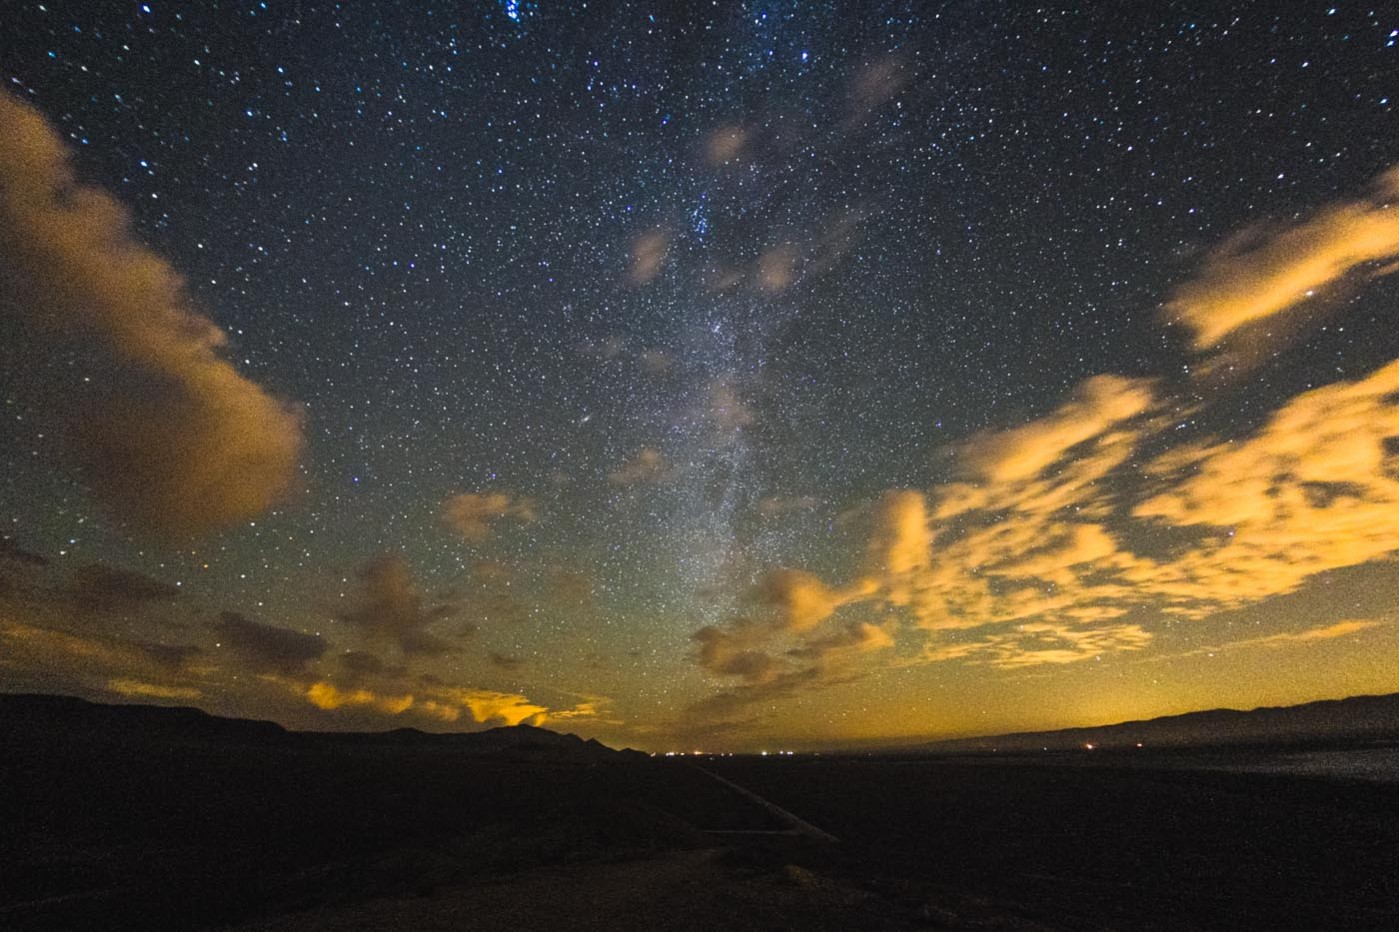
It’s kind of a weird thing to write about how to find the Milky Way because we’re technically in the Milky Way galaxy. Every star that you can see in the night sky is technically part of the Milky Way so when I say “how to find the Milky Way,” what I actually mean is “how to find the Milky Way galactic plane” or even more specifically, “how to find the Milky Way galactic center.” To start, let’s take a look at one of my photographs of the Milky Way from Trona Pinnacles, California:
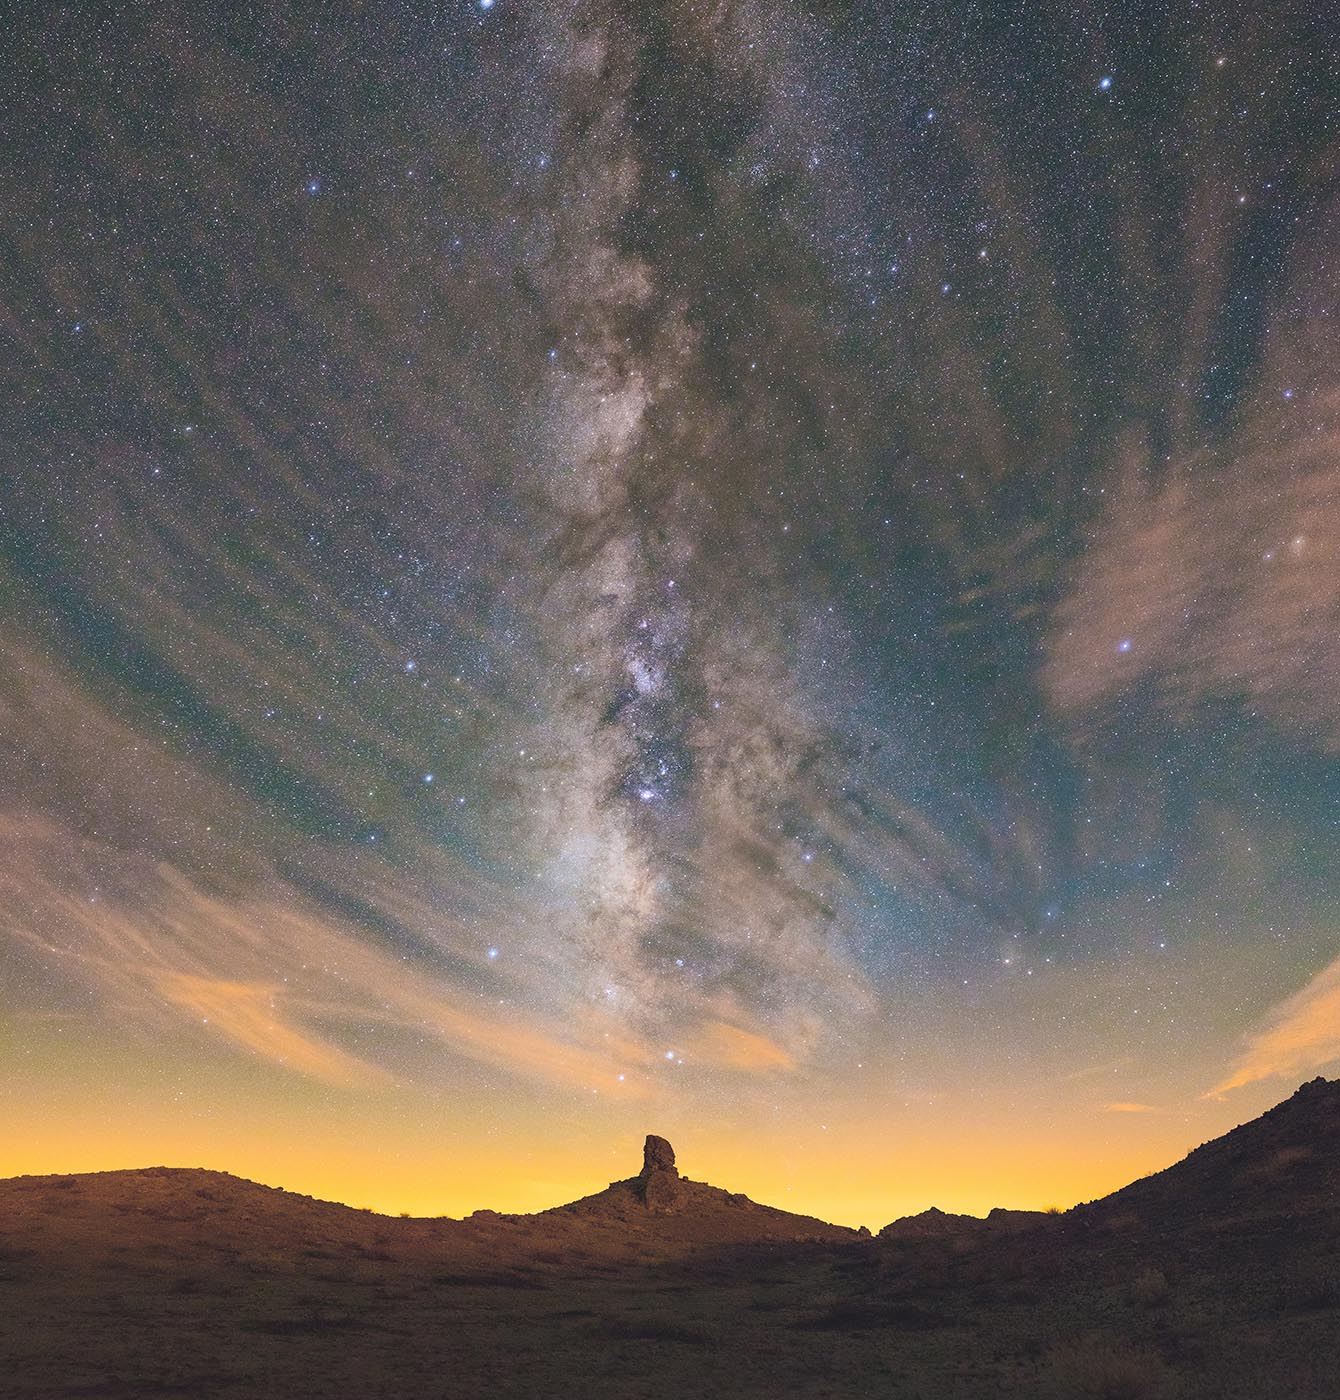
That really bright part of the Milky Way, right above the lone pinnacle? That’s the galactic center, the bright glowing core of our galaxy about which our entire solar system revolves. Our sun moves around the core of our galaxy at an estimated one revolution per every 240 million years. In this image, the galactic plane extends vertically out of the frame. On any dark, clear night, in most parts of of the world, it’s almost always possible to see a portion of the galactic plane at some moment of the night. The galactic plane can be found arching across some portion of the sky. Usually the plane of the galaxy is where most of the stars will be visible in the night sky. That’s the part of the sky that we’ll want to photograph.
Now if you’re in a dark enough place, the Milky Way should already be visible to the naked eye (though not as obvious as it appears in a long-exposure photo). That said, there are some particularly important constellations to remember so you know what to expect depending on where you point your camera. There are many constellations that can be found along the galactic plane, but these six will help you find the best photographic results. If you learn to recognize these constellations, you’ll have no trouble finding the plane of the Milky Way, even in light polluted conditions when the position of the Milky Way may not be obvious. At least one of these constellations should be visible on any given night, and they tend to be the easiest to learn how to find.
Major Constellations along the Milky Way Galactic Plane:
- Scorpius
- Sagittarius
- The Summer Triangle
- Cassiopeia
- Crux or the Southern Cross
- Orion
Scorpius
Scorpius is probably my favorite constellation in the night sky. It’s specifically characterized by the bright star Antares, also know as “The Heart of the Scorpion” and is accompanied by an arc of stars that form the body of the scorpion-shaped constellation. Antares is notable as one of the brightest stars in the sky and it has a distinctly orange-yellow color which makes it stand out from many of the other stars. The colorful stars and dark dust clouds surrounding Antares are collectively known as the Rho Ophiuchi Cloud Complex.

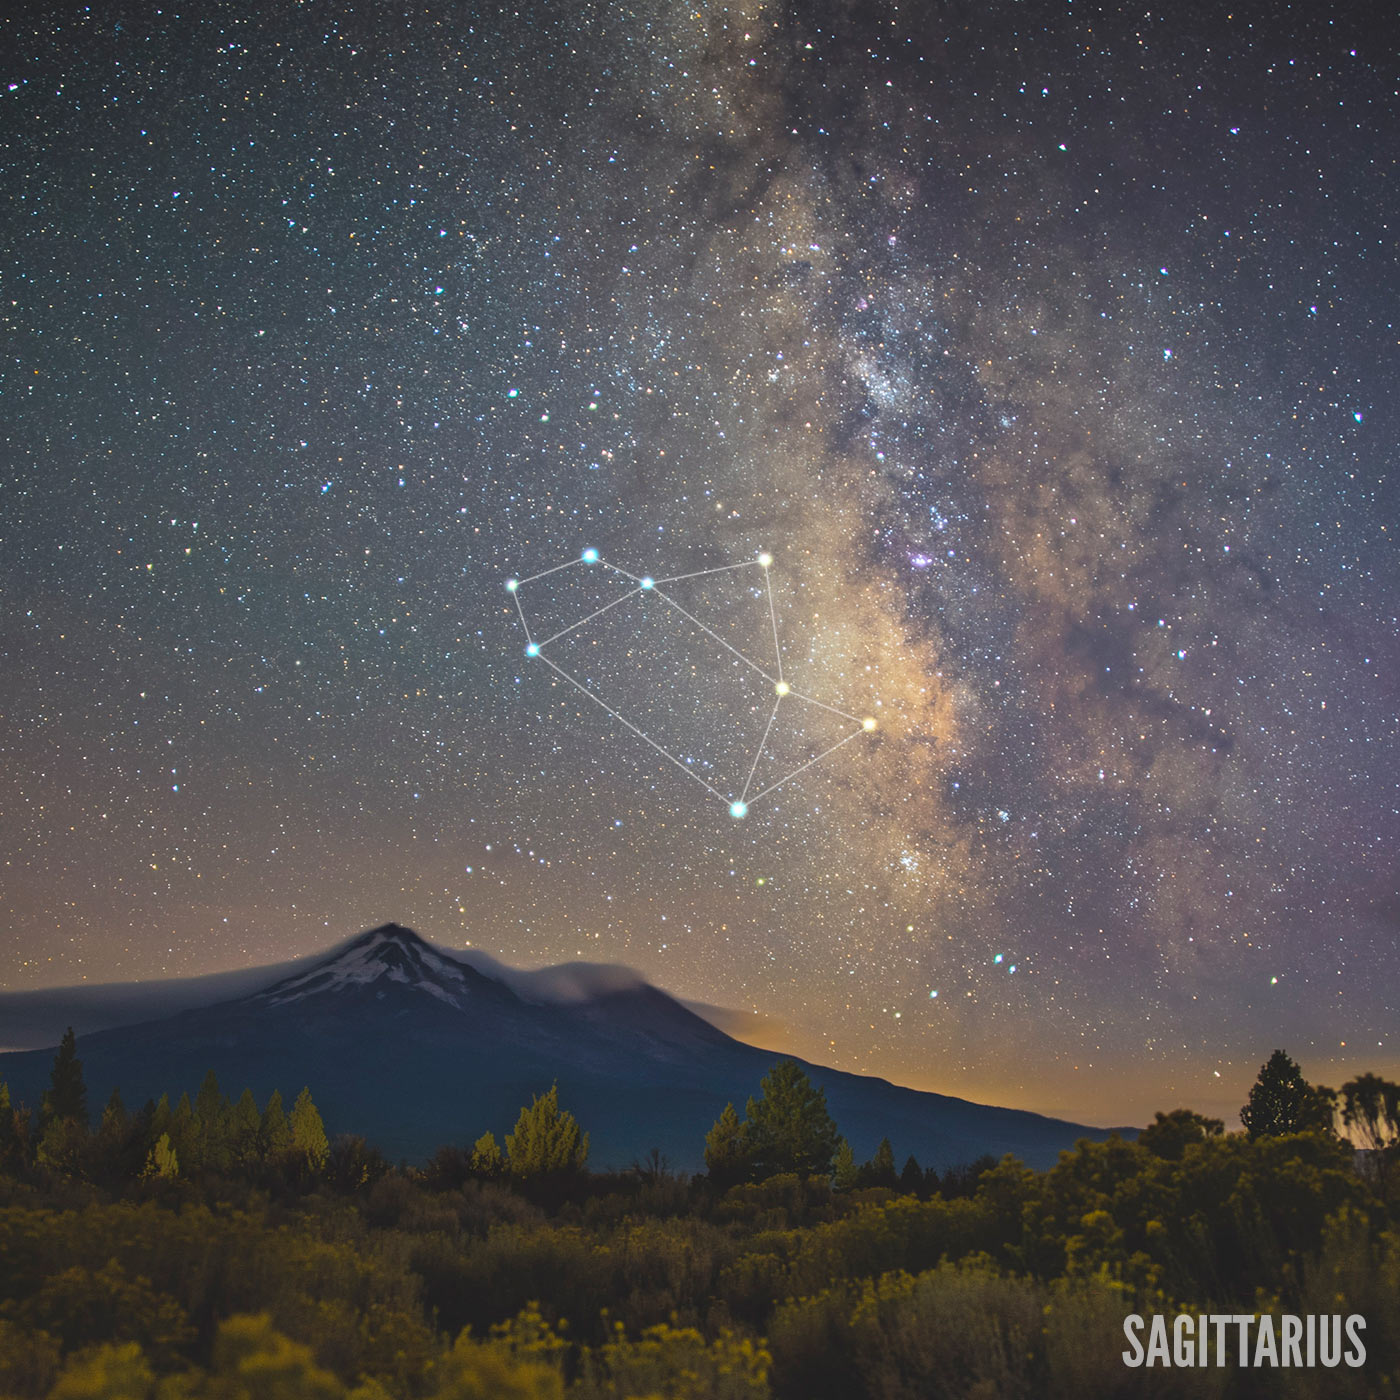
Sagittarius
Sagittarius is situated almost exactly at the brightest part of the Milky Way. Since that part of the sky is particularly dense with stars, Sagittarius is usually a bit harder to find, but it’s notable because it directly points out where the brightest part of the night sky will be. Sagittarius is supposed to be shaped like a centaur drawing a bow, but the brightest stars in the constellation form a more recognizable “teapot” shape. The spout of the teapot is located right on the bright bulge of the galactic center.
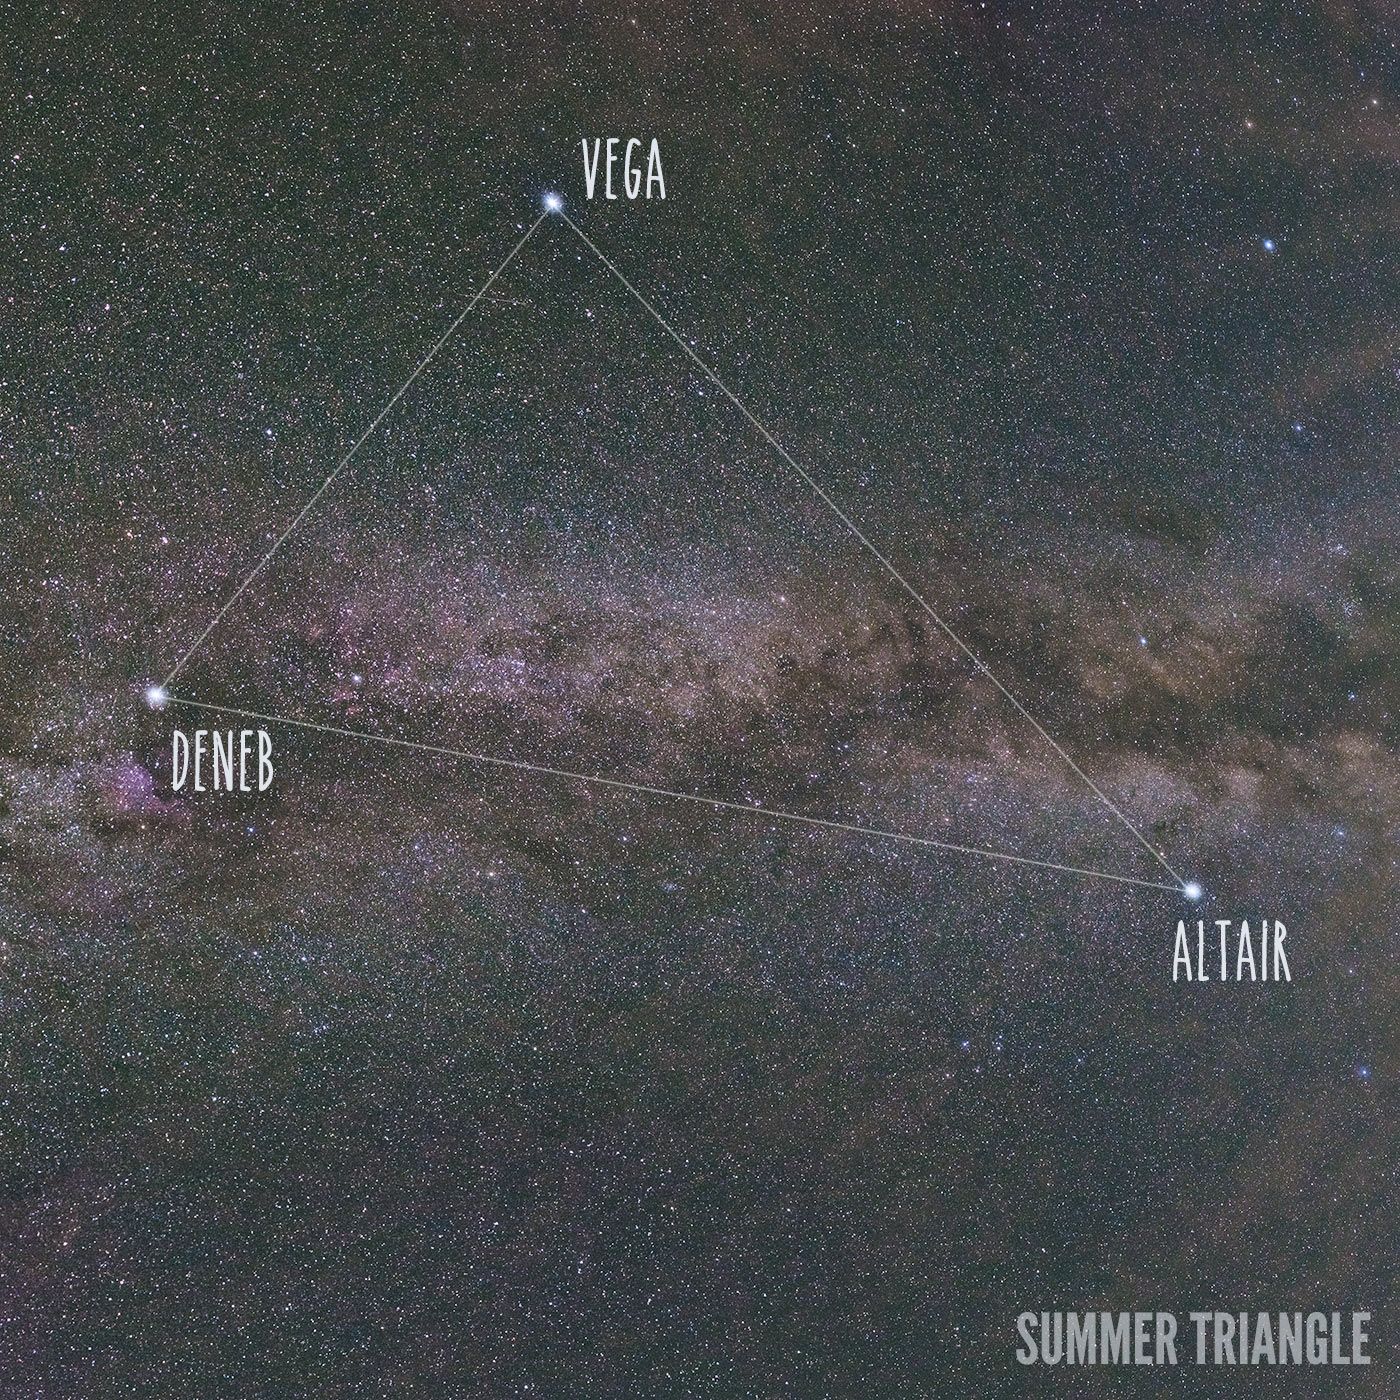
The Summer Triangle
The Summer Triangle is particularly helpful for finding the galactic plane in the Northern Hemisphere. This portion of the galactic plane is home to three of the brightest stars in the sky: Deneb (the tail of Cygnus, the swan), Altair, and Vega. These three bright stars are some of the brightest stars visible in the Northern Hemisphere’s summer and are usually visible high in the sky in May, June and July. Deneb in particular is nice to capture in a photograph because it’s located right next to a colorful pink nebula called the North American nebula.
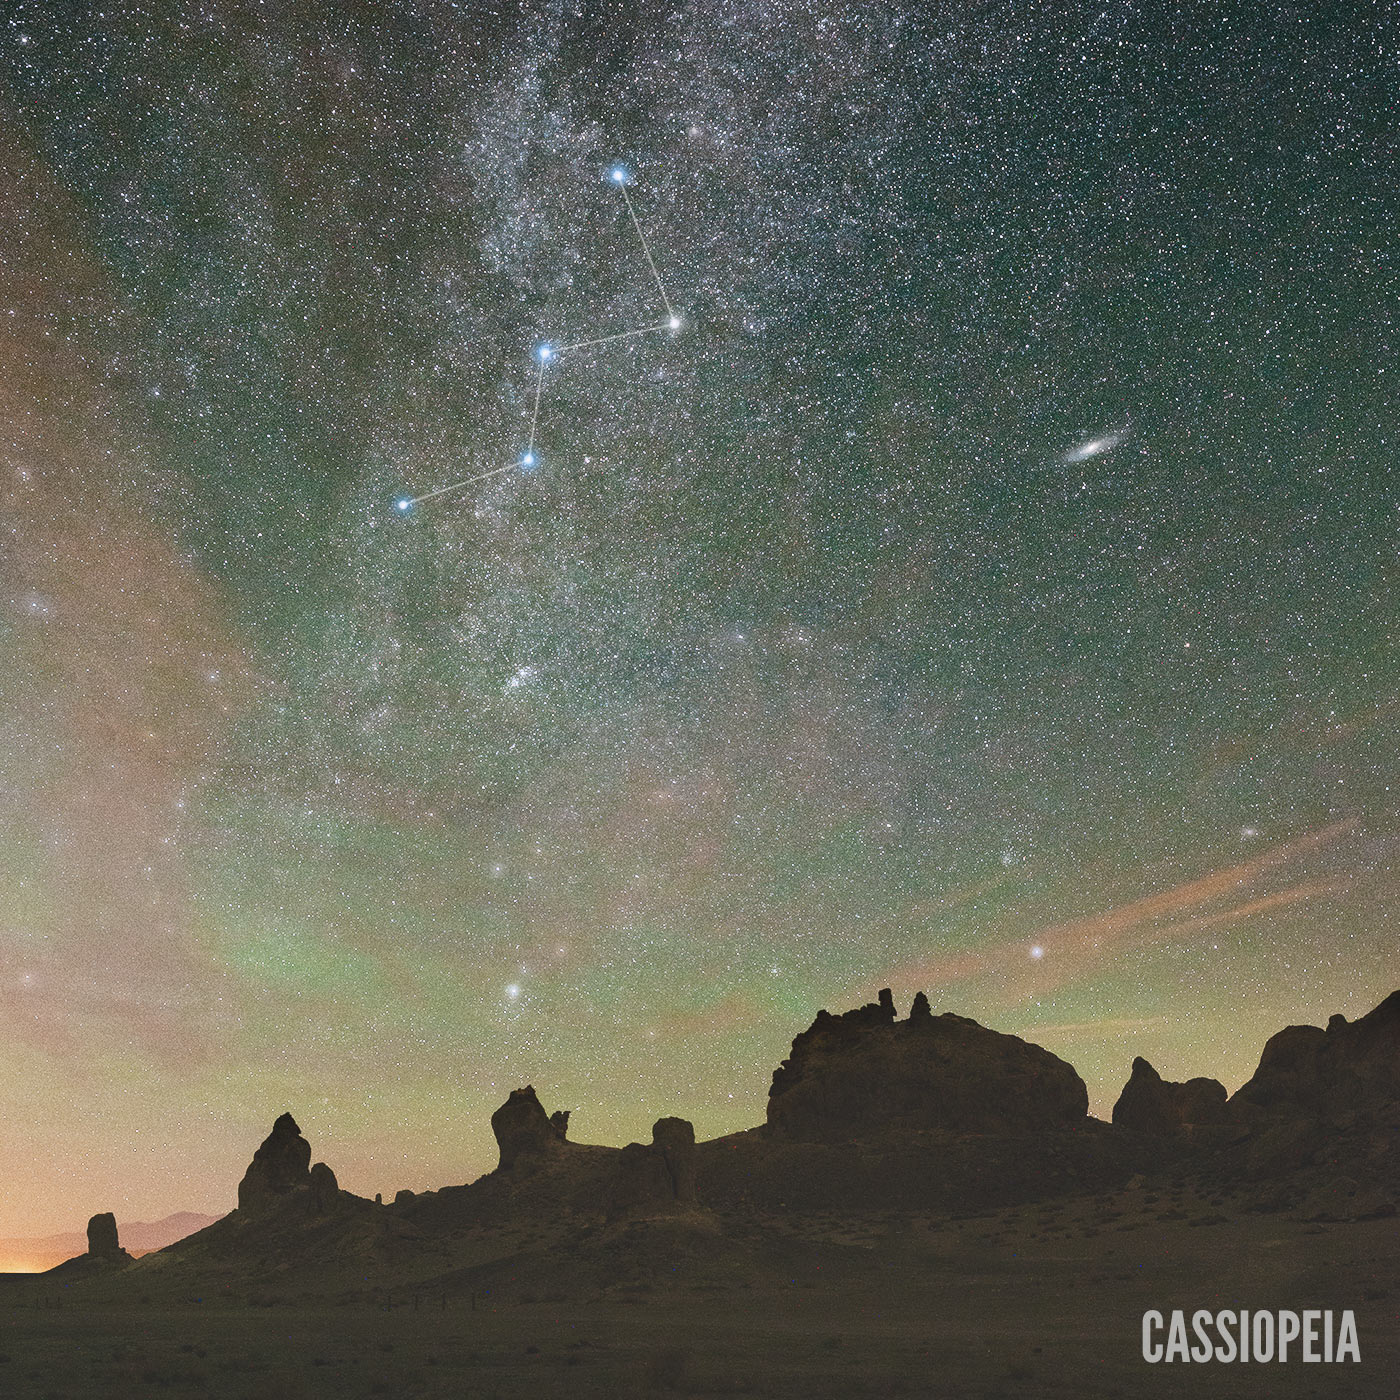
Cassiopeia
In the Northern Hemisphere, Cassiopeia is visible almost the entire year. It’s easy to find because it’s shaped like a giant “W” in the night sky. It’s one of the most northerly constellations and it’s notable because it’s adjacent to Polaris, the north star. I also use it as a guide to locate the galaxy Andromeda, the nearest full size galaxy to the Milky Way. Andromeda is visible to the right of Cassiopeia in the photo below.
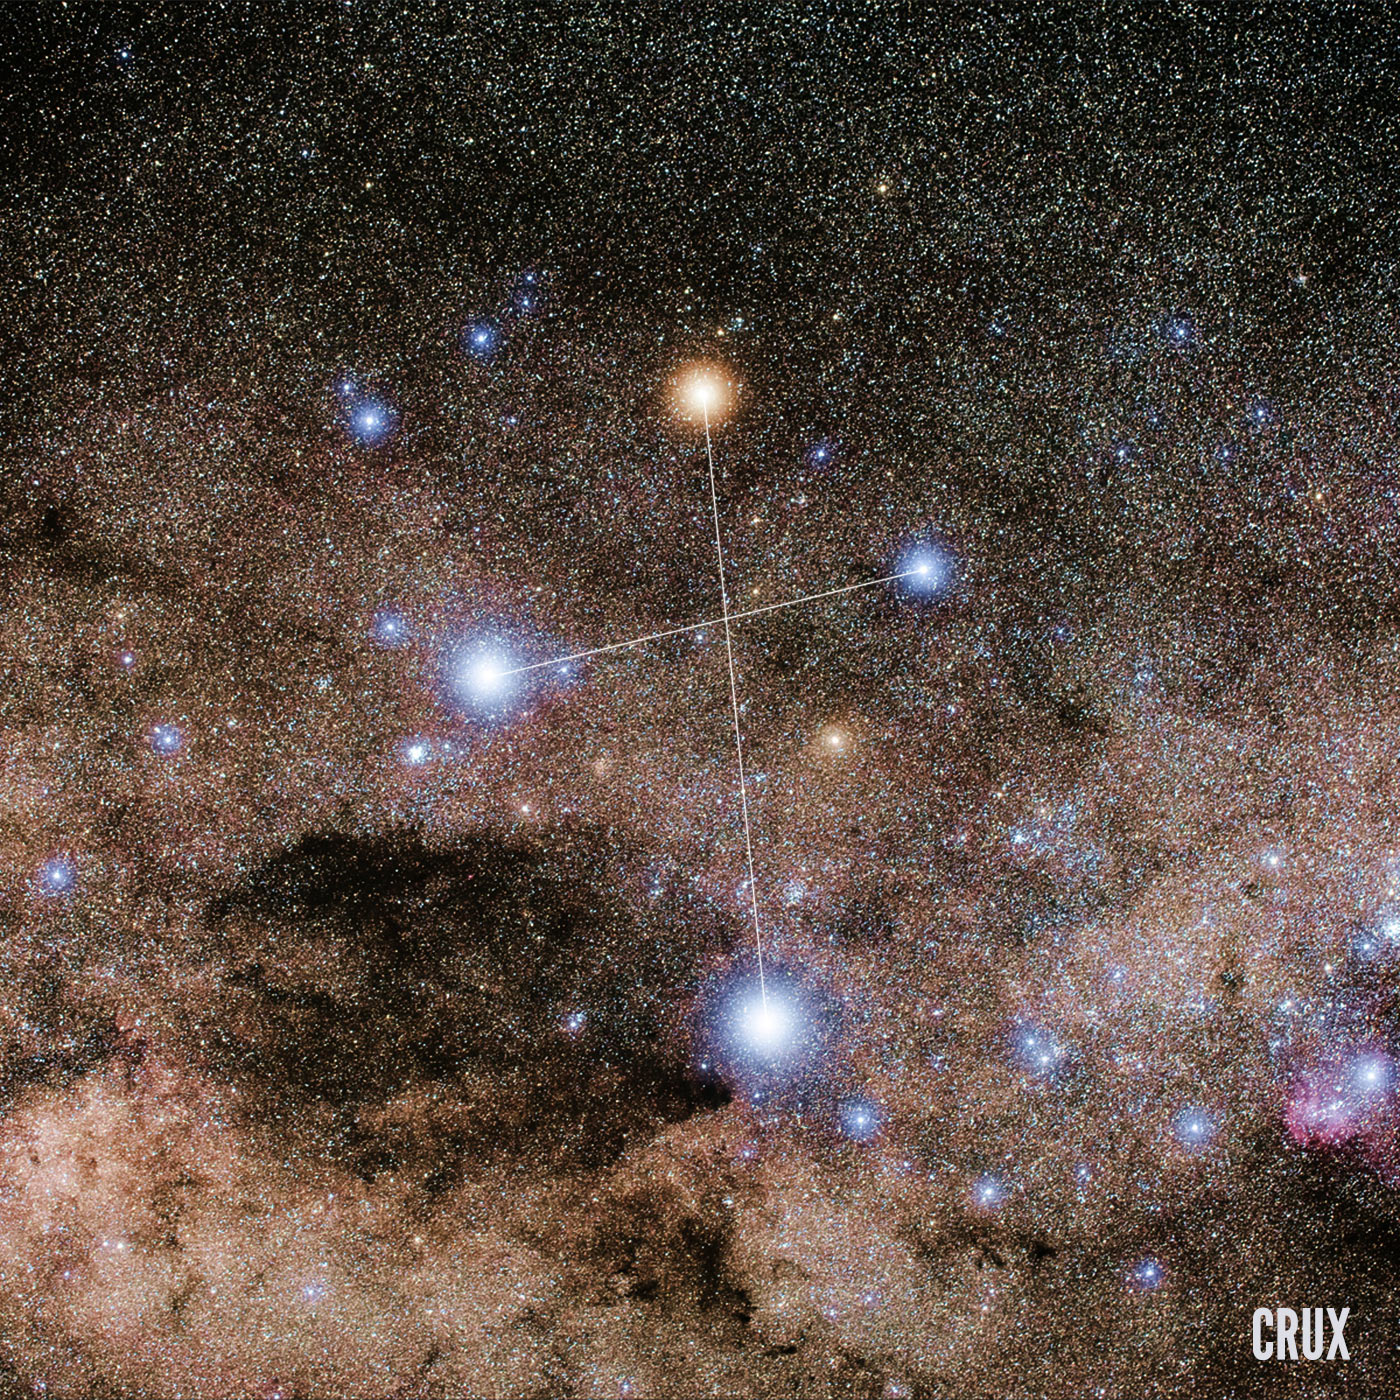
Crux or the Southern Cross
In the Southern Hemisphere, Crux is the constellation that is visible as an almost perfect cross with some of the brightest stars in the sky. It sits right on the galactic plane.
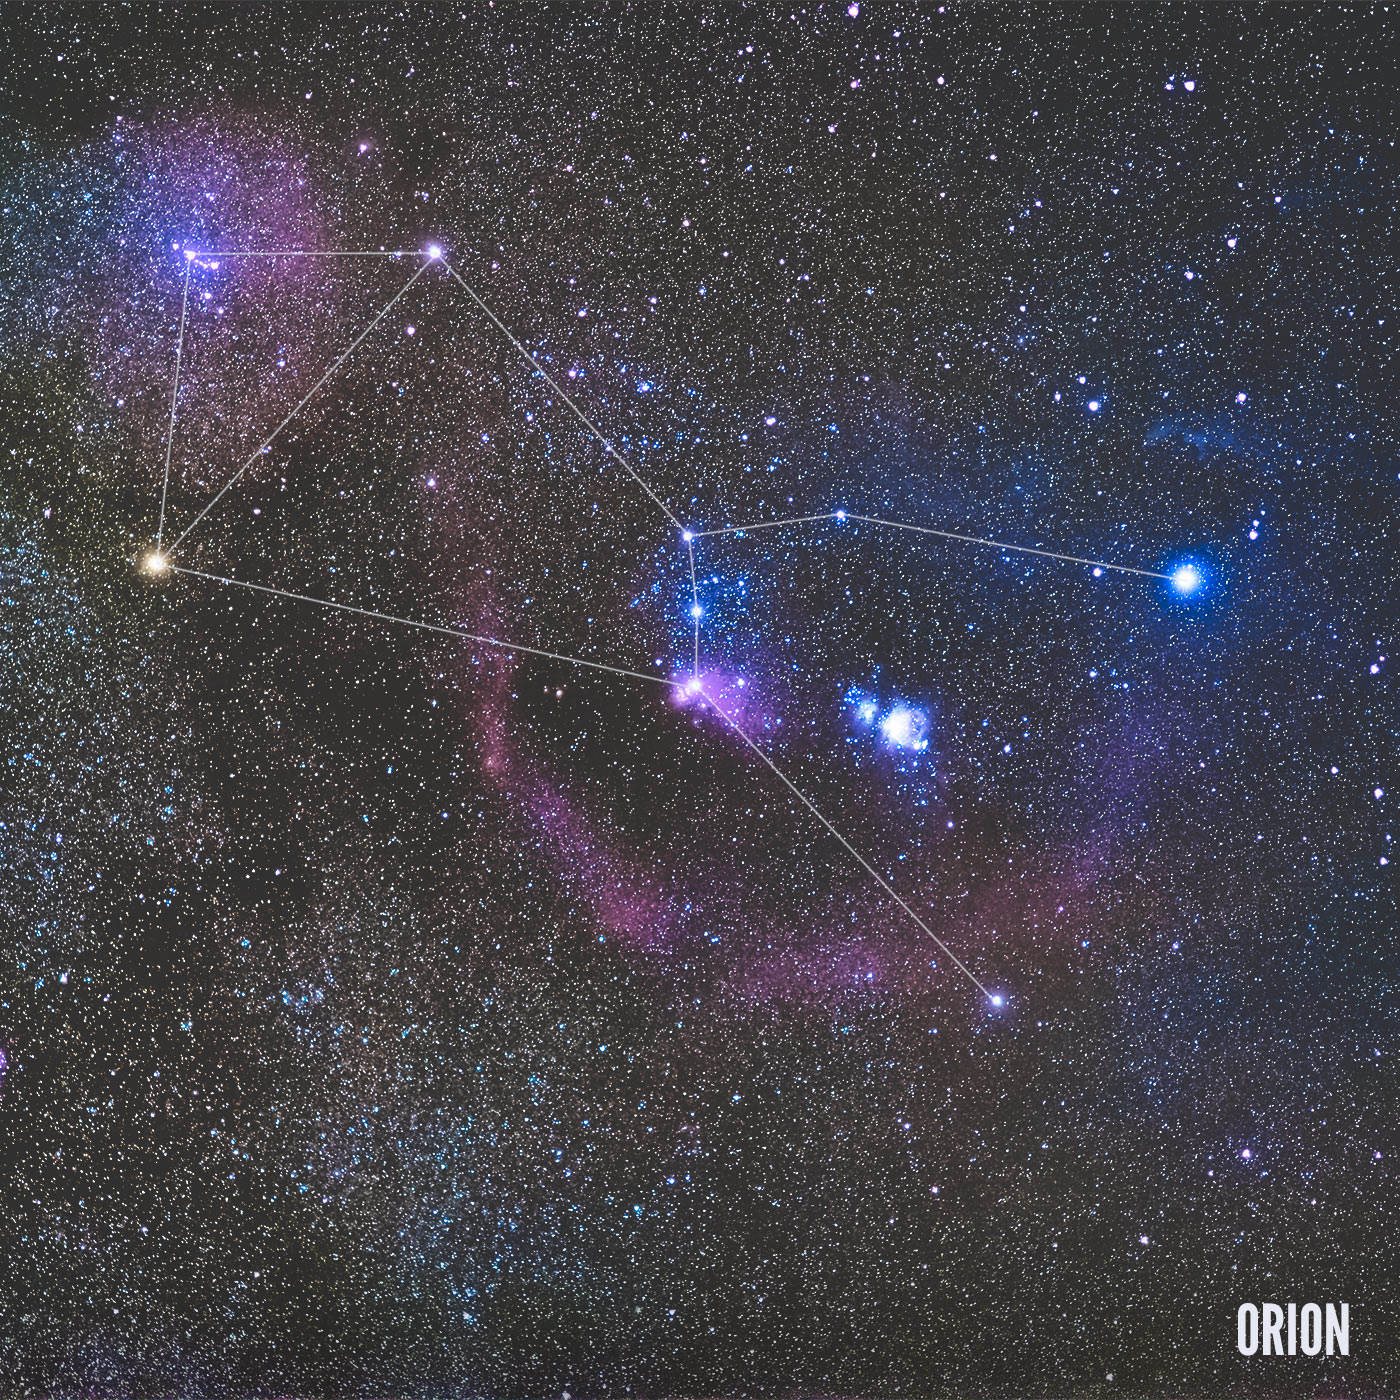
Orion
Orion is the part of the Milky Way that’s easiest to see in the “quiet season” of the night sky from September through April. Orion is positioned near the galactic plane almost directly opposite the galactic center. It’s immediately recognizable in the sky by the three bright stars that make up Orion’s belt. I like shooting photos of Orion because of its large amount of colorful nebula and bright stars. I think Orion is one of my favorite parts of the night sky and I’ve made a tutorial specifically about shooting Orion.
These constellations are your tools for finding the Milky Way. Try using your smartphone app to help look for these constellations to learn how to recognize them. After several sessions of night sky gazing, you’ll become more adept at recognizing these important parts of our home galaxy. Now all you’ll need are some clear dark skies and some simple photo equipment like a camera, a fast lens and tripod to learn how to photograph the Milky Way. If you have any questions or comments feel free to chime in on the comments below.
I hope you enjoyed this article. If you’re interested in learning more about photographing the Milky Way, check out the rest of the Astrophotography 101 lessons or head straight on over to How to Photograph the Milky Way.
Disclosure
We are a participant in the Amazon Services LLC Associates Program, an affiliate advertising program designed to provide a means for us to earn fees by linking to Amazon.com and affiliated sites. We are also a participant in the B&H Affiliate Program which also allows us to earn fees by linking to bhphotovideo.com.
Learn Astrophotography
Astrophotography 101 is completely free for everyone. All of the lessons are available on the Lonely Speck Astrophotography 101 page for you to access at any time. Enter your email and whenever we post a new lesson you’ll receive it in your inbox. We won’t spam you and your email will stay secure. Furthermore, updates will be sent out only periodically, usually less than once per week.
Help us help you!
Believe it or not, Lonely Speck is my full-time job. It’s been an amazing experience for us to see a community develop around learning astrophotography and we’re so happy to be a small part of it. I have learned that amazing things happen when you ask for help so remember that we are always here for you. If you have any questions about photography or just want to share a story, contact us! If you find the articles here helpful, consider helping us out with a donation.
[button font_size=”16″ color=”#136e9f” text_color=”#ffffff” url=”https://www.paypal.com/cgi-bin/webscr?cmd=_donations&business=lonelyspeckblog%40gmail.com&item_name=These+tips+help+keep+lonelyspeck.com+running.¤cy_code=USD&source=url” target=”_blank”]Donate[/button]
Thanks so much for being a part of our astrophotography adventure.
-Ian
[button font_size=”16″ color=”#136e9f” text_color=”#ffffff” icon=”arrow-left” url=”https://www.lonelyspeck.com/astrophotography-101/” target=”_self”]Back to Astrophotography 101[/button]
Any suggestion on exposure for milky way?
Two places to go on Lonely Spec…
Tools menu / Milky Way exposure calculator
and
Tutorials / How to shoot the Milky Way.
Have Fun.
What’s the easiest way to earn $30000 a month: http://v.ht/xw5NfrW?&isjgd=ZZtEo
UPDATE: Cryptocurrency Investing Strategy – Q2 2019. Receive passive income of $ 70,000 per month: http://cort.as/-PP_R?Pu0P3e
Android users rejoice! PhotoPills is now available on Android.