

In this article I review one of the most common problems that affects the design of our camera lenses: aberrations.
I hope to give you practical knowledge about the common technical problems of lens design and how they actually affect your photos. Most of all, this article is here to help you understand one aspect of why one lens will produce a better, more accurate photo than another. It’s an especially nice bit of knowledge to have when choosing equipment for use in even basic astrophotography.
This is sort of a pixel peepers’ article: you could go through your entire photography career and never learn about lens aberrations and be just fine. But if you like the idea of understanding the fine details behind lens performance — and how it affects your photos — this article is for you.
Reading a press release for a recent lens announced by Sigma will give you a taste of the geekery that surrounds the world of optics:
“The Sigma 24-35mm f/2 DG HSM Art incorporates large-diameter aspherical lens elements… one Low Dispersion glass and seven Special Low Dispersion glass elements, of which two are aspherical lenses. The advanced optics and optimized lens power distribution minimize spherical aberration, axial chromatic aberration and field curvature, resulting in outstanding optical performance.”
So what is Sigma bragging about? When we hear that a lens has “minimized spherical aberration” and uses “low dispersion glass” should we even care?
Let’s spend some time learning about lens aberrations and the optical challenges that lens designers like to brag about so that we can get a better understanding of how they actually affect our photos, especially in astrophotography.
I’ve done my best to be accurate and factual in my explanations of lens aberrations to give a practical set of knowledge for photographers. I don’t claim to be an expert on lens design or optics, and I’m hoping this article doesn’t delve too far into the technical realm. Okay, let’s start!
What is an aberration?
An aberration is simply an imperfection in the way a lens focuses light. There are a number of different classifications of aberrations, and they affect things like the sharpness, color, focus, magnification, and distortion in your photographs.
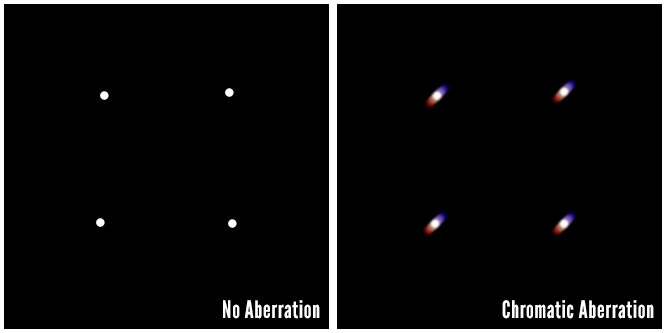
From the lens designer’s perspective, aberrations are the primary challenge when designing a lens. It is almost entirely the presence of aberrations that limits a lens’s performance from a standpoint of accurate image reproduction. Ideally, a lens designer wants a white pinpoint of light to always look like a white pinpoint of light, regardless of its position in the frame. But that’s not always how it turns out, especially when using fast wide angle lenses, like the lenses I recommend most for shooting landscape astrophotography.
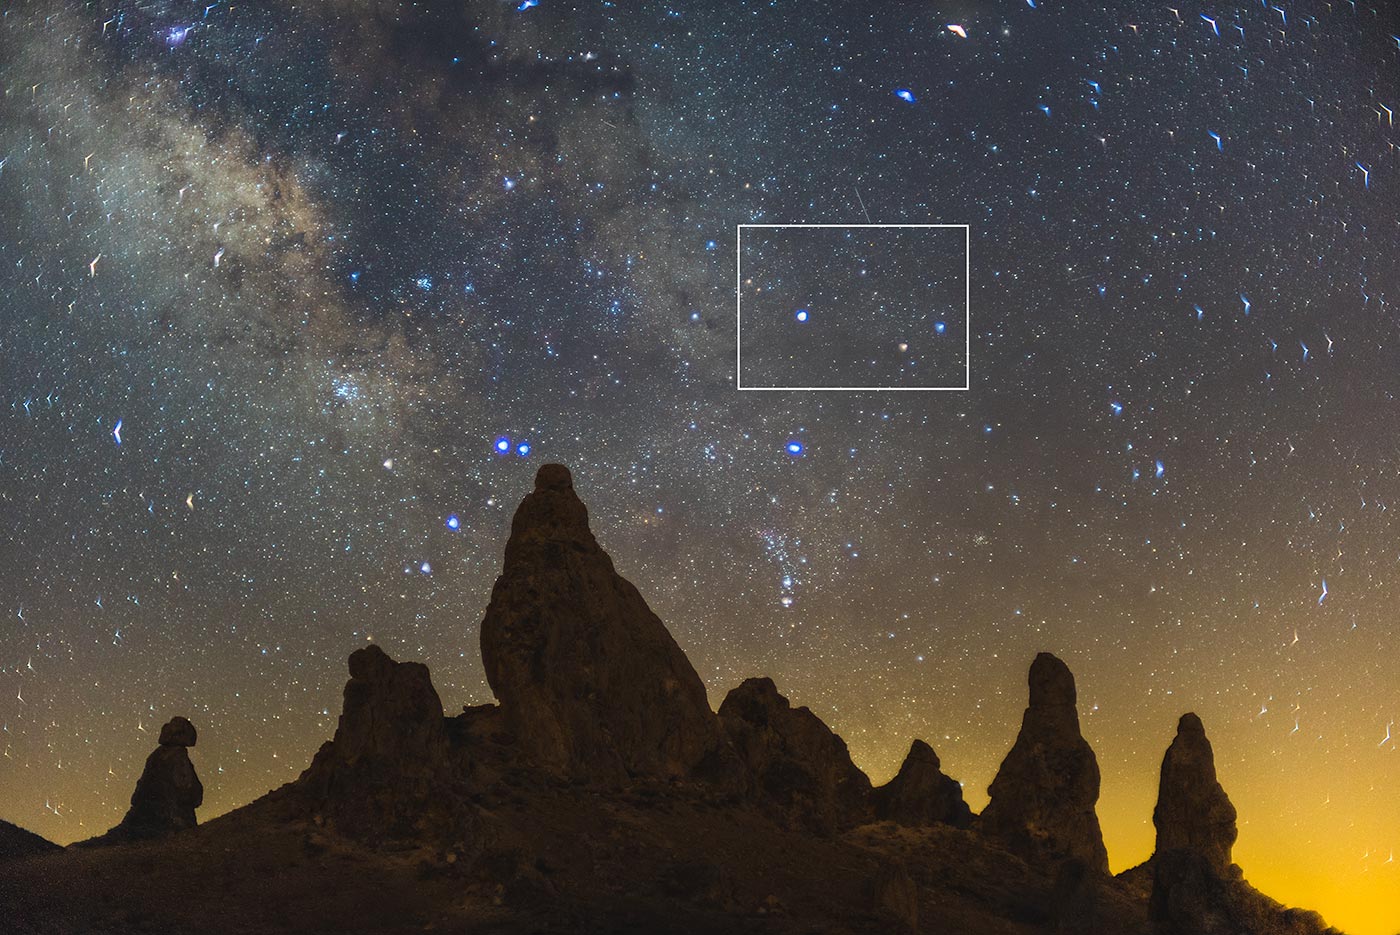
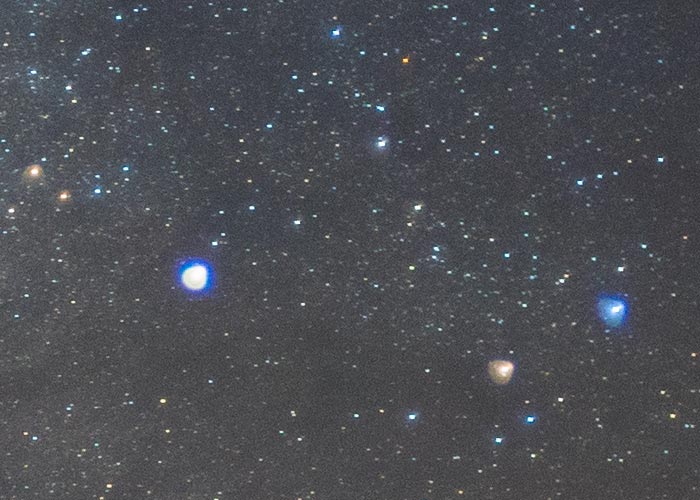
In astrophotography, our subject tends to be point sources of light (stars) against a highly-contrasting dark background (space) so the presence of lens aberrations can appear to be more prevalent in astrophotos than in other types of photography.
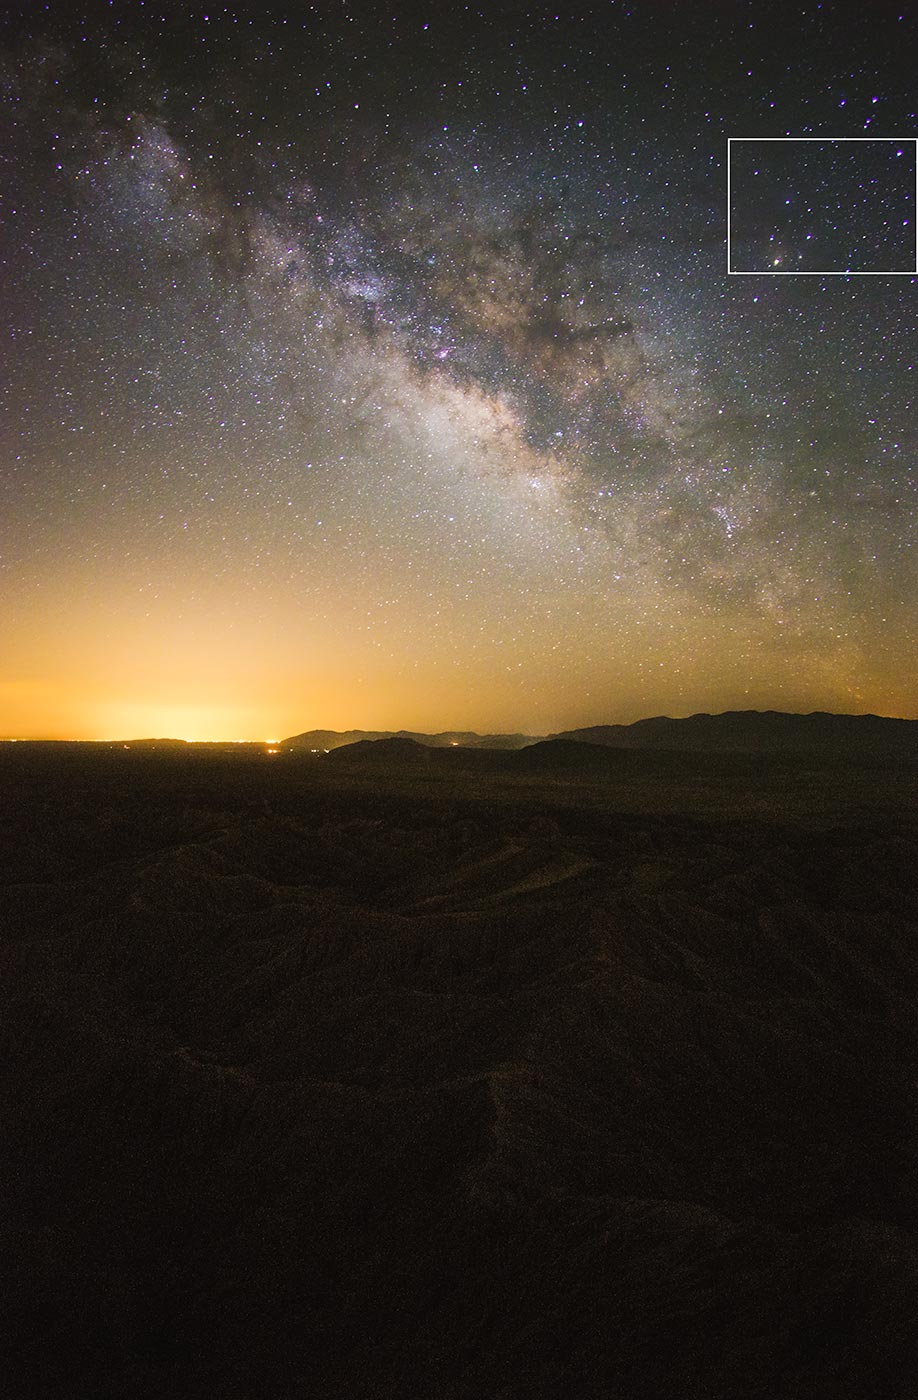
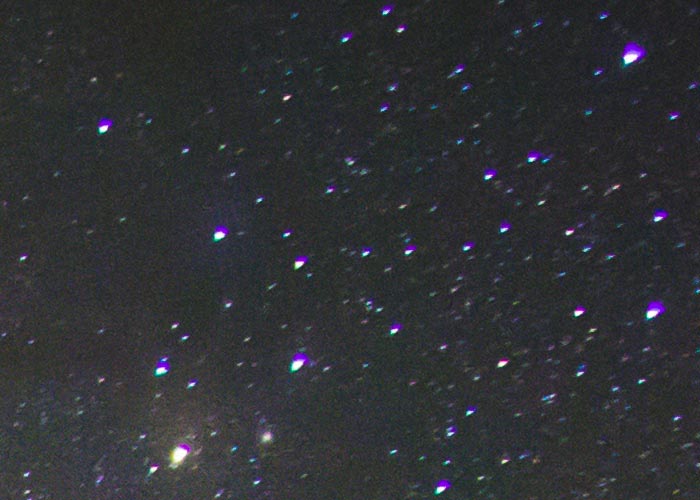
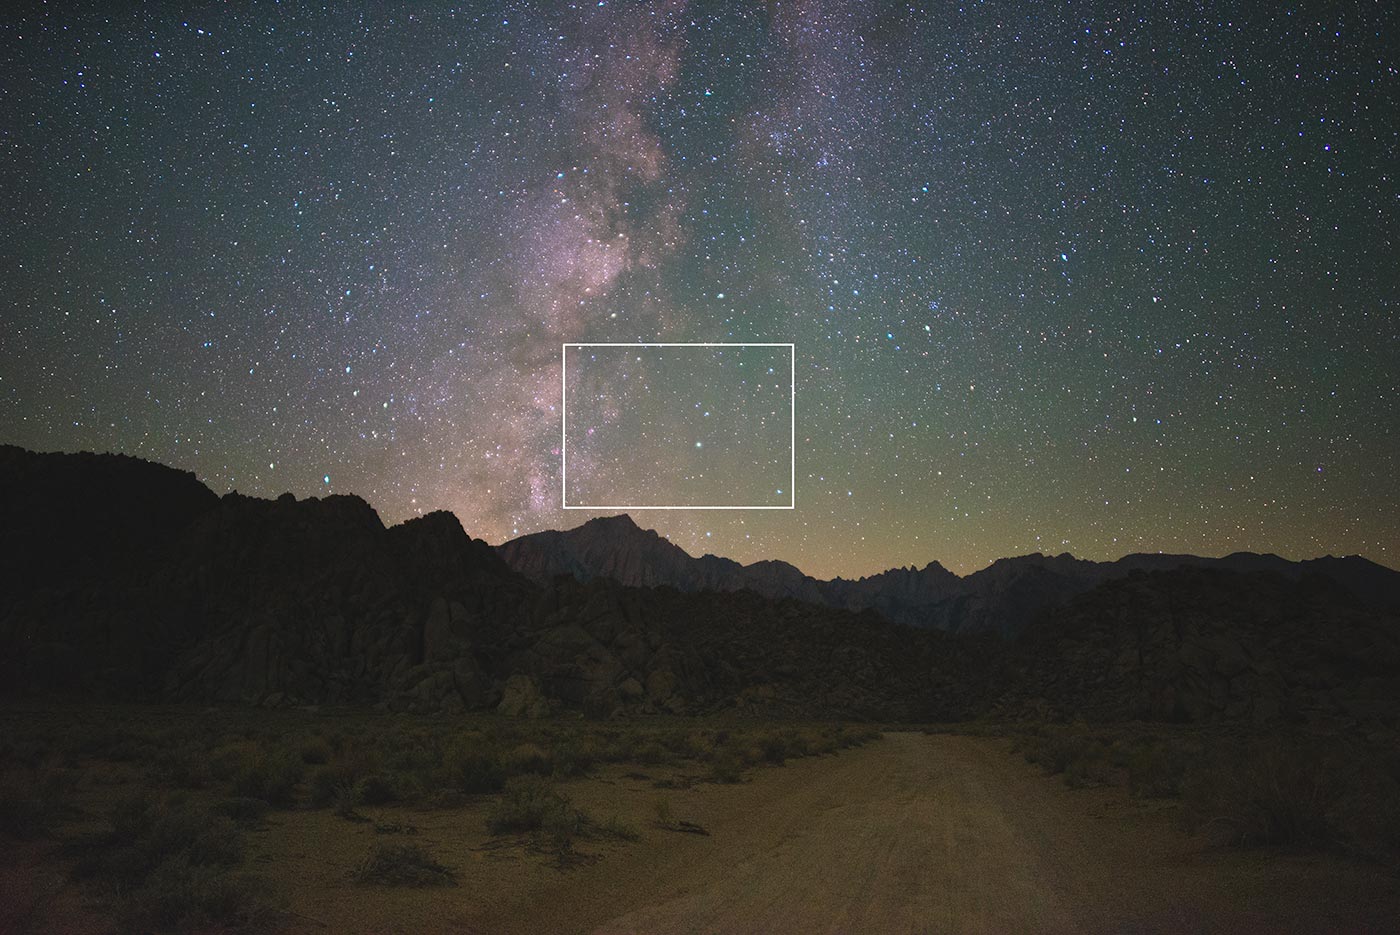
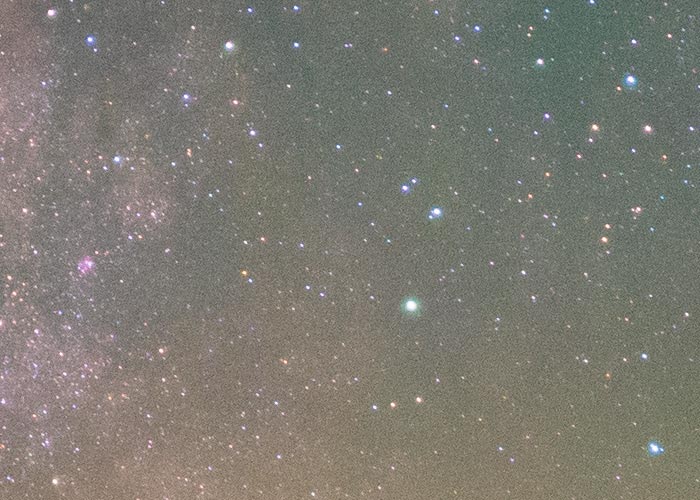
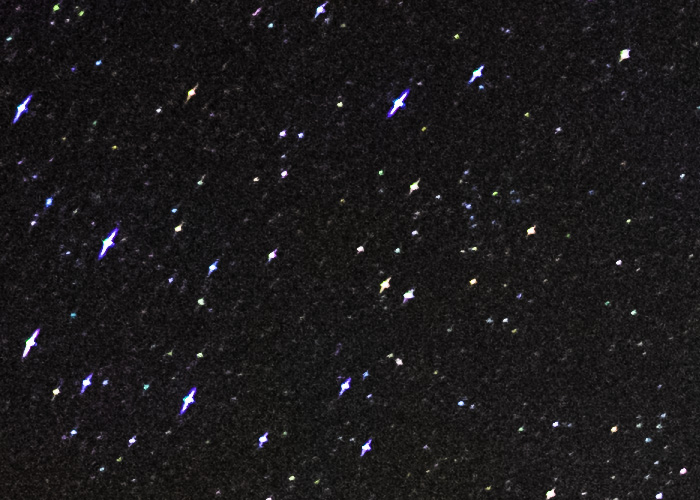
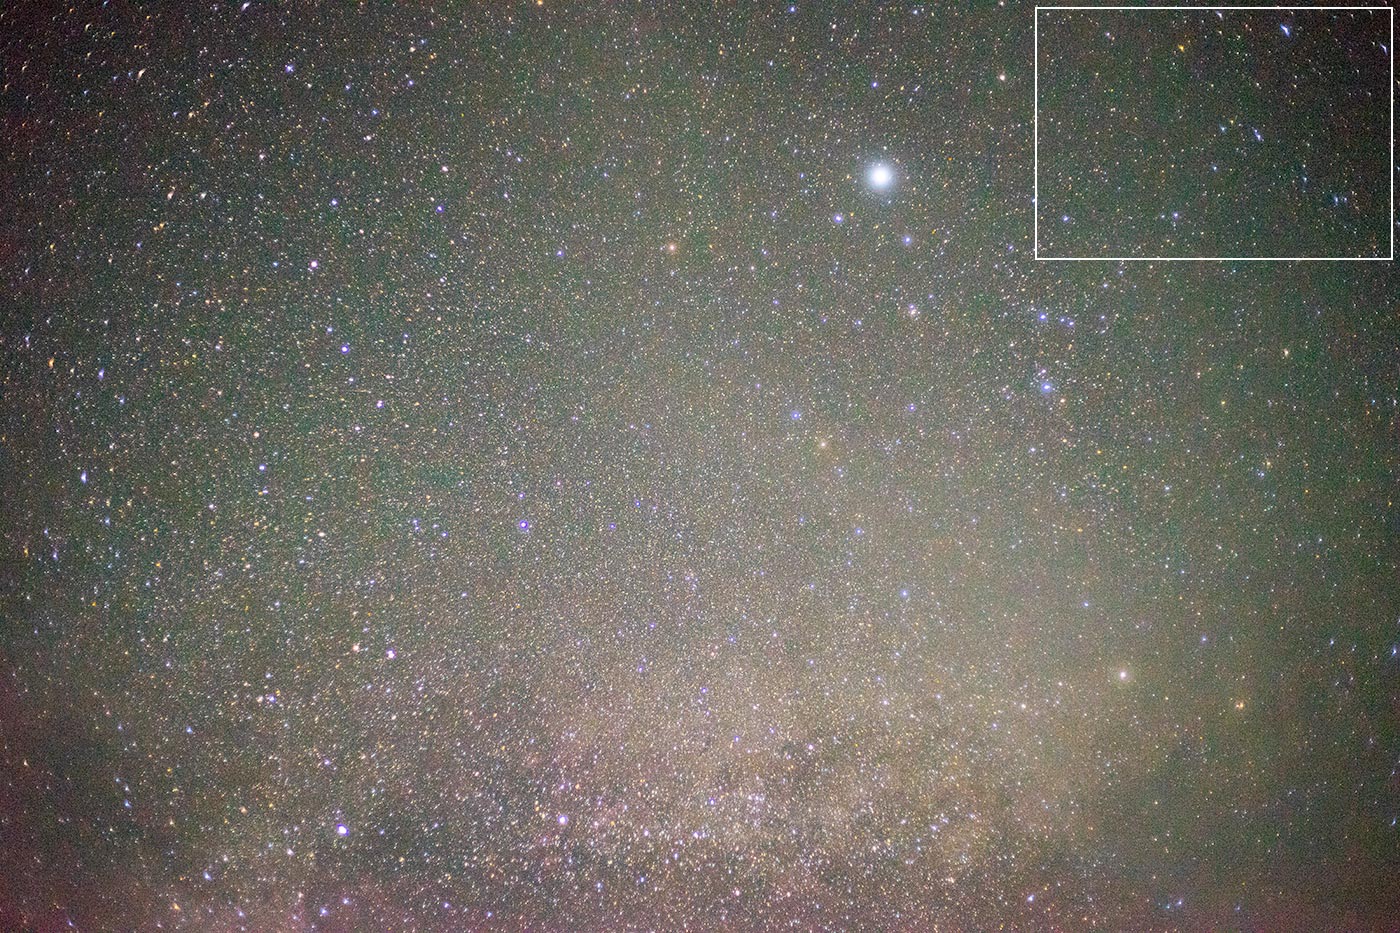
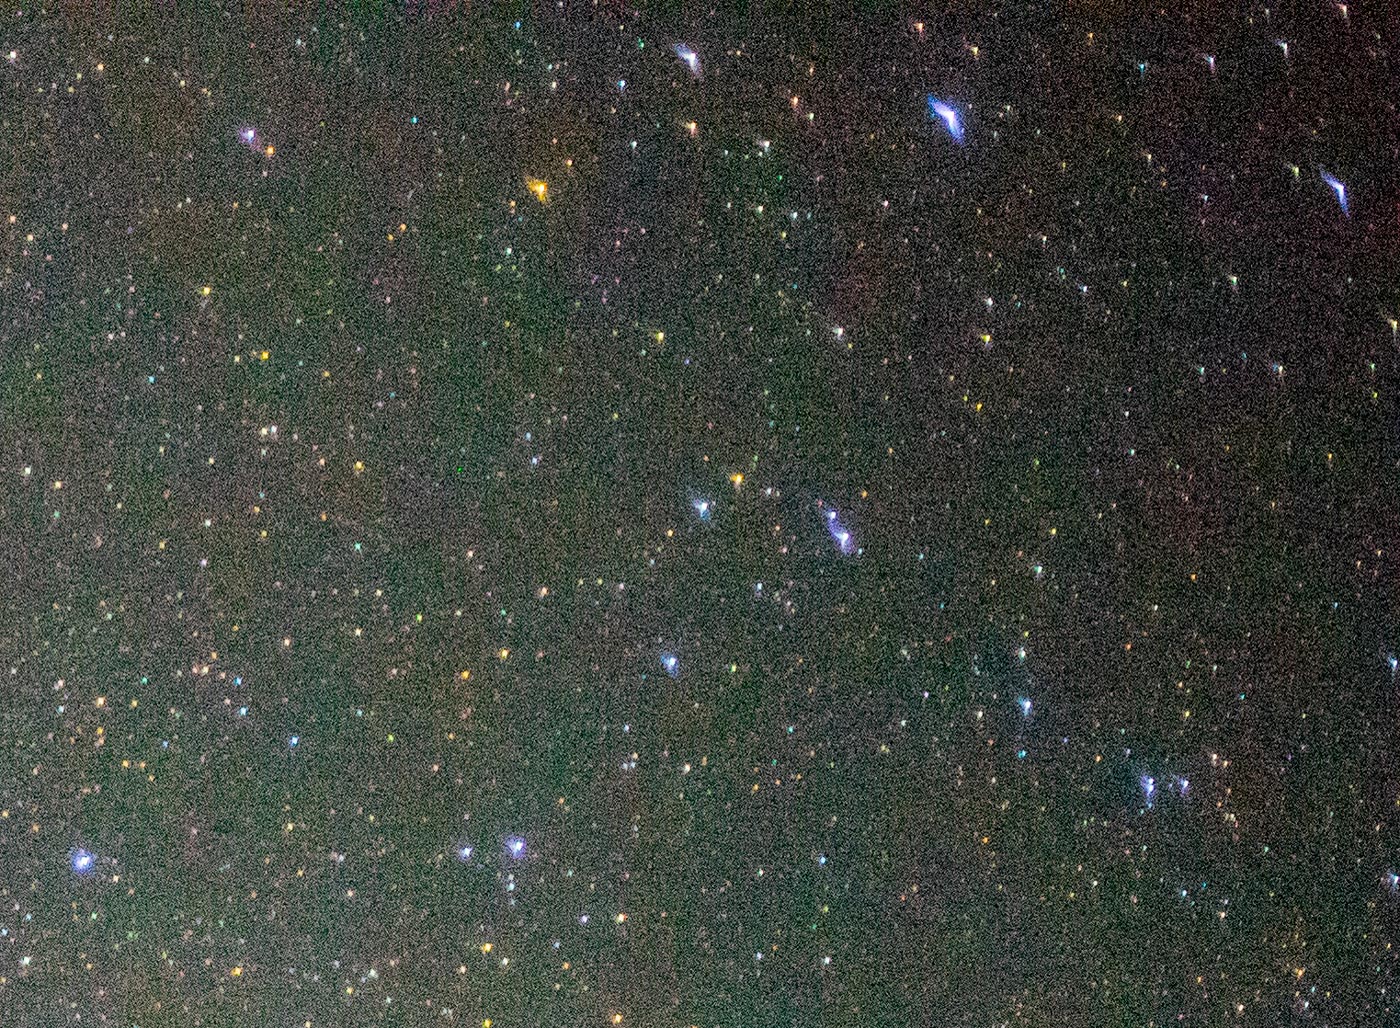
A lens with a prominent aberration will drastically distort the shape of the stars, especially towards the outer edges of the frame. One of the first lenses that I used for making astrophotos, the Canon EF 28mm f/1.8 USM (Amazon / B&H), has especially bad aberrations when used at its lowest f/number, and the problem is very apparent in its photos of the stars. In the sample photo of the Milky Way below, you can see how the stars in the corners of the image are stretched and distorted, the result of the lens aberrations present in the Canon EF 28mm f/1.8 USM.

Chromatic aberration and monochromatic aberration are the two main types of aberration.
Chromatic aberrations are imperfections in the way a lens disperses different colors of light, much like the way a prism splits light into a rainbow. Monochromatic aberrations are problems in the way a lens focuses a single color of light.
Nearly every lens I’ve ever used shows some degree of chromatic and monochromatic aberration when being used for astrophotography, especially when the lens is used wide open, at it’s lowest f/number setting. Typically, aberrations are more prevalent on lenses with low f/numbers. In most cases, the aberration can be reduced by stopping the lens to a higher f/number. This is most inconvenient for astrophotography because lower f/numbers tend to be more desireable for collecting more light from the faint stars. Choosing a lens or setting an f/number for an astrophoto is often a balancing act between collecting ample light for the exposure with a low f/number and reducing the effect of aberration with a higher f/number.
Lens Design
For most forms of photography, aberrations will tend to soften the image, particularly in the corners of the frame. The sharpest lenses tend to have low levels of aberration. Lens manufacturers usually go to great lengths to design a lens that has as few visible aberrations as possible, usually through the addition of corrective lens elements to their design.
The lens designer will usually add specially shaped elements to target a specific aberration. Sometimes, making one correction can introduce another aberration, so lens designs can become exceedingly complex when designers keep adding corrective elements to try to curb the presence of aberrations introduced by others.

A perfect example of a well-corrected lens is the monstrous Zeiss Otus 55mm f/1.4 (Amazon / B&H). It’s arguably one of the sharpest full frame lenses ever made (dpreview.com) and as a result of its complex lens design, it’s also one of the largest standard primes ever made for a full frame DSLR. So, when Zeiss brags about having 12 elements in 10 groups in the 55mm Otus, they’re talking about how many additional corrective lenses were added to achieve the improved performance. Compare that number to the much cheaper Canon 50mm f/1.8 STM (Amazon / B&H) lens, with only 6 elements in 5 groups, and we can see that it took twice as many pieces of glass for Zeiss to produce their better design. Now more lens elements doesn’t specifically mean that a lens will be better, but it does give us some indication as to how hard a lens designer tried to curb aberrations.
Now let’s review the two main types of aberrations, what some of them look like for point light sources (like stars), and some real world examples of each.
1. Chromatic Aberration
Chromatic aberration is a dispersion problem that causes white light to split into its respective colors of the rainbow.
Most lenses are fairly well corrected for chromatic aberration but it’s not uncommon, especially with fast lenses, to still see small signs of chromatic aberration, especially in the corners of the image, particularly when photographing very high contrast objects like tree branches against a bright white sky.
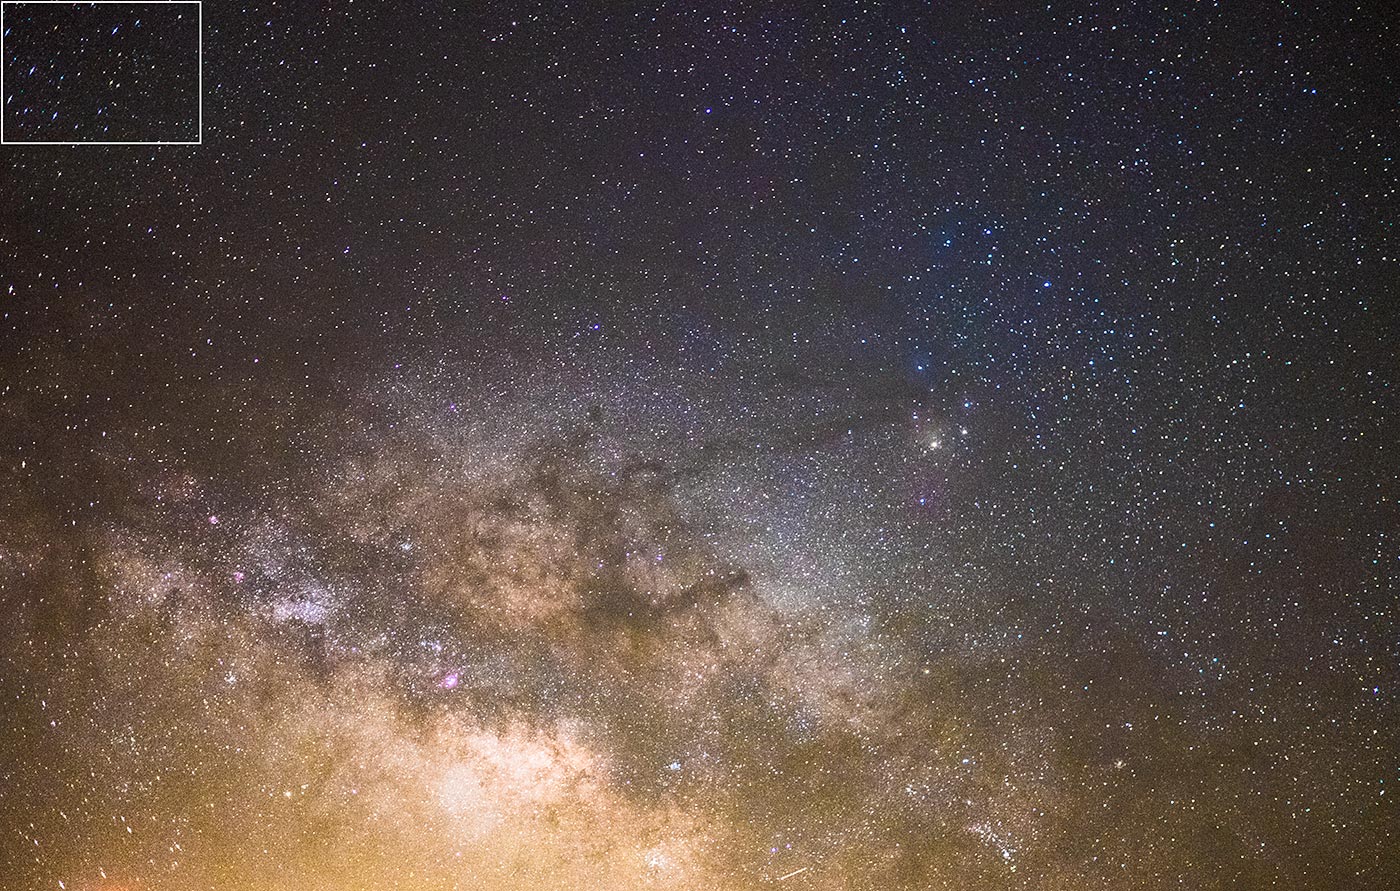
In astrophotography, chromatic aberration often shows up as a colored edge on one side of a star. Lens manufacturers often use a combination of different shaped low and high dispersion lens elements to correct for chromatic aberrations. That said, it’s still common for many modern lenses to show purple or green fringed highlights in high contrast areas of the image. In the image above from my Rokinon 12mm f/2 review, you can see very distinct purple edges around one side of all the overexposed highlights and a small amount of green on the opposite side of the highlights — a perfect example of lateral chromatic aberration.

I personally don’t spend a lot of time trying to correct for chromatic aberration in post processing, as it’s usually not detrimental to a photo as a whole. In cases where it’s distracting, Adobe Lightroom and Adobe Camera Raw both have useful and easy to use chromatic aberration correction tools.
2. Monochromatic Aberrations
All of the following aberration types are forms of monochromatic aberration. Again, monochromatic aberrations are problems in the way a lens focuses a single color of light.
Spherical Aberration
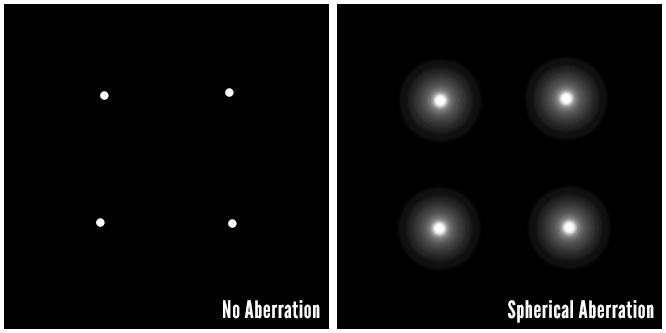
Spherical aberration will cause point sources of light to show soft, symmetric halos.
It’s a problem created by the use of spherically-shaped lens elements that have different focal lengths at different aperture diameters. Light rays traveling through the edge of the lens aperture are focused at a different distance than light rays traveling through the center of the lens aperture. While it will still allow a lens to create a sharp round pinpoint star, spherical aberration tends to lower the overall contrast of the image across the frame. Unlike most of the other aberrations that are most visible towards the edges of the image, spherical aberration will still be noticeable on central portions of the image.
Most lenses are fairly well-corrected for spherical aberration, especially from the common use of aspherical lens elements to help correct for spherical aberration. One case where I have encountered a small amount of spherical aberration is actually on my favorite lens for astrophotography: the Rokinon 24mm f/1.4 (full review), despite its use of aspherical elements. Wide open at f/1.4, the lens shows distinct halos around bright stars in the center of the image. The halos go away when stopping down to about f/1.7 to f/2.0. Overall, a small amount of spherical aberration isn’t as visually detrimental to an astrophoto as some of the other aberrations, because stars tend to still appear round and the added “hazy” look actually accentuates star colors, similar to the look you’d get if you were using a fog filter.
Comatic Aberration
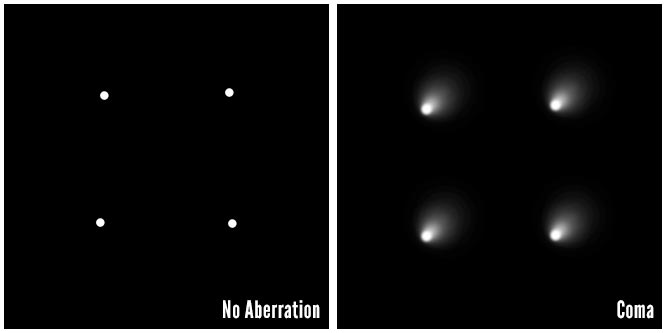
Comatic aberration or just “Coma” is named for its comet like shape for point light sources.
Coma occurs when light from a single source entering at the edge of the lens is not projected at the same size as light entering the center of the lens. For this reason it becomes more apparent on point sources of light at the edge of the frame and at low f/numbers. Coma is common on fast (large aperture or low f/number) lenses but can also be reduced by stopping the lens to a higher f/number. A lot of lens aberrations that distort the shape of light sources like stars are often assumed to be coma, but sometimes the explanation is more complex. The easiest way to recognize pure coma is by its comet-like shape.
Coma can occur in either of two directions. When the tails point away from the center of the image, it’s called “external coma” and the opposite is “internal coma.” The Voigtländer 50mm f/1.1 Nokton (Amazon / B&H) is an example of where a lens manufacturer decided that speed was more important than correcting for aberrations. The shows heavy internal coma in the mid field of its frame. It transitions into a combination of internal coma and sagittal astigmatism by the edge of the frame. Most of the severe aberrations on the 50mm f/1.1 Nokton are reduced once stopped to at least f/2.8.
Tangential and Sagittal Astigmatism
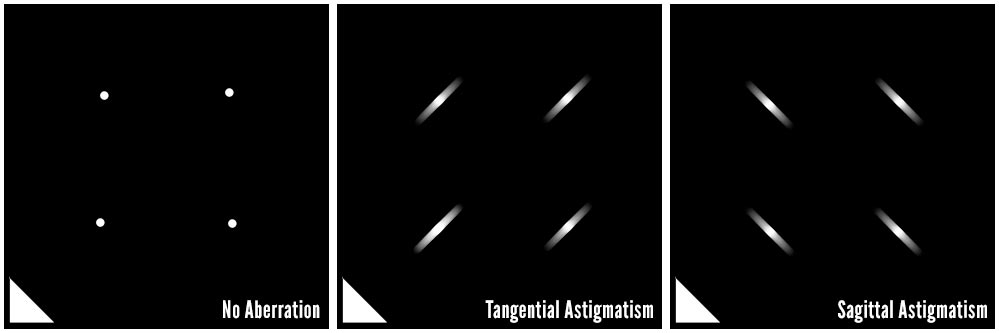
Astigmatism causes point light sources at the edge of the frame to appear to stretch in a line.
Astigmatism can occur in two directions depending on the direction that the light is spread, relative to the optical axis that runs along the center of the lens. In the graphics above, the white triangle on the bottom of each frame indicates the direction towards the center of the image. Tangential astigmatism spreads point light sources in lines that seem to radiate from the center of the image while sagittal astigmatism spreads the point light sources as if rotated about the center of the image. Astigmatism is apparently one of the most difficult aberrations for lens designers to fully correct.
In my experience, astigmatism is certainly one of the most common aberrations that I see, even in expensive lenses. The Fujifilm 23mm f/1.4R (Amazon / B&H) , while a very nice lens otherwise, shows a noticeable amount of sagittal astigmatism in the extreme corners at f/1.4. The astigmatism goes away when stopped to f/2.0.
Distortion
Distortion is caused when the lens projects different sized images at different points along the frame.
This can happen in either direction, where the image at the edge of the frame appears smaller than the image at the center (negative or barrel distortion) or where the image at the edge of the frame appears larger than the image at the center (positive, rectilinear or pincushion distortion). A fisheye lens is a perfect example of a lens with extreme levels of negative distortion.
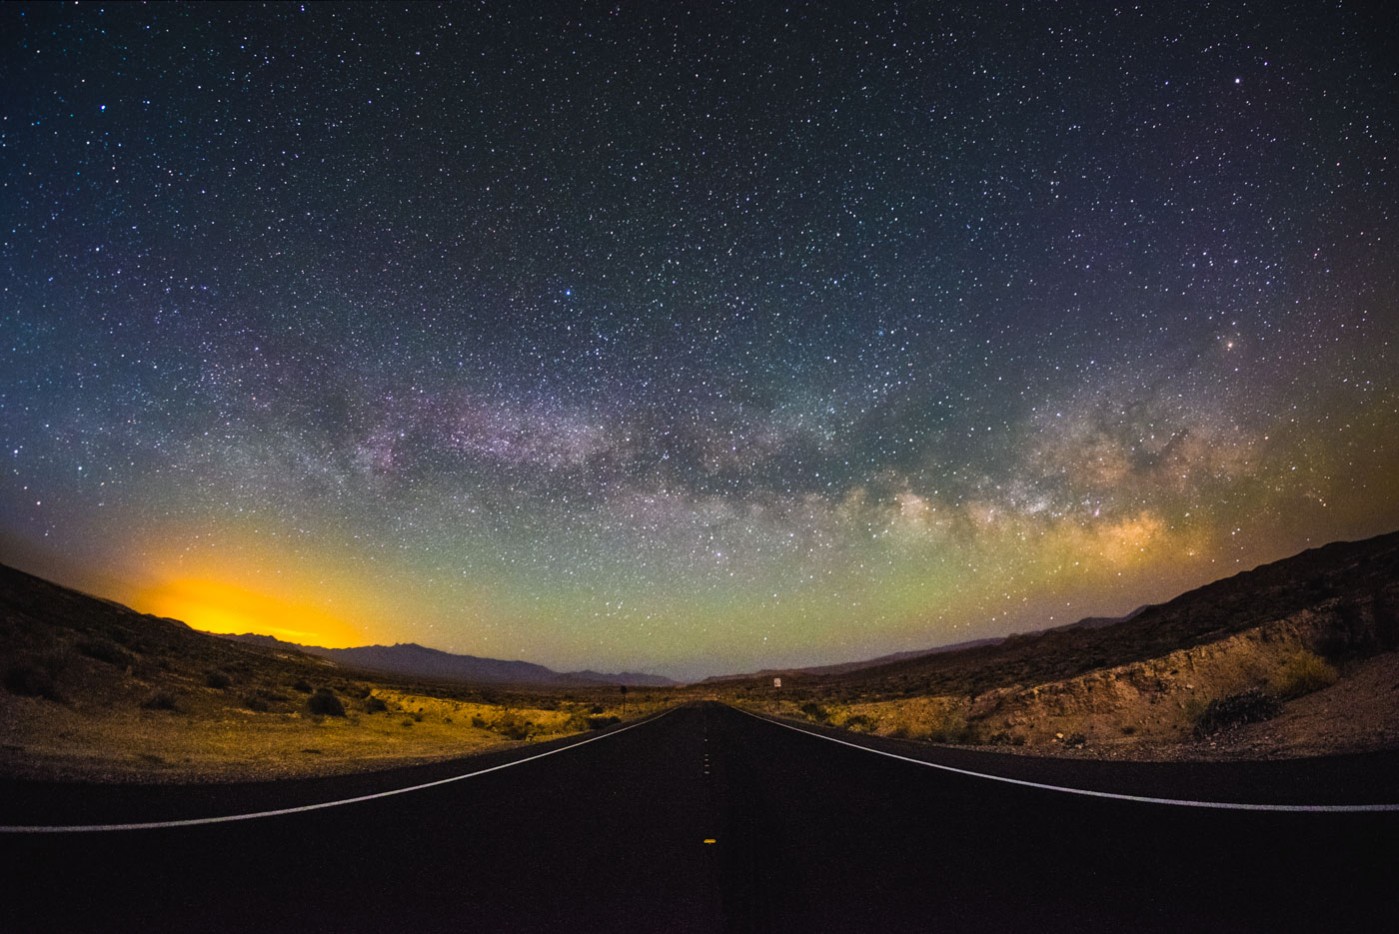
Distortion can be particularly noticeable when photographing things you would expect to be straight. An extreme example of this is the photo above made with a Rokinon 8mm f/2.8 II (Amazon / B&H) fisheye lens. By pointing the camera upward, the lens severely distorted the horizon and the road on which I was standing.
Some lenses can show a combination of both positive and negative distortion called moustache distortion due to the wavy nature of the way it distorts straight lines. The Rokinon 14mm f/2.8 (full review) is a lens that exhibits pronounced moustache distortion.
In terms of practical effects on astrophotos, distortion doesn’t tend to be a huge problem, but in the case of lenses like that Rokinon 14mm f/2.8 that have distracting distortion, the effect can usually be corrected in post processing in Adobe Lightroom or Adobe Camera Raw with a lens profile (Adobe Lens Profile Downloader). For fisheye lenses, I tend to like “undistorting” them with a “defishing” method.
Field Curvature
Field curvature is when the lens doesn’t focus the light onto a perfectly flat plane and instead focuses on an imaginary curved surface.
Since the sensor of most cameras is flat, this will cause changes in focus across the image. Field Curvature will usually appear as if the edges of the frame are out of focus while the center is in focus and vice-versa. Field curvature is actually a trait that has been used to artistic effect in novelty lenses like the Lomography Petzval Lens (B&H) which is known to produce “swirly bokeh” due to its combination of pronounced vignetting and field curvature. I have found field curvature to be most prevalent on older lens designs. It usually doesn’t occur on more modern lenses.

I haven’t personally used the modern Petzval Lens but my 40mm Voigtländer (Amazon / B&H) does have a little bit of field curvature that can be seen in the portrait of Diana above. The background lights in the center of the image are more out of focus than the lights at the edges of the image, a good indicator of field curvature.
Other Lens Imperfections
Vignetting
Vignetting causes the edges of the frame to appear darker than at the center of the image. It is especially common on fast (low-f/number) lenses. I personally like a little bit of vignetting for artistic effect but it does mean that the lens is collecting less light than it’s technically supposed to.
Since vignetting changes the appearance of the overall brightness of the image, it’s especially detrimental to video production where one shot might need to match in brightness with another shot, and for this reason cinema lenses often categorize their lenses with T-stops instead of F-stops which account for the “Transmittance” of the lens. Lenses set to equal T-stops should produce images with similar brightness. Vignetting is most common at low f/numbers and on wide angle lenses. If you want to eliminate vignetting, stopping the lens to a higher f/number (smaller aperture) will usually reduce the effect.
Flare
Flare happens as a result of reflections internally in the lens.
It’s not possible to completely eliminate reflections off of polished glass surfaces so when bright light enters a lens, it can bounce around and produce flare spots on the image. With astrophotography, flare is rarely an issue since it’s not common to see extremely bright light sources in astrophotos. The only instance when flare might occur in an astrophoto is when shooting with the moon in the frame.

Lens manufacturers usually apply several extremely thin layers of Magnesium Fluoride or other special materials to the surface of the lens. Each layer of Magnesium Fluoride helps eliminate reflections of a specific wavelength or color of light. Most modern lenses have these “multi-coated” lens elements to try to reduce the occurrence of flare, but it is still possible to find lenses without multi-coated elements.

The Voigtländer 40mm f/1.4 Nokton S.C. (Amazon / B&H) is a single-coated lens that’s specifically made to produce more flare than its multi-coated counterpart (Amazon / B&H). The lens is popular for use specifically in photography where the photographer wants to produce lower contrast images. It’s an especially well-regarded lens in the black and white photography community because of the way it produces low-contrast shadow details, particularly in brightly backlit conditions. I have owned the Voigtländer 40mm Nokton S.C. and found its characteristic flare to be rather aesthetically pleasing, especially for portraits.
Correcting Aberrations In-Camera
Most aberrations are prevalent at low f/numbers (wide apertures). Thus, the easiest way for a photographer to try to minimize the presence of aberrations is to stop the lens to a higher f/number.
Consistent with my examples so far, most lenses that have aberration problems tend to show great improvements when the lens aperture is closed one or two stops from wide-open. For example, if your lens shows bad aberration at f/1.4, try stopping down to f/2.0 or f/2.8 to try to reduce the effect. Stopping the lens to a higher f/number will reduce the total light collected by the camera, but will also improve sharpness and hide aberrations.
A Practical Test Method
For astrophotography, aberrations can be a distracting element of the photo. I usually gauge the quality of a lens for use with astrophotography by its aberration performance at low f/numbers.
I’ve been working on an easy method to test all of my future lenses for their aberration performance. I wanted to make the test reasonably easy to understand and provide a good visual representation and success criteria for judging lens aberration performance. The goal of the test is to allow photographers to understand how one lens performs versus another and to help define the threshold of aperture setting (f/number) beyond which the lens performs acceptably.
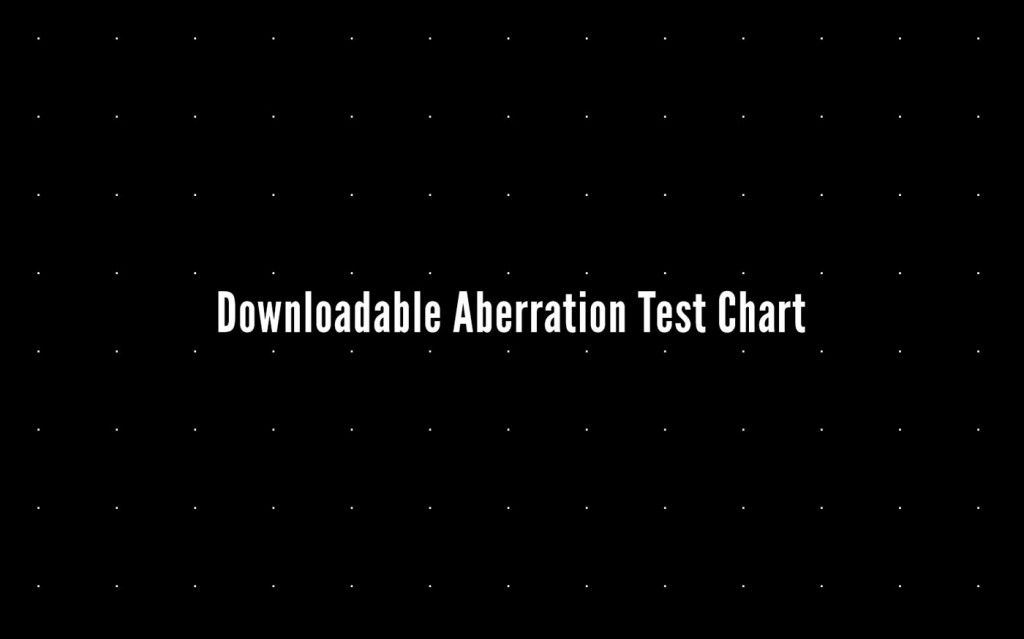
Now I like to test my lenses by using them for real-world photography, so I originally thought I could just make my tests by shooting the stars with each lens and then showing the results. But this presents a lot of variability, dealing with light pollution, the moon cycle and the changes of the night sky throughout the calendar year. For my aberration test, I instead decided to make a simple test chart for my computer screen (.zip). It’s simply a black image with a square grid of 360 white dots. It can be used on LCD screens with a resolution of at least 1440px by 900px or higher.
By photographing this image on my computer screen with a lens at various apertures, it’s possible to see and measure the aberration characteristics of the lens at those aperture settings. Every lens is tested by making a photo perpendicular to the screen such that the screen occupies the upper right quadrant of the image. As long as we’re reasonably consistent with framing, the image size of the dots should be roughly the same size relative to the sensor size, regardless of the lens or camera system used, which gives us a good way to compare the aberration shapes of one lens to another and across multiple systems. As an example, I have samples made with a Canon EF 50mm f/1.8 STM lens which can be used on either a full-frame camera or an APS-C camera. Two sets of data are collected: one at each aperture framed with a full frame sensor and another set framed on an APS-C sensor (or via APS-C crop mode). If testing on another sensor size like Micro 4/3″ or 1″ sensors, the test would be performed identically.


Key of Common Aberrations
One of the cool things about this test is that it allows us to see, very obviously, the kind of aberration the lens is producing. I’ve made a key with our most common aberrations to help us define the aberration. In real life, we’ll often encounter slightly different shapes (or a combination of them), but this key is fairly representative of the pure aberration shapes, just as I described earlier in this article.

The Lonely Speck Aberration Test
I wanted a way to quantitatively compare lens performance so I thought of making a simple scale for measuring the aberration: measuring the width of the aberration — Adobe Photoshop has a simple measurement tool — at its longest point (in pixels) and comparing that dimension as a percentage of the height of the image (4000 pixels in the case of the Sony a7II).
So for example, if an aberration measures at 62 pixels wide, the resulting aberration level is: (62/4000)*100% which is approximately 1.5%.
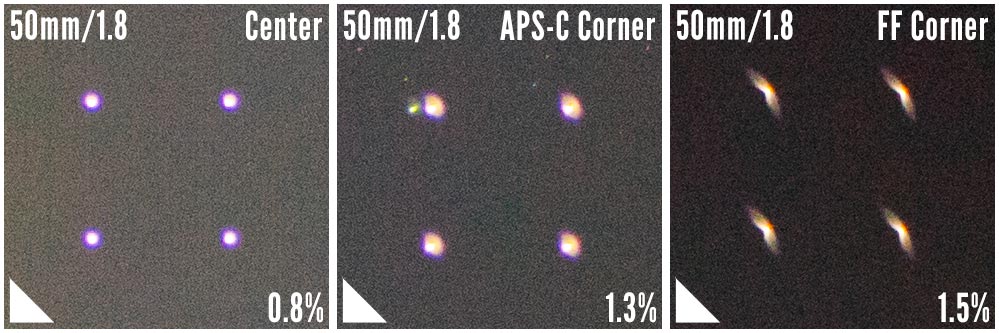
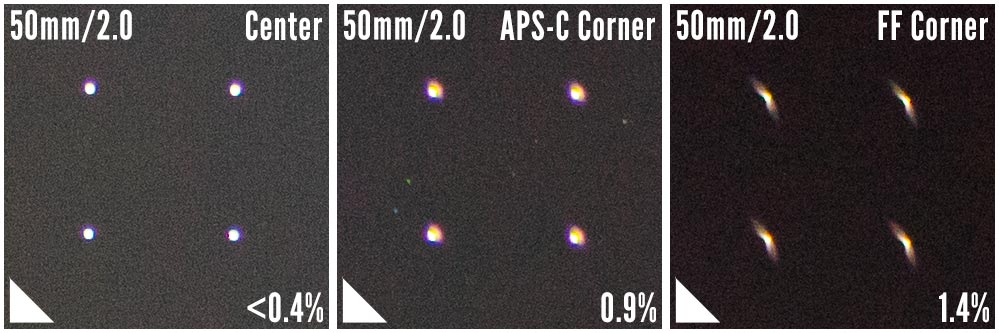
Just from my testing of how I like to use my lenses, an aberration level of 0.4% or less is considered “excellent,” less than 1% is “acceptable,” while aberration levels of 1% or higher is considered “poor” performance. It’s kind of a coarse and arbitrary scale, but it gives us a way to compare lenses on pretty much any camera system. APS-C corners, which tend to show lower aberration levels anyway, are always measured relative to the height of the APS-C frame. If the test were performed on even smaller camera systems, like Micro 4/3 or 1″, they would be measured relative to the height of those respective images. For some visual reference, the dimensions of each square crop in the test below is exactly 2mm by 2mm as measured on a full frame camera’s sensor and 1.33mm as measured on an APS-C sensor.
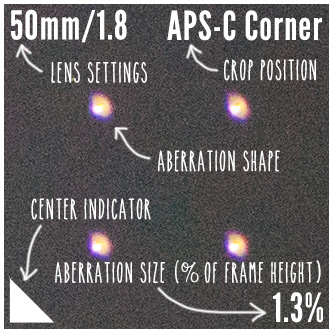
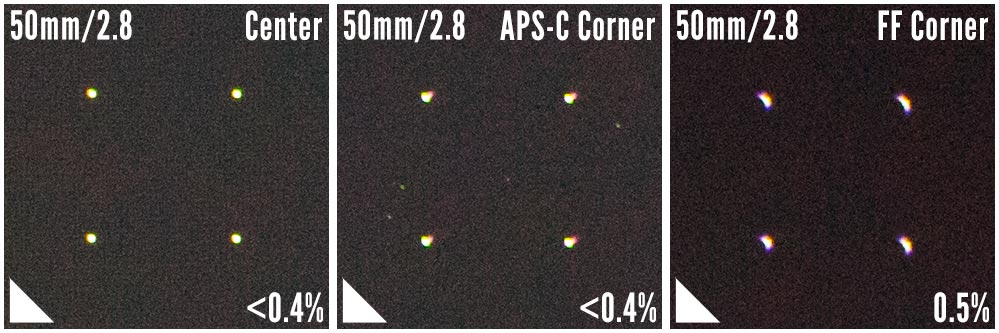
In this example using the Canon EF 50mm f/1.8 STM (Amazon / B&H), the lens shows very poor performance at f/1.8 in the corner of the full frame image with aberration levels of 1.5% but reaches a very good level of 0.5% by f/2.8, which is consistent with how I’ve tended to use the lens for astrophotography. We can also see by the shape of the aberration that the lens has a complex mix of coma at the APS-C edge that transitions into distinct sagittal astigmatism by the full frame edge.
Usually results like this tend to correspond well to the sharpness of a lens. In the case of the 50mm f/1.8 STM, it does tend to produce lower sharpness images at f/1.8 and gets a lot sharper by f/2.8 — consistent with our test.
Now some technical notes: this test isn’t perfect.
Some lenses, particularly those with floating lens elements (usually zooms and lenses with internal focusing mechanisms), won’t always render aberrations exactly the same at different focus positions. Since we’re photographing a computer screen close to the camera, rather than stars at infinity, it’s possible that some lenses might show different real-world performance when compared directly to my test. That said, in my experience, the aberration shapes tend to stay fairly representative of what you should expect from a lens, even in my tests with lenses that use floating lens elements. I’ll make it a note to always compare the test results with real world results to make sure that there are no pronounced differences.
Here’s what the crops from the Canon EF 50mm f/1.8 STM look like when shooting actual stars at full frame. The aberration shapes look very similar to what the test above showed.
Final Thoughts
The presence of aberrations can be particularly distracting in astrophotos. My test makes for a simple standard way to compare the aberration characteristics of lenses, hopefully without being too technical. I think it’s a good standard test that should prove useful for finding lenses with particularly good performance for astrophotography.
Now this test method is only one metric for the quality of a lens (there are other things like actual sharpness measurements, build quality, etc.). While I think it’s an excellent test for gauging the performance of a lens for use with astrophotography, definitely keep in mind that even lenses that “fail” an aberration test at certain apertures can still be excellent otherwise. While I wouldn’t use the Canon 50mm f/1.8 STM at f/1.8 for astrophotography, it’s great for other applications like portraits at that setting. The test lets me know that if I want the best compromise between light gathering and aberration performance for astrophotography, I should stop the lens down to at least f/2.8. For more information on how I like to choose lenses for astrophotography, check out my article on how to pick a lens for Milky Way photography.
I plan to run all of my future lens reviews through the Lonely Speck Aberration Test to hopefully make for a great way to compare choice lenses for astrophotography use. If you have a lens you would like to test with this method in order to compare with my results, please feel free to download the test chart (.zip) and try the same test on your equipment. If you’d like, contact me with your results and I’ll add them to a running spreadsheet of lens tests.
I hope this article gave you a practical and hopefully not-too-technical set of knowledge about lens aberrations, how they affect your photos, and a simple way to test your lens’s performance. There’s a lot more that can be learned about optics out there. For some extended reading on lens design and aberrations, check out some of my resources: Wikipedia: Optical Aberration, Roger Cicala’s Seven Deadly Aberrations article on LensRentals and finally, The Astronomical Files for Black Oak Observatory. This post would not be possible without their sharing of knowledge on optical aberrations.
I hope you enjoyed this article. If you’re interested in learning more about photographing the Milky Way, check out the rest of the Astrophotography 101 lessons or head straight on over to How to Photograph the Milky Way.
Disclosure
We are a participant in the Amazon Services LLC Associates Program, an affiliate advertising program designed to provide a means for us to earn fees by linking to Amazon.com and affiliated sites. We are also a participant in the B&H Affiliate Program which also allows us to earn fees by linking to bhphotovideo.com.
Learn Astrophotography
Astrophotography 101 is completely free for everyone. All of the lessons are available on the Lonely Speck Astrophotography 101 page for you to access at any time. Enter your email and whenever we post a new lesson you’ll receive it in your inbox. We won’t spam you and your email will stay secure. Furthermore, updates will be sent out only periodically, usually less than once per week.
Help us help you!
Believe it or not, Lonely Speck is my full-time job. It’s been an amazing experience for us to see a community develop around learning astrophotography and we’re so happy to be a small part of it. I have learned that amazing things happen when you ask for help so remember that we are always here for you. If you have any questions about photography or just want to share a story, contact us! If you find the articles here helpful, consider helping us out with a donation.
[button font_size=”16″ color=”#136e9f” text_color=”#ffffff” url=”https://www.paypal.com/cgi-bin/webscr?cmd=_donations&business=lonelyspeckblog%40gmail.com&item_name=These+tips+help+keep+lonelyspeck.com+running.¤cy_code=USD&source=url” target=”_blank”]Donate[/button]
Thanks so much for being a part of our astrophotography adventure.
-Ian
[button font_size=”16″ color=”#136e9f” text_color=”#ffffff” icon=”arrow-left” url=”https://www.lonelyspeck.com/astrophotography-101/” target=”_self”]Back to Astrophotography 101[/button]
Hey Ian, been loving your site, super informative, thankyou! I just picked up a Tokina 11-16mm to throw on my 600d. I like it, but I’m getting severe tangential and sagittal aberrations in the top left and right corners but much more on the top left corner. Is this normal or would this mean the lens is off center or faulty?
Cheers
Mike
Excellent one again! Thanks for the great information about lens defects.
I am planning to buy the recently released Sigma 20mm f1.4 Art lens on Canon 6D for astrophotography . Do you think this lens would be a good option or are there any other better lenses out there without breaking the bank?
Thanks so much for this article and the test chart. I’ve been planning on testing a lot of our stock of fast aperture lenses in preparation for a blog article or series of blog articles (maybe broken down by mount) on good lenses for astro work. Your chart is gonna come in very handy. I plan on doing actual infinity testing on stars as well, but I’ll probably use your chart first to weed out problem lenses and reduce the need to lug several dozen lenses around.