

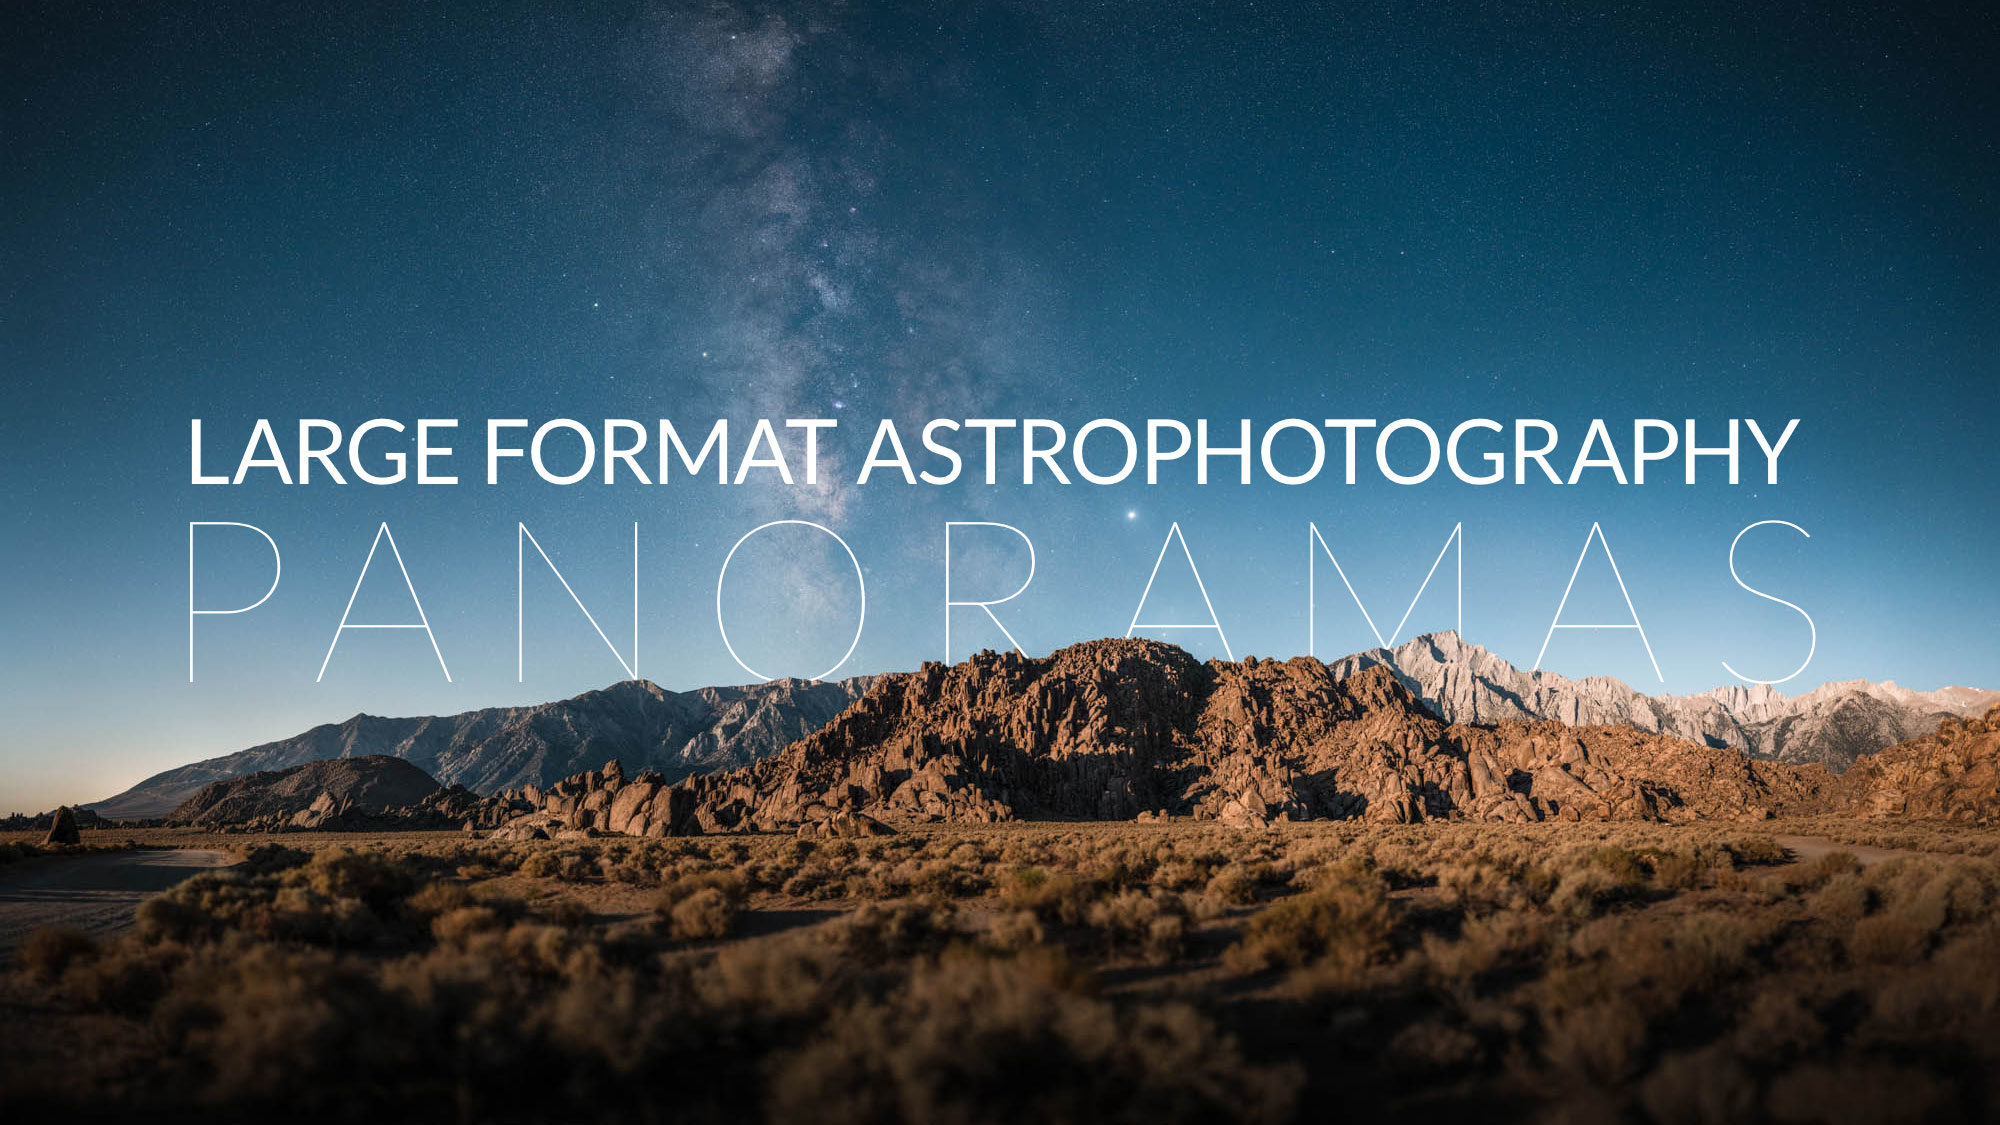
We’re on a quest to capture more pixels. This is our guided tutorial behind how to shoot and process extremely high resolution large format landscape astrophotography.
The photography industry is ever driven to achieve more resolution. It seems to me that every few months, a new camera comes out with specs that gush pixels, pixels, pixels. We’ve seen cameras tout 42 megapixels, 45 megapixels, 50 megapixels, 61 megapixels, and even 102 megapixels, each flaunted for a matter of months before being superseded by the latest model, as if each were some kind of high score on an arcade game leaderboard.
Let me open by saying that I love ultra high resolution photos. I love getting lost in those pixels. In an age where we consume millions of vibrant, wanderlust inducing, agonizingly low resolution photos by the second (I’m looking at you, Instagram), there’s something exceptionally special about spending an extended amount of time to look at a truly high resolution photograph in detail.
[devvn_ihotspot id=”129867″]
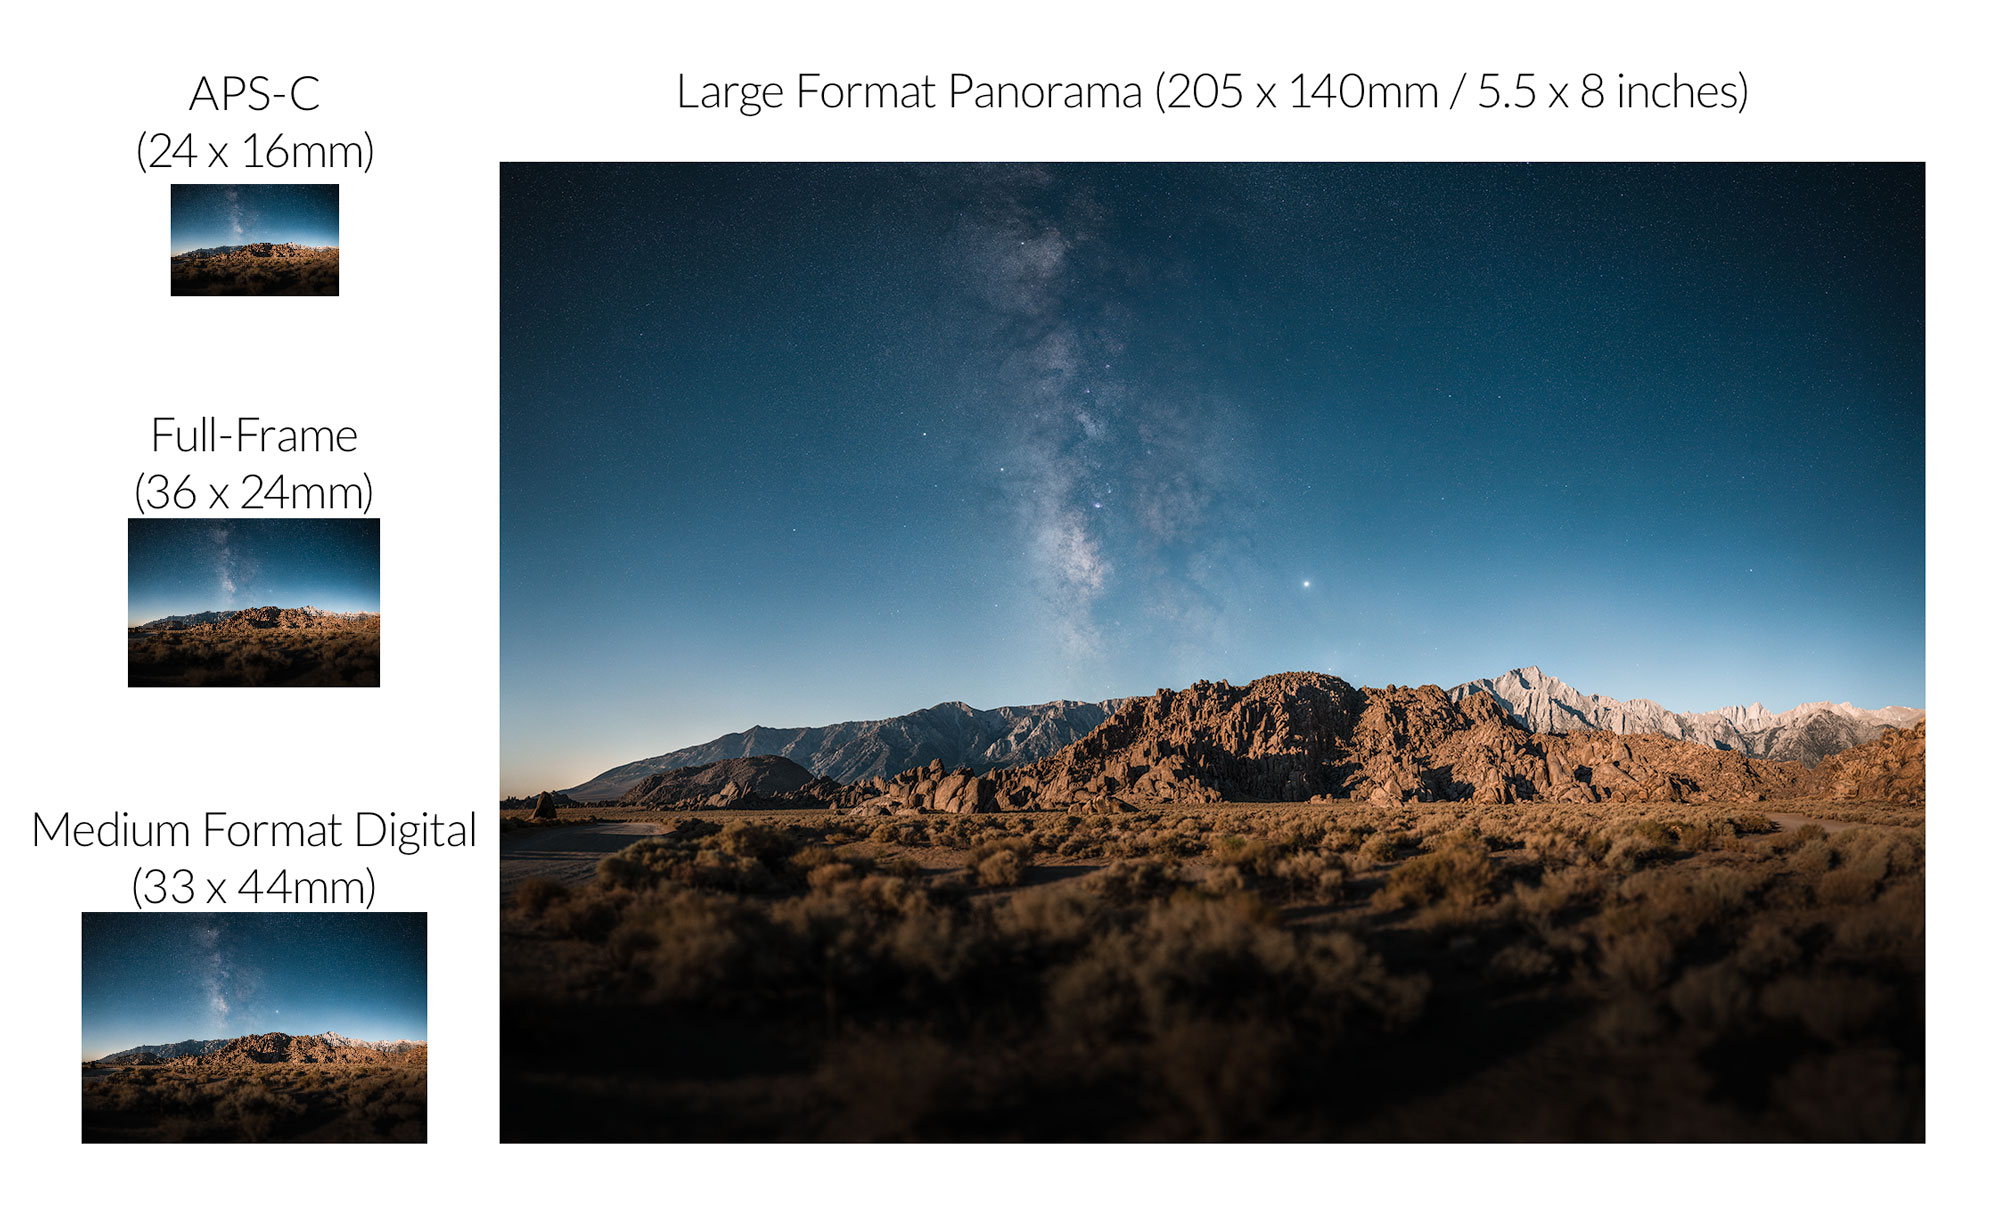
And so, I’d like to share what I’ve discovered so far in my quest for capturing more pixels. I’ve spent the last half year learning how to shoot and process large format landscape astrophotography panoramas. With the techniques in this article, it’s possible to emulate the image caliber of a 4×5″ or even an 8×10″ large format camera using a regular DSLR or mirrorless camera. Pretty much any interchangeable lens camera or camera with a 1″ sensor or larger will be able to utilize this technique. The results are astrophotos with resolutions that can range from 150 megapixels to 1 gigapixel or more. Step aside Fujifilm GFX 100.
Of all of the techniques for shooting and processing that I’ve explored, panorama stitching stands out above all the rest in terms of improving resolution and maximizing the overall quality of an image.
Introduction
Panorama stitching isn’t new. And the methods I’m using for large format astrophotography are not much different from the panorama technique I showed in my post about “medium format astrophotography”. We simply combine multiple overlapping photos from a longer focal length lens to make a final photo with a much larger field of view and much higher resolution. The primary difference between a “medium format” pano and a “large format” pano is the use of an even longer focal length lens. In the medium format technique, we used a 50mm lens.
For large format panoramas, we’re going to step up to a medium telephoto… between 85mm and 135mm. That might seem like a small change, but with it comes a significant increase in resolution (between 3 and 7 times as much)… along with a number of additional challenges and hurdles.
Most of our astrophotography tutorials or guides on Lonely Speck focus specifically on improving image quality, whether it’s via gear selection or new techniques. Large format panorama creation relies a little bit on both.
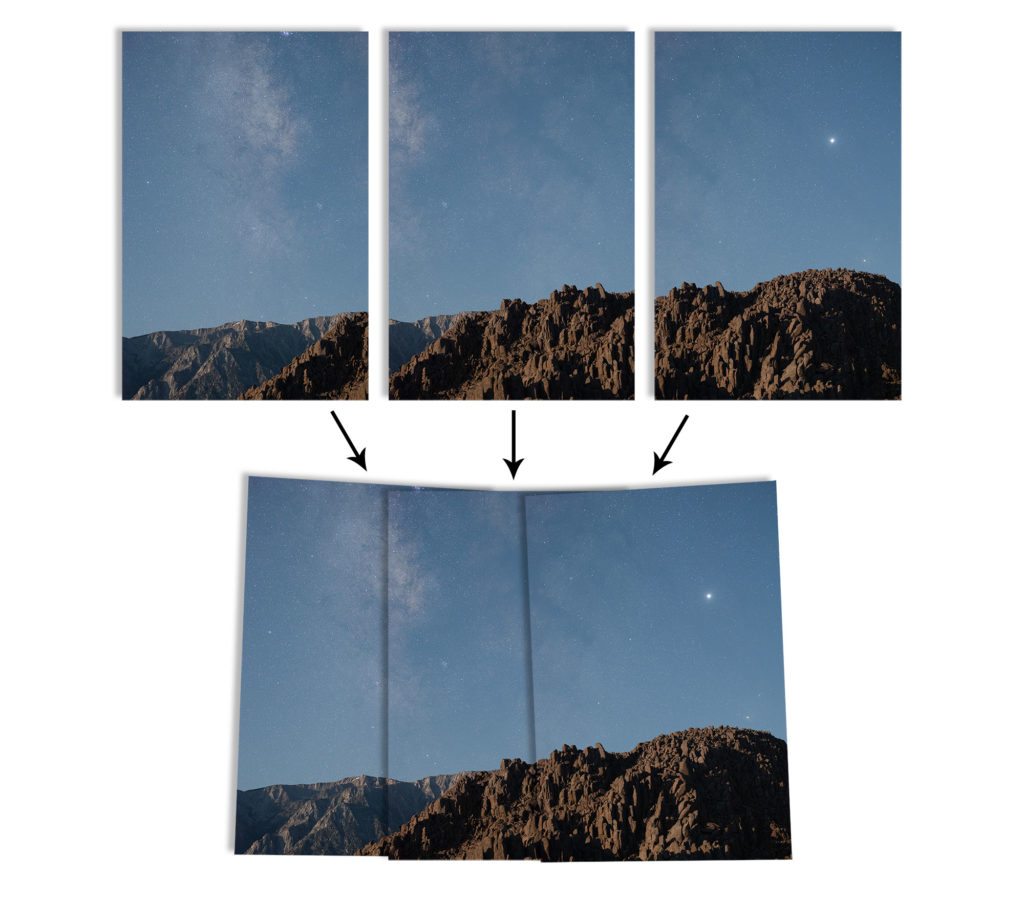
At its core, the concept behind large format astrophotography panoramas is simple. Using a medium telephoto lens, like a 100mm, we shoot a mosaic of individual overlapping photos, ideally in a careful grid-like pattern, to cover a much wider field of view. Then, in post-processing, we combine those photos together using a panorama stitching software to form a final, seamless, ultra high resolution image.
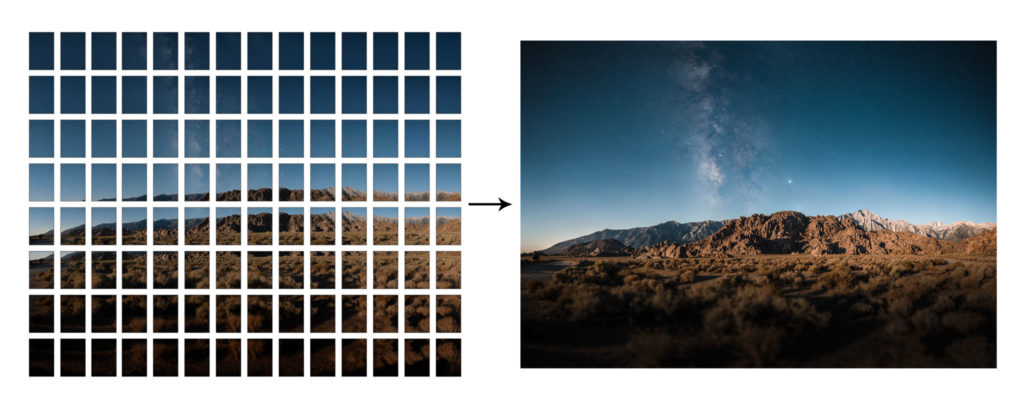
Panoramas allow us to, of course, increase image resolution, but they also reduce perceived noise, eliminate vignetting and aberrations, and give photos a significantly finer level of visual quality. Multi-row panoramas have completely changed my definition of image quality and the technique has become my absolute favorite way to shoot landscape astrophotos.
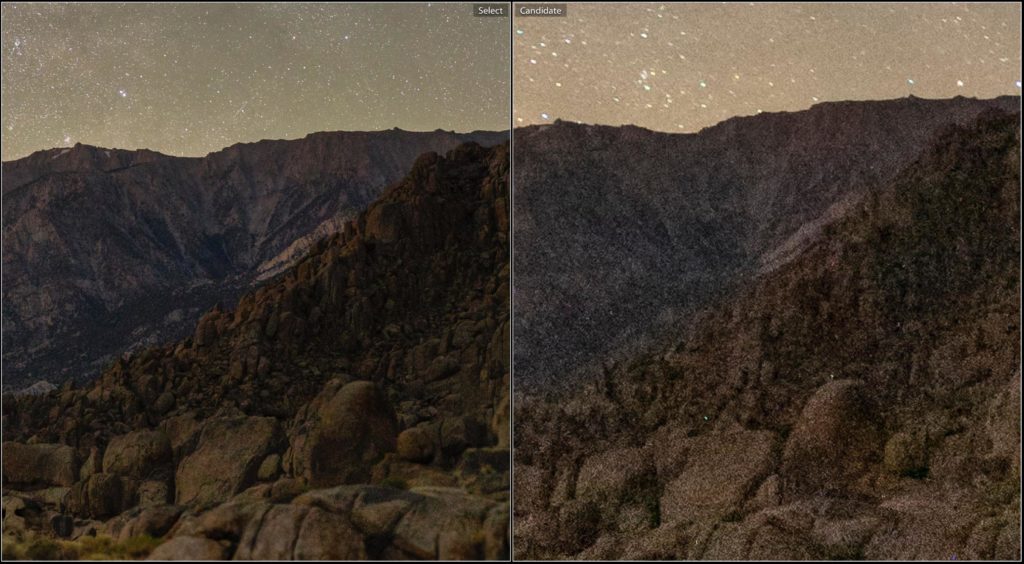
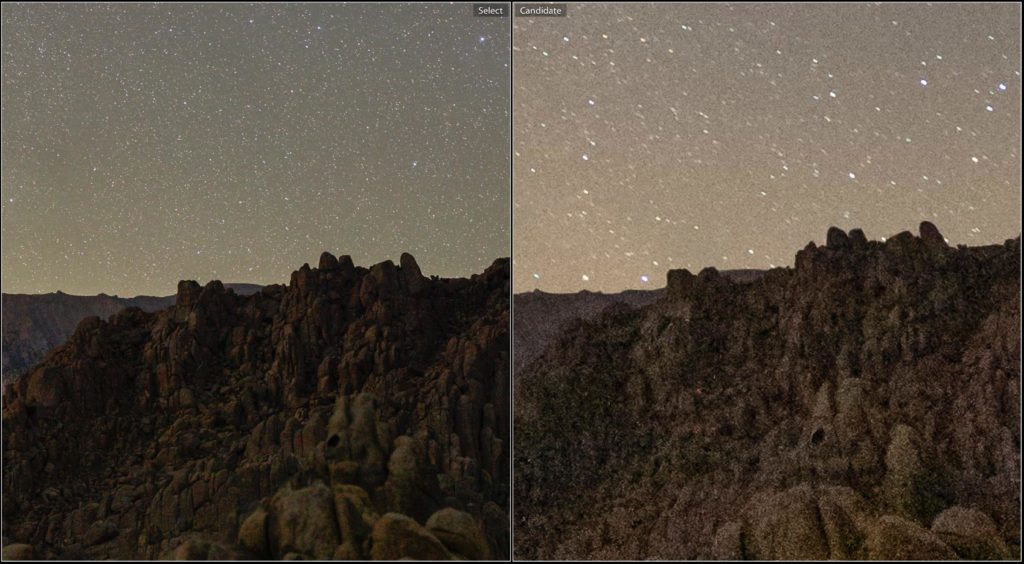
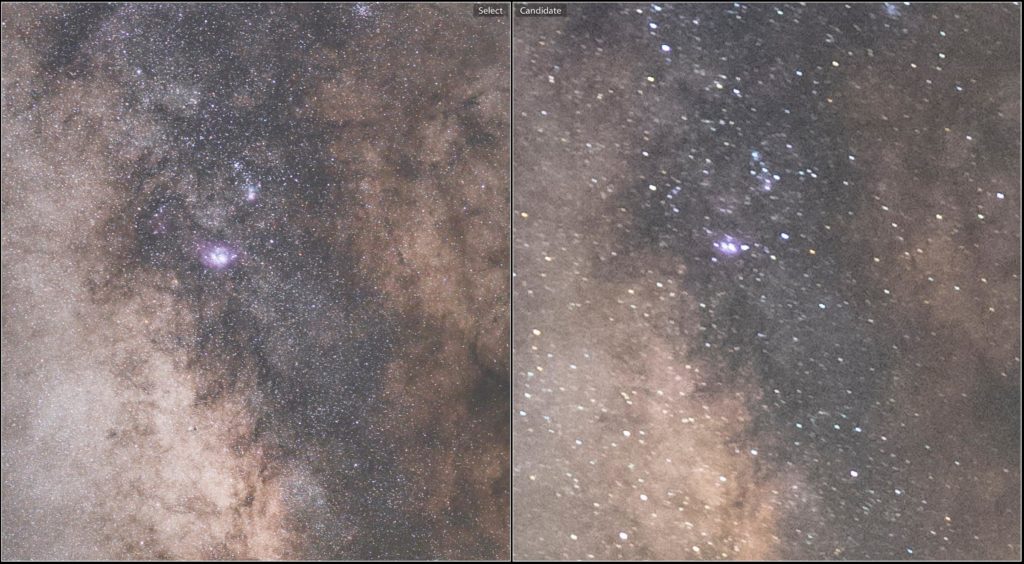
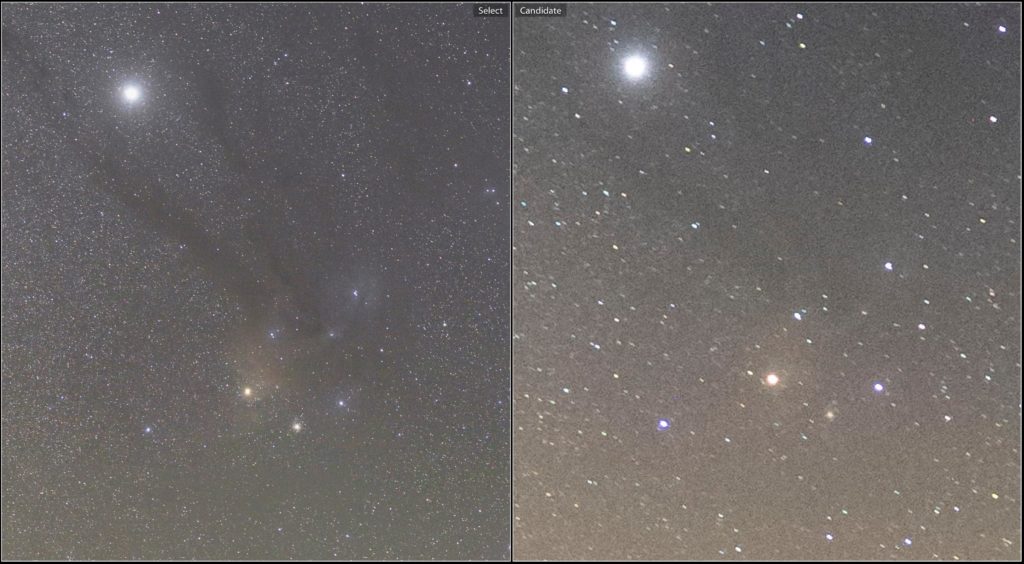
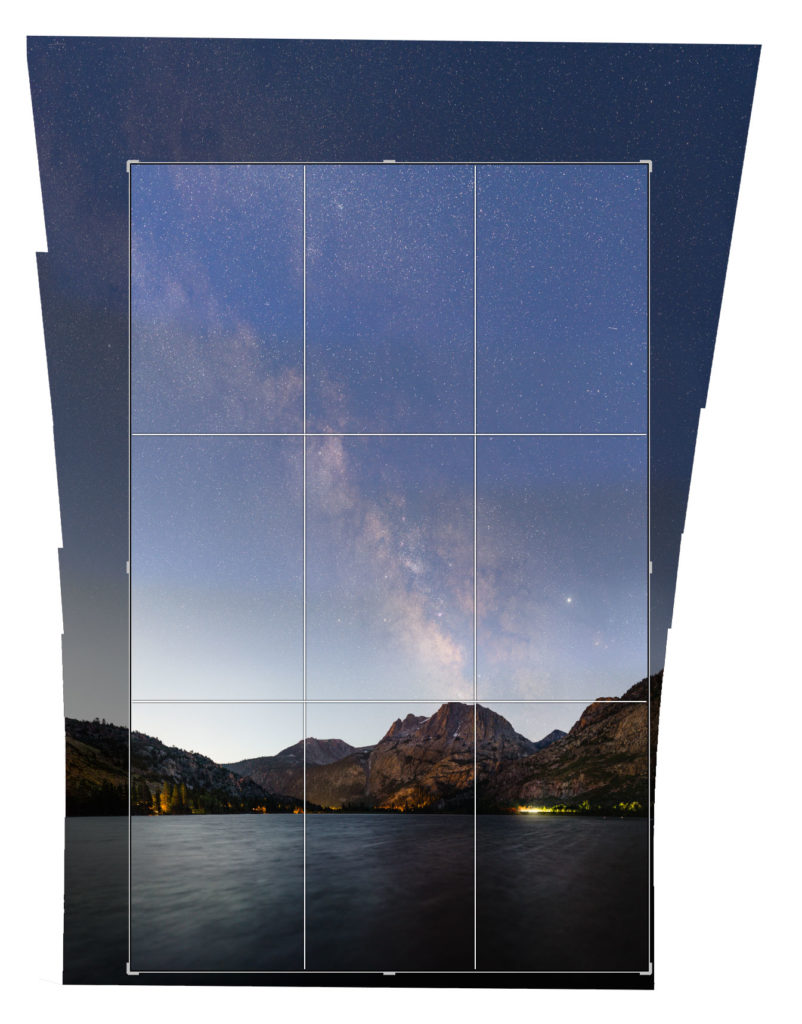
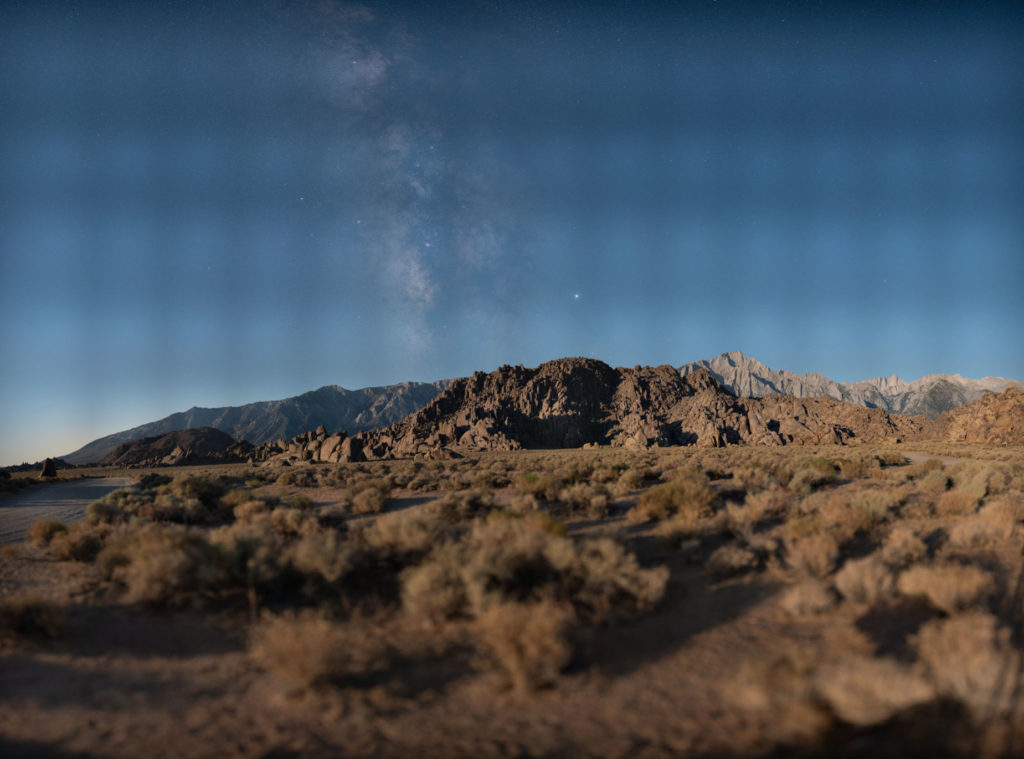
To show how even a modestly sized large format panorama compared to a regular shot made on a 24 megapixel camera, check out some of the comparisons below. 145 megapixels on the left, 24 megapixels on the right. At normal viewing angles, the differences seem relatively small, but looking at narrow crops shows how much more detail large format shooting can capture:
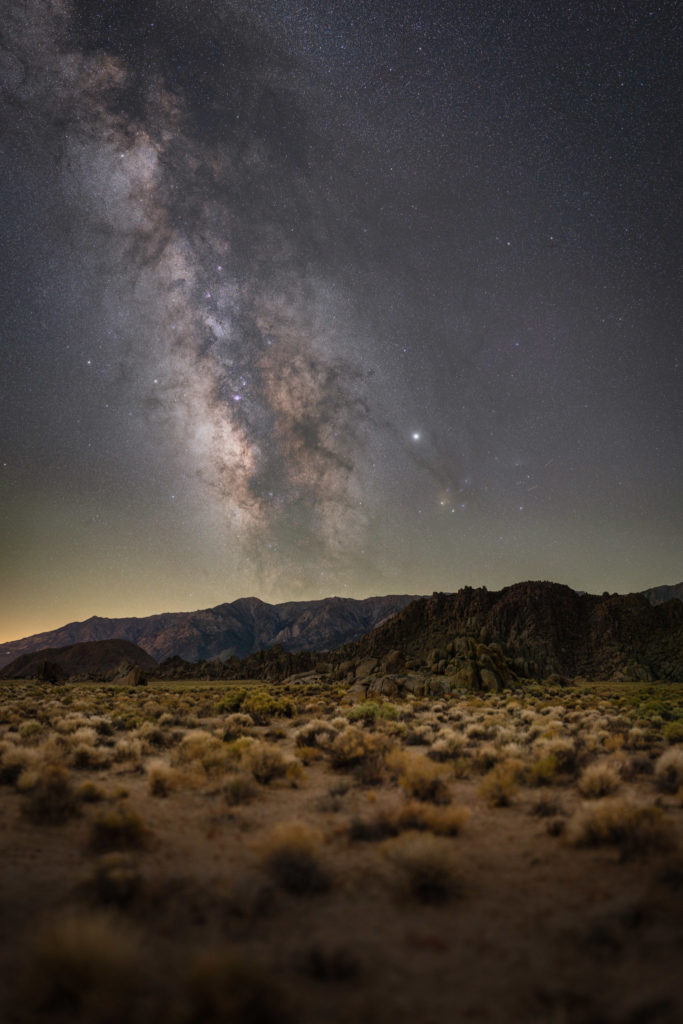
145 megapixels 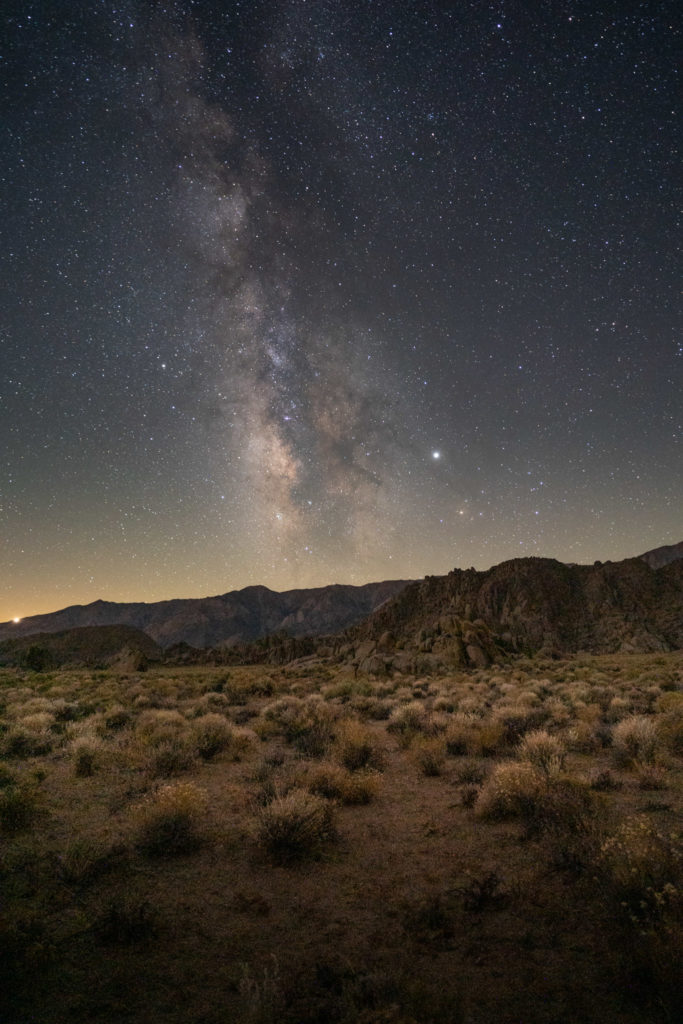
24 megapixels 
With patience and the right techniques, the results of a large format panorama can be many times better than what even the best top-of-the-line cameras can offer. Best of all, shooting a large format panorama is usually much cheaper than buying a whole new camera system.
As an example of what can be achieved with a low resolution full-frame camera, I’ve made a rough spreadsheet calculation that shows what’s possible with my 12-megapixel Sony a7S, a 135mm lens, and panorama stitching:
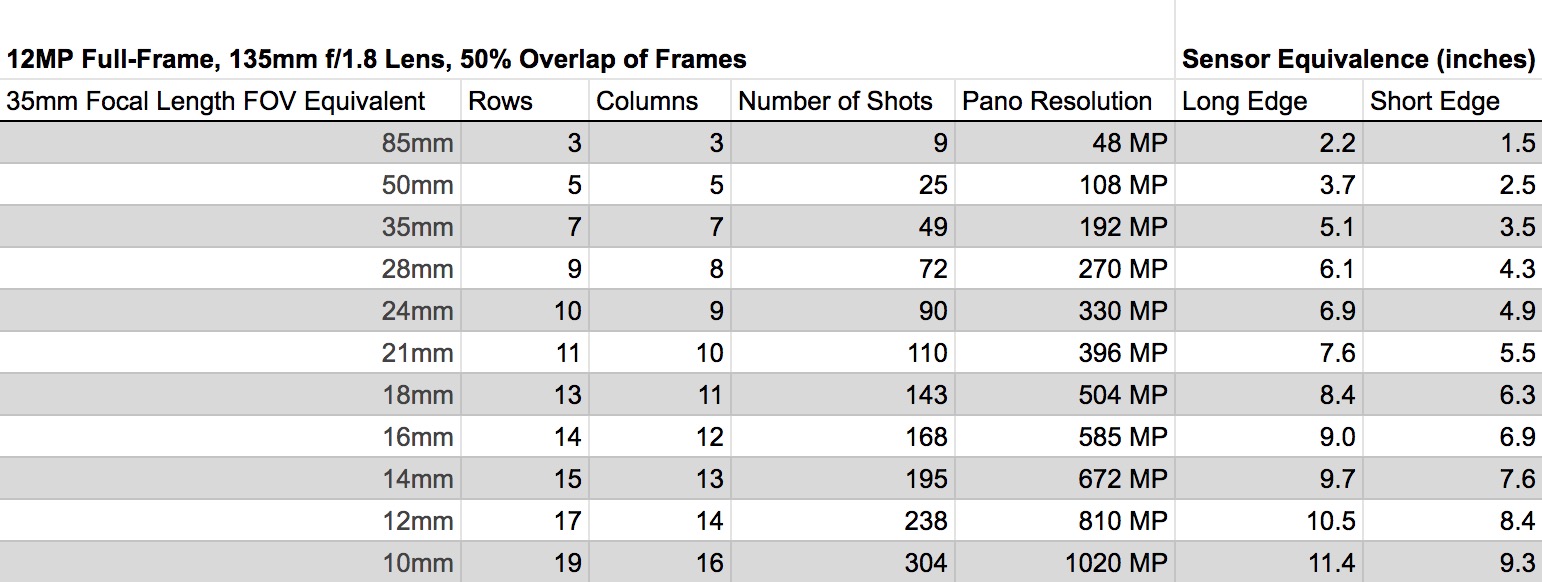
According to my calculations, with a 12 megapixel full-frame camera and a 135mm lens, we can shoot an 11-row, 10-column panorama, with a 50% overlap of frames, to achieve a result with a field of view that matches a super wide angle 21mm (92°) lens, a final resolution of about 396 megapixels and an equivalent sensor area bigger than a large format 5×7″ camera.
At the extreme end, if we attempted to shoot a 19-row, 16-column panorama, it would result in a massive 10mm (130°) equivalent field of view, more than 1 gigapixel of resolution for the final panorama, and an equivalent image sensor area of more than 9″ x 11″, many times larger than pretty much any commercially available digital camera ever made.
If you’d like to calculate similar numbers for your camera, check out our Panorama Overlap Calculator here or later in this article.
Now, it’s easy to look at calculations, but in practice there are some obvious hurdles to clear when attempting to shoot a single image composed of hundreds of separate exposures, but it’s definitely possible with the right gear and the right techniques and that’s what this article is all about.
Tutorial: Large Format Multi-Row Astrophotography Panorama Stitching
I want to jump right into a basic guide on how to make these gigantic large format landscape astrophotos. For the last few months, I’ve searched high and low for the best affordable gear, tried many different shooting techniques, post processing techniques and stitching software. And I’ve made a ton of mistakes and failed attempts, hopefully, so you don’t have to.
[devvn_ihotspot id=”130325″]
The more and more I shoot large format panoramas, the more I learn, so I’ll continue to update this tutorial with refinements and revisions into the future. I hope this guide provides everything you need to plan, shoot and process a gigapixel-sized large format photograph of the night sky. Let’s get started. Here are the talking points:
- Large Format Astrophotography Gear
- The Best Stitching Software: PTGui Pro
- Camera Settings
- Shooting Tips, and Techniques
- Panorama Overlap Calculator
- Pre-Stitch Vignette Correction
- Stitching Large Format Panoramas in PTGui Pro
- More Resources and Inspiration
This would probably be a good time to make a sort of disclaimer: making large format astrophotos is difficult. I’ve never before encountered so many challenges, setbacks and disappointments in a photography project as I have while starting this one. I’ve had multiple instances where I just wanted to give up. There were entire nights that I spent shooting and multiple days of processing only to realize that everything I shot, literally hundreds of photos, was all for naught. (Remember to double check your focus, kids.)
[devvn_ihotspot id=”130310″]
Large format panos are difficult to plan, difficult to shoot and difficult to process. But it’s not impossible, and with some trial-and-error, practice, and patience, I’ve come to greatly enjoy the process. More than anything, I love the amazing level of image quality that this technique creates. If you’re up for the challenge, it’s worth it.
Large Format Astrophotography Gear
The equipment needed for shooting a successful large format panorama is relatively simple. It’s likely that you probably already have some of these items in your kit.
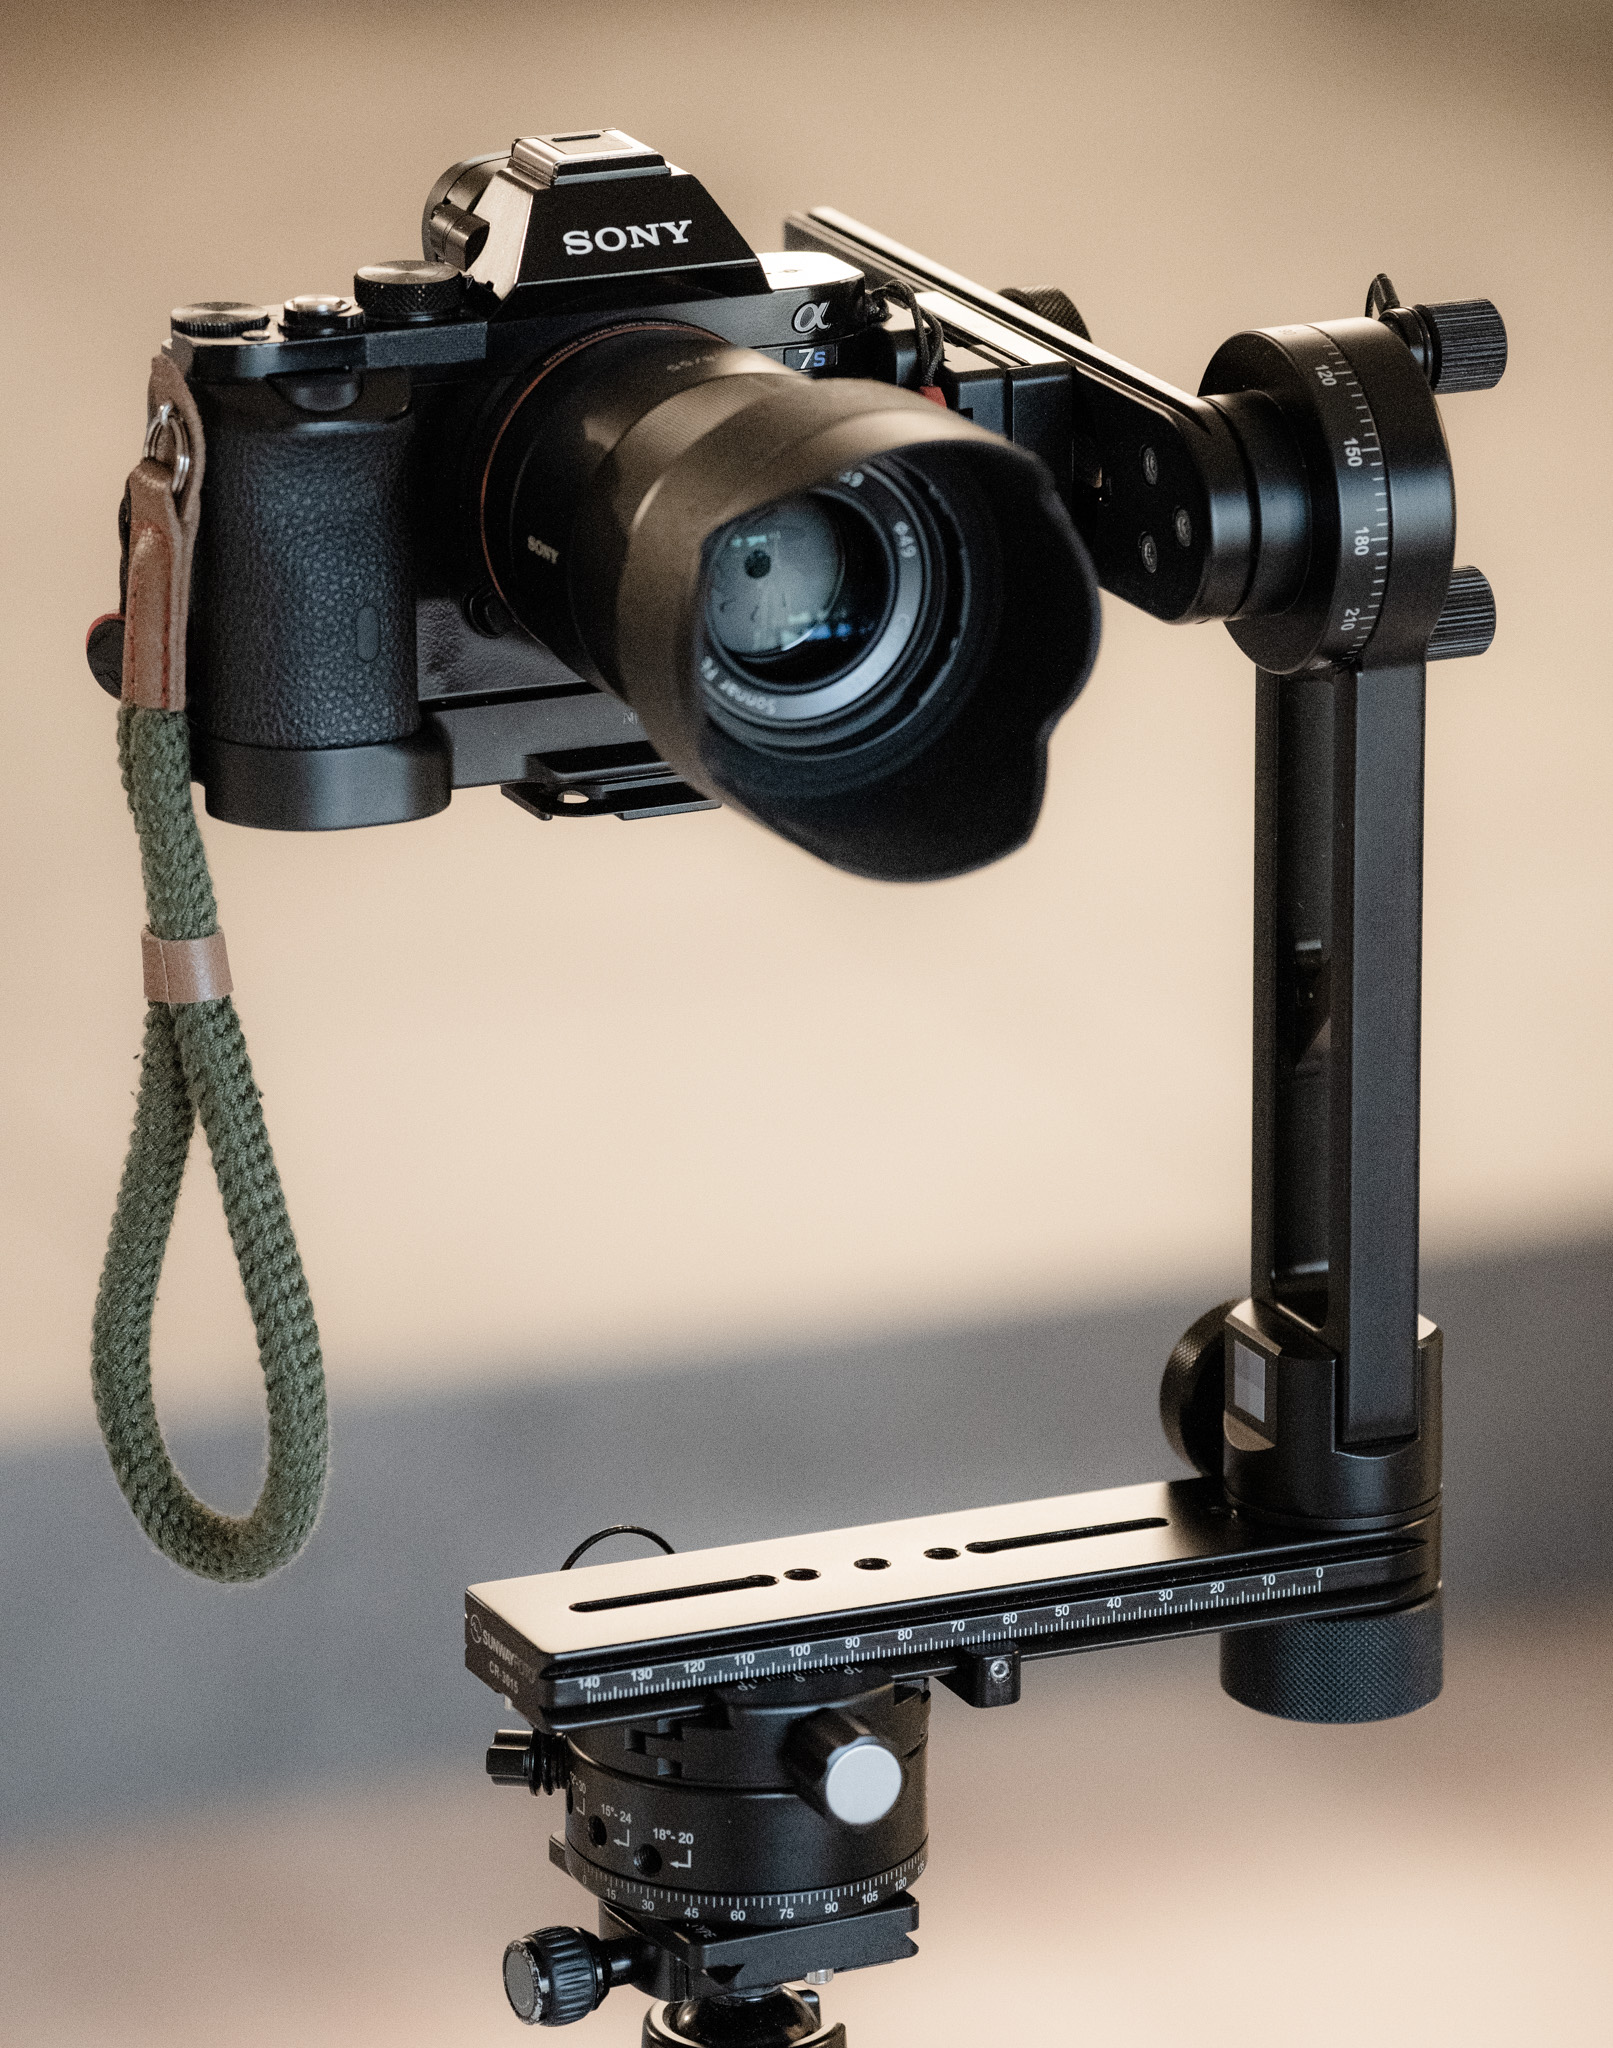
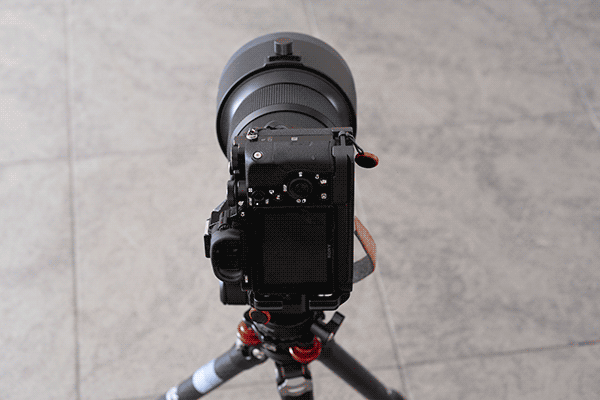
The biggest difference in a large format panorama kit, beyond the basic camera, lens and tripod, is the addition of a suitable panorama head. Using a basic ballhead is possible, but if you want to go large format, I highly recommend a proper indexing pan/tilt panorama head.
Here’s a breakdown of exactly what I currently use for shooting and processing my large format panoramas.
- Panorama Head
- Tripod
- Camera
- Remote Trigger
- IR Remote Trigger (Amazon / B&H) for my Sony a7S.
- Medium Telephoto Lens
- Computer and Panorama Software

Panorama Head
While not explicitly necessary for making multi-row panoramas with a long lens, an indexing panorama head makes large format digital photography much easier.
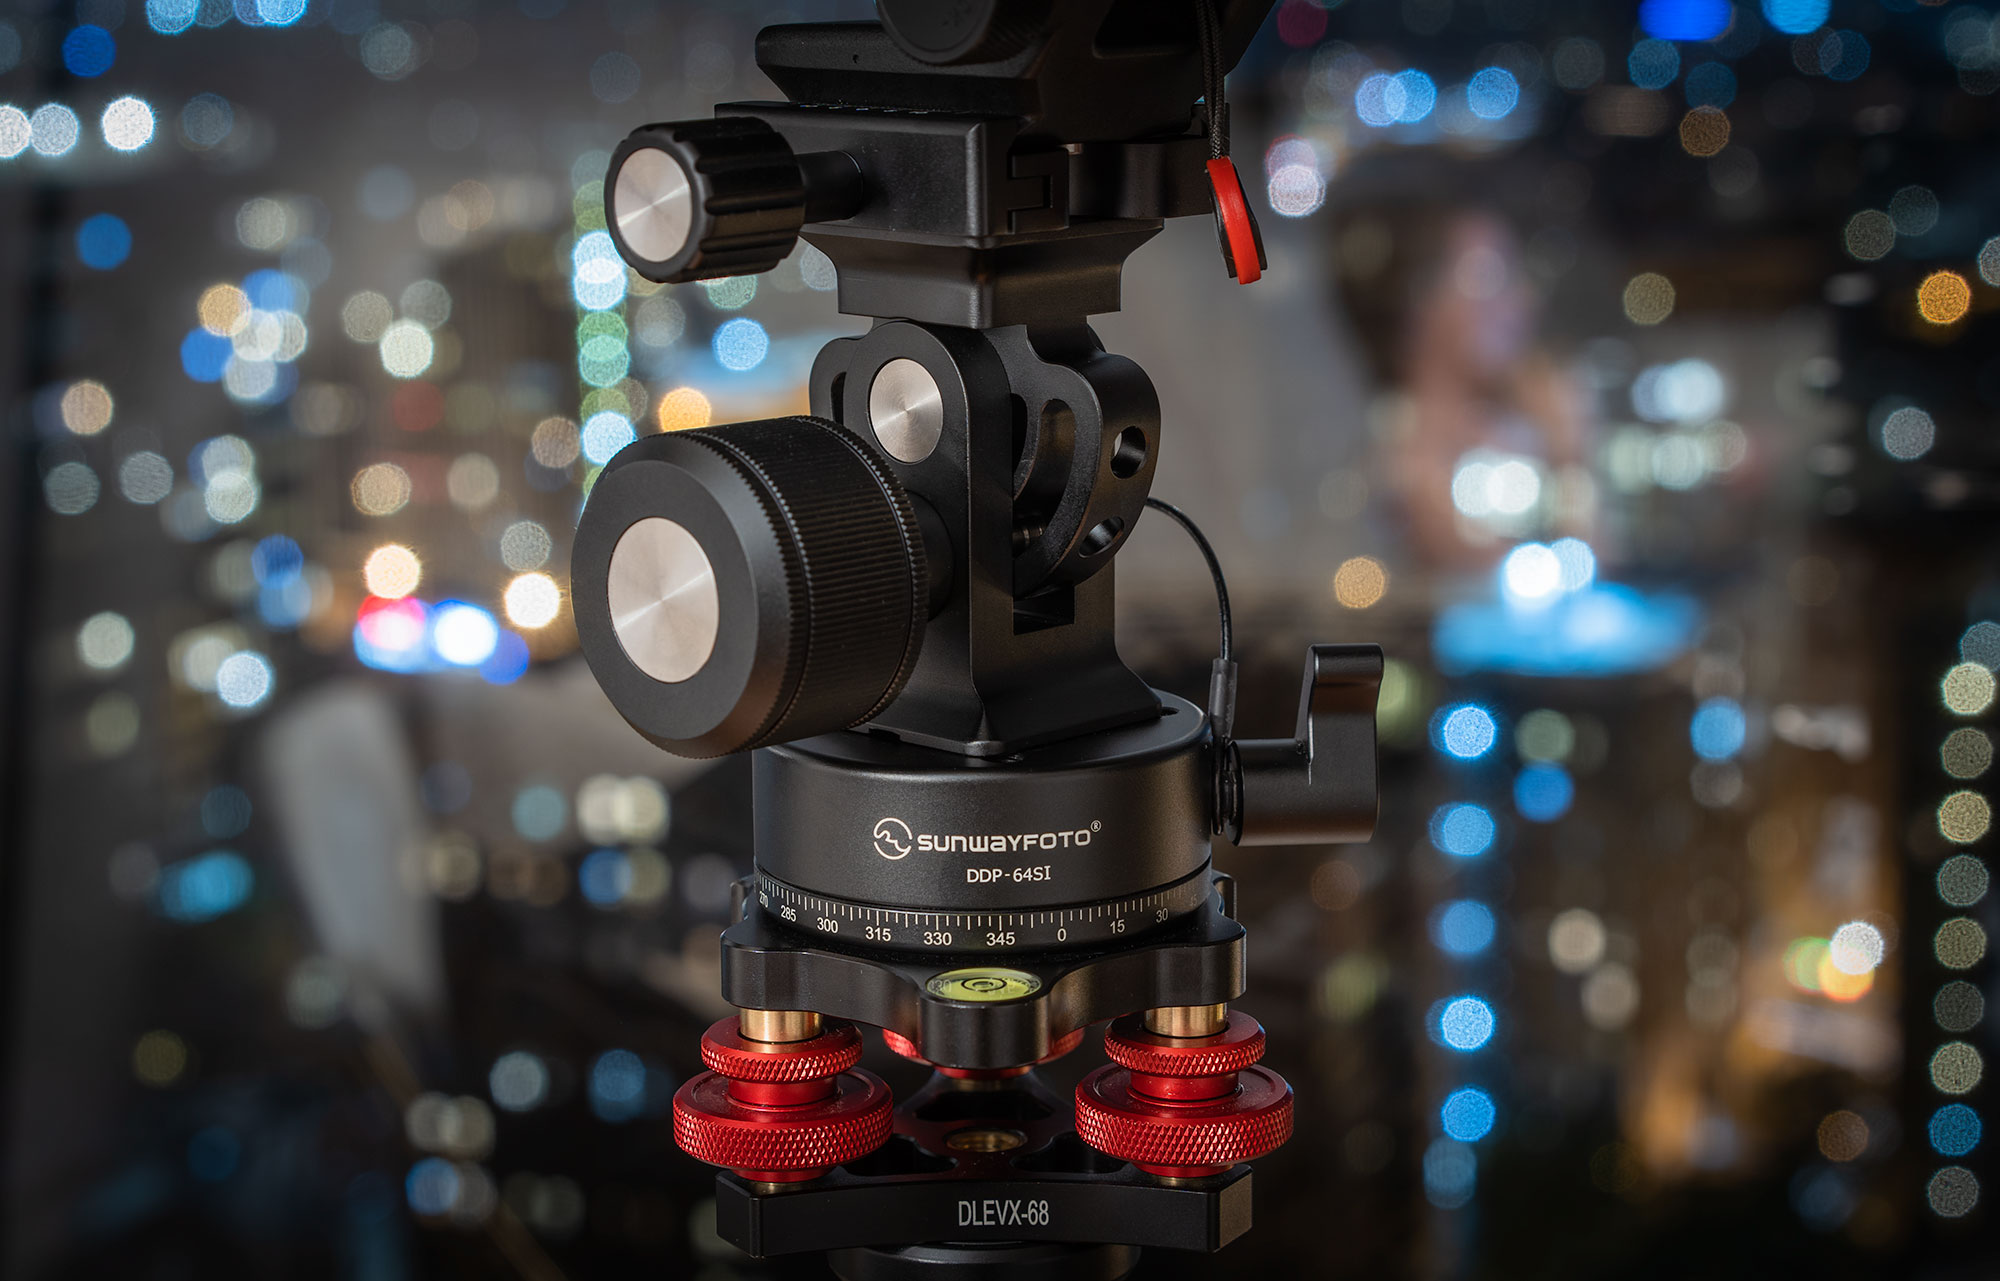
When shooting a panorama in the dark, an indexing head makes it possible to “feel” and hear each detent position of the camera so shooting a grid-like mosaic is much faster and simpler. I’ve preferred a simple pan/tilt panorama head, custom assembled from several parts: a leveling base, indexing rotator, and a monopod tilt head.
Fo more detail on my panorama head, check out our complete guide for building your own large format panorama head. If you want to get started immediately, you can forego a dedicated panorama head and use the tripod head you likely already have. A tripod ballhead or pan/tilt gearhead should also work fine, as long as the tripod is properly leveled for the panning axis.
Why not a multi-row no-parallax panorama head?
Note that my large format panorama head is different than a nodal rail based multi-row panorama head, like the ones I talked about in my medium format astrophotography post. No-parallax panorama heads like this have two indexing pan and tilt axes on rails that allow it to rotate about the lens’s no-parallax point.
For large format panoramas made with a long lens, shooting about the no-parallax point is not usually necessary and most nodal rail based panorama heads don’t work well with longer lenses like a 100mm. Since the no-parallax point for these lenses is usually at the rear of the lens or sometimes even inside the camera, it negates the need for a nodal rail.
Tripod
For all long exposure work, a tripod is essential. Make sure it’s stable enough for your camera and lens. Since we’ll be working with longer lenses, the stiffer the tripod, the better. I personally use a Leofoto LS-284C travel tripod, but I’m looking to eventually replace it with one that has a built-in leveling base, such as the LS-284CEX (Amazon / B&H) version.

Camera
The camera body you’re using doesn’t really matter that much. More megapixels will result in… more megapixels, but that’s about it. The other advantages of panorama stitching, like greatly reduced noise and elimination of vignetting and aberration, will be apparent regardless of the camera body.
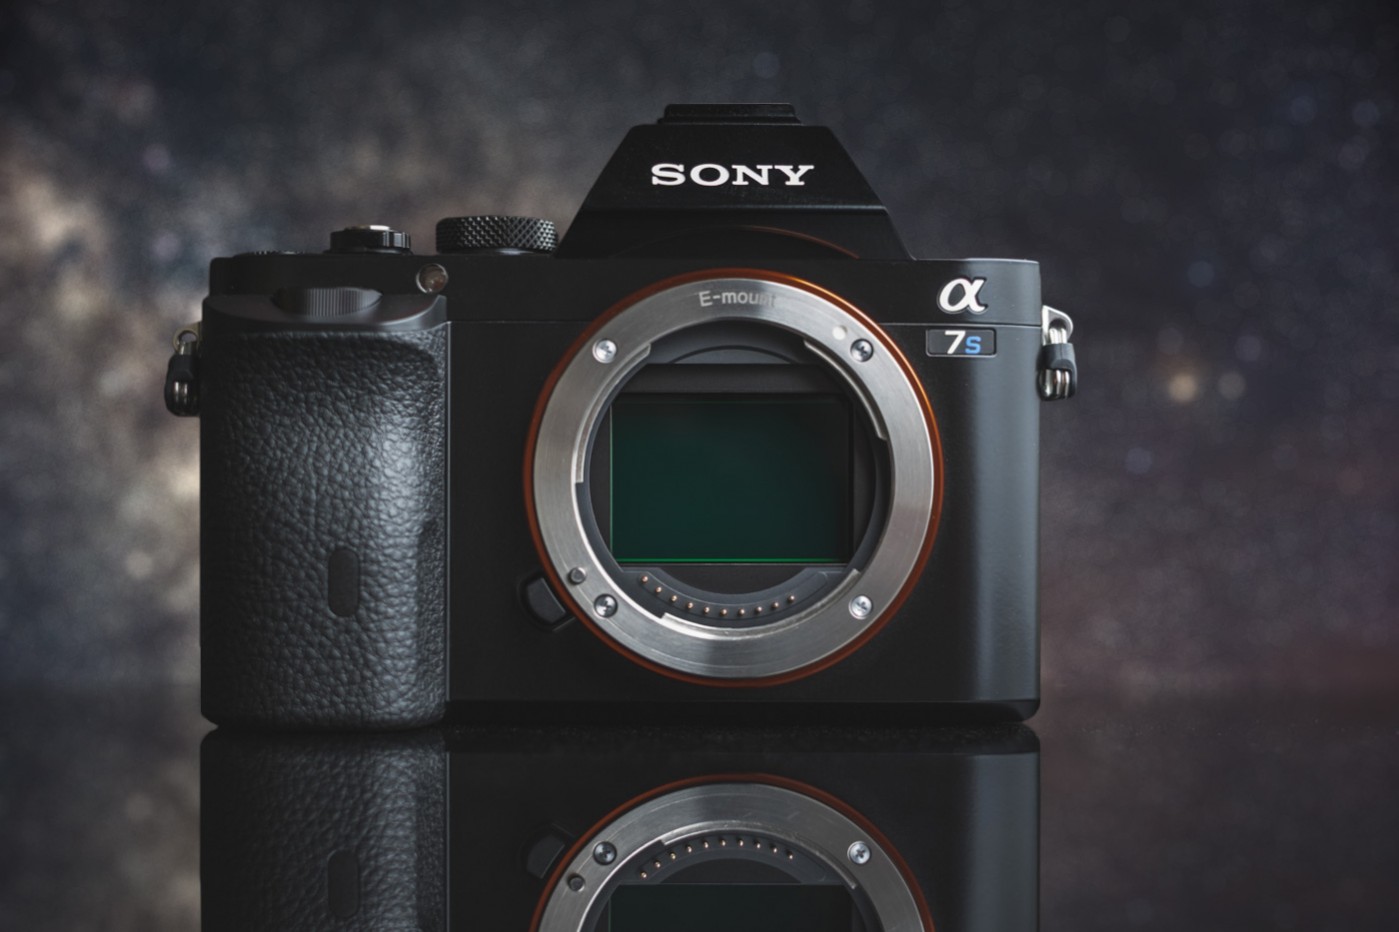
I shoot my large format panoramas on my aging 12-megapixel Sony a7S. I hope to step up to a higher resolution body like the Sony a7RIV (Amazon / B&H) eventually, but if I do, I’ll need to figure out if my 7 year old computer can handle processing 4+ gigapixel panoramas.
Remote Release
In order to prevent camera shake, especially with long exposures on a tripod, and to speed up shooting, I highly recommend a remote release for your camera.
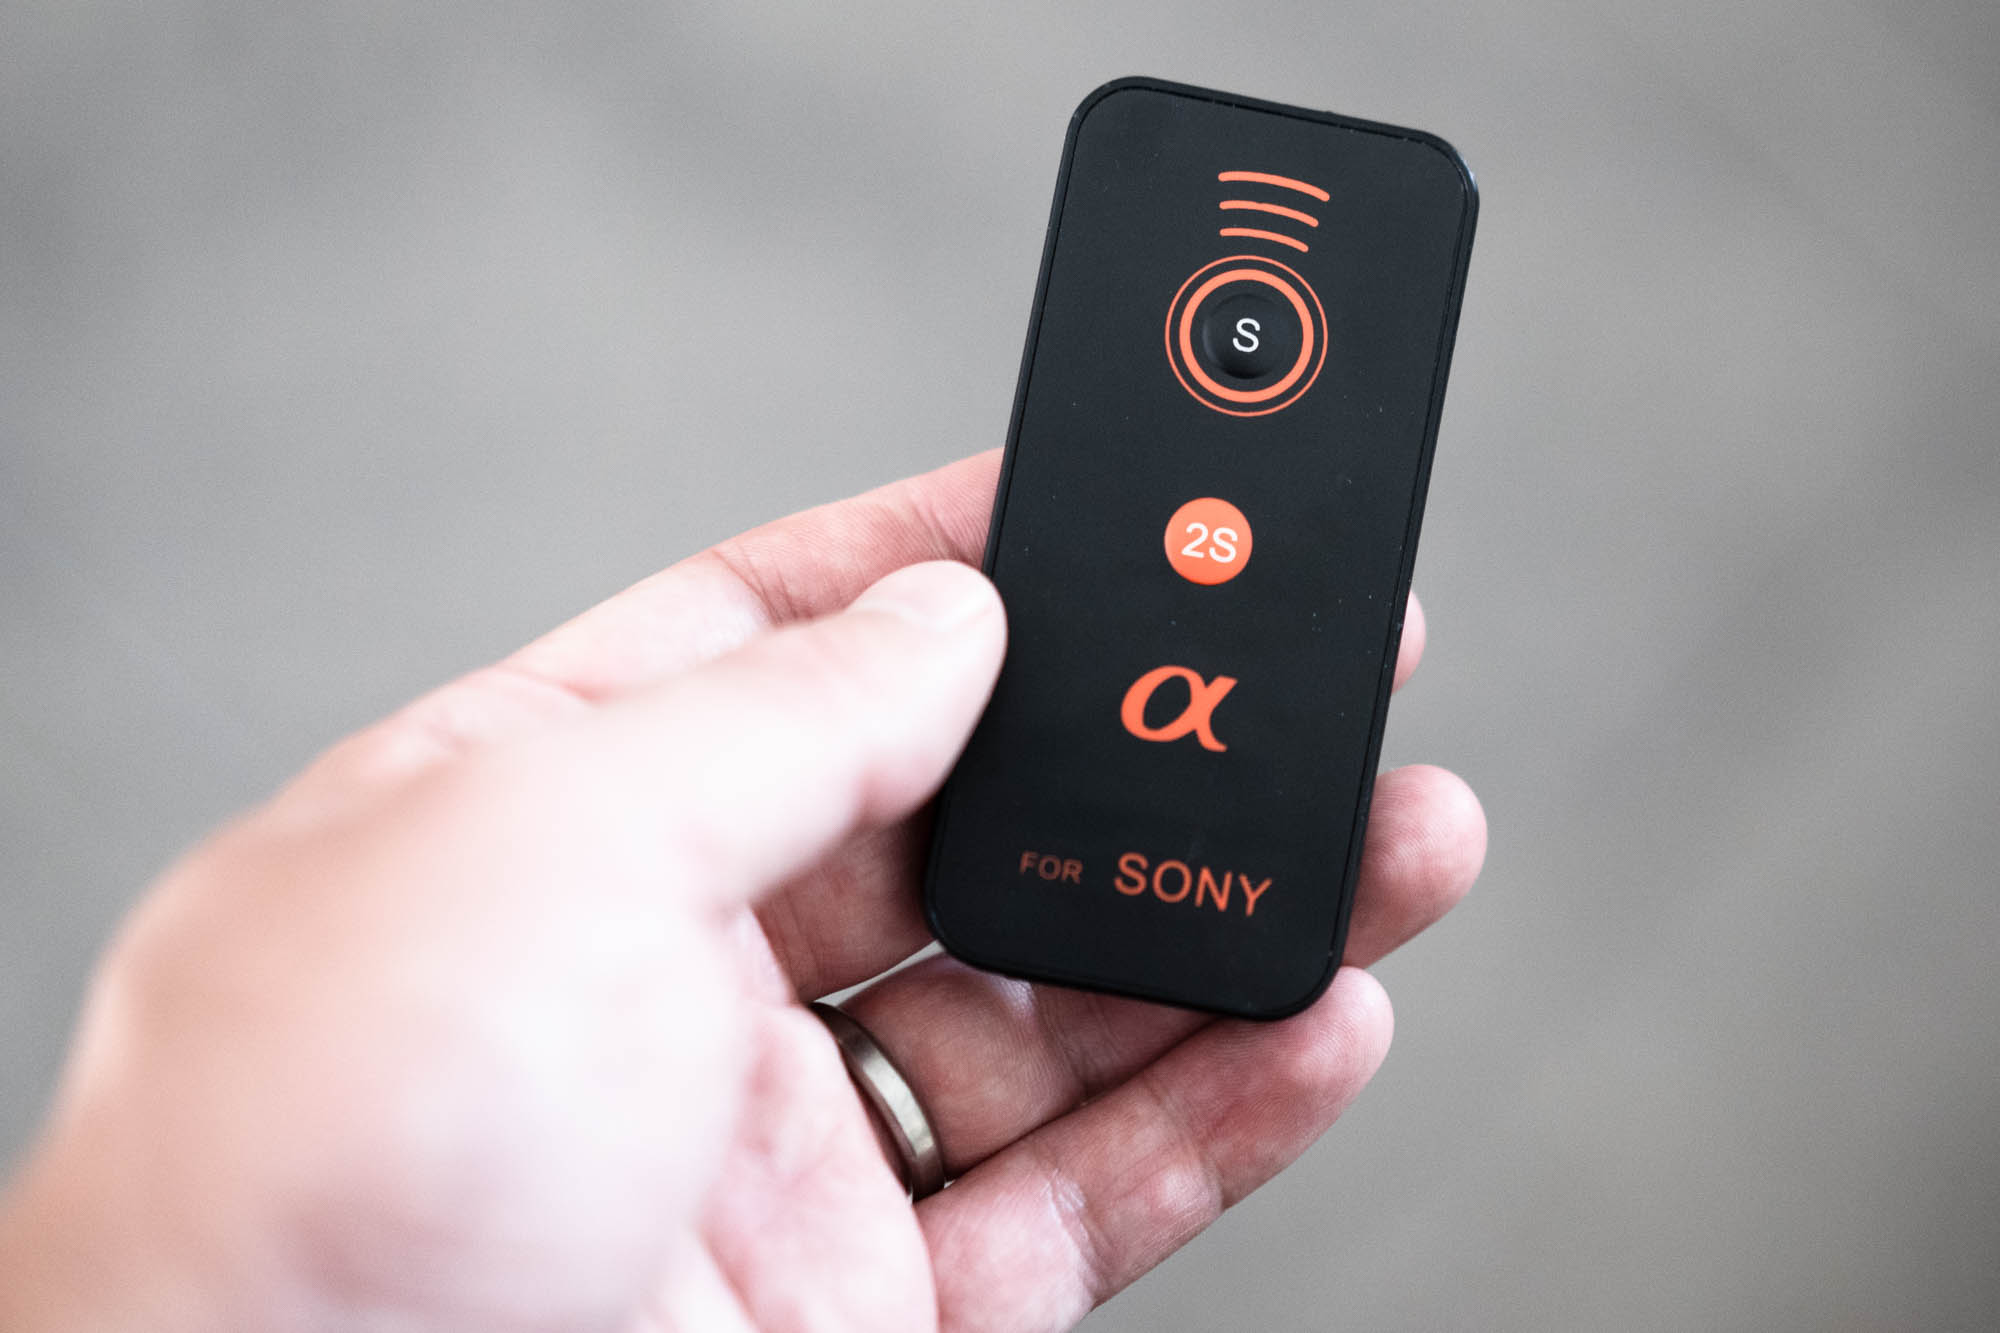
Either wireless or wired remote triggers are fine in this regard. Just find one that’s compatible with your camera. On my Sony a7S, I use a cheap IR remote made for Sony cameras.
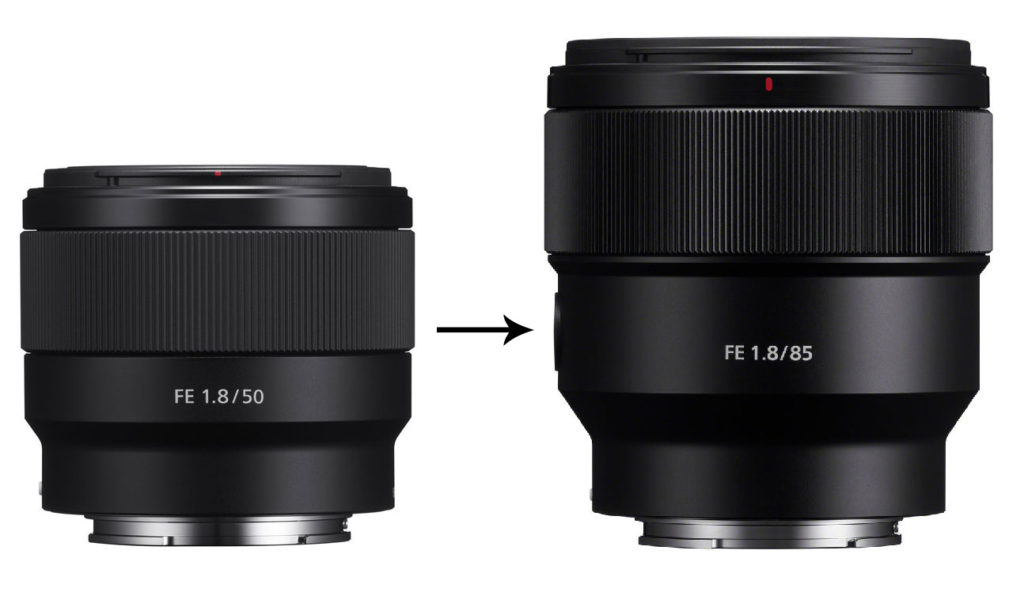
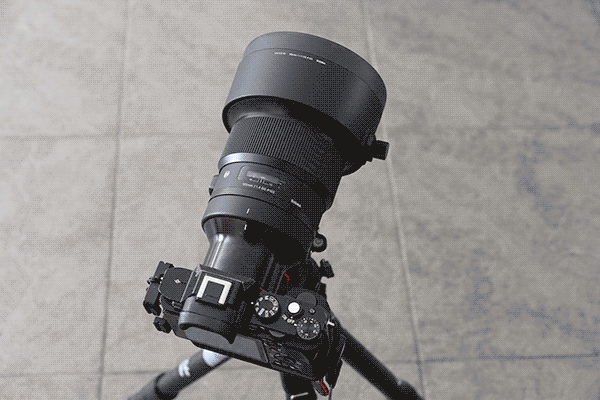
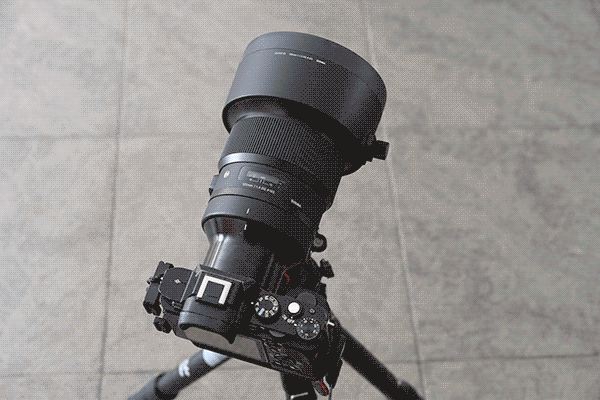
Medium Telephoto Lens
For a large format astrophotography panorama, I recommend a fast 85mm to 135mm equivalent lens with an f/number of f/2.0 or lower. A fairly long focal length is necessary in order to fully take advantage of the resolution benefits of large format panorama making. Telephoto lenses generally have higher resolution, larger apertures and less aberration issues than wide angle, short focal length lenses. Longer lenses are the secret sauce behind the “large format” look.
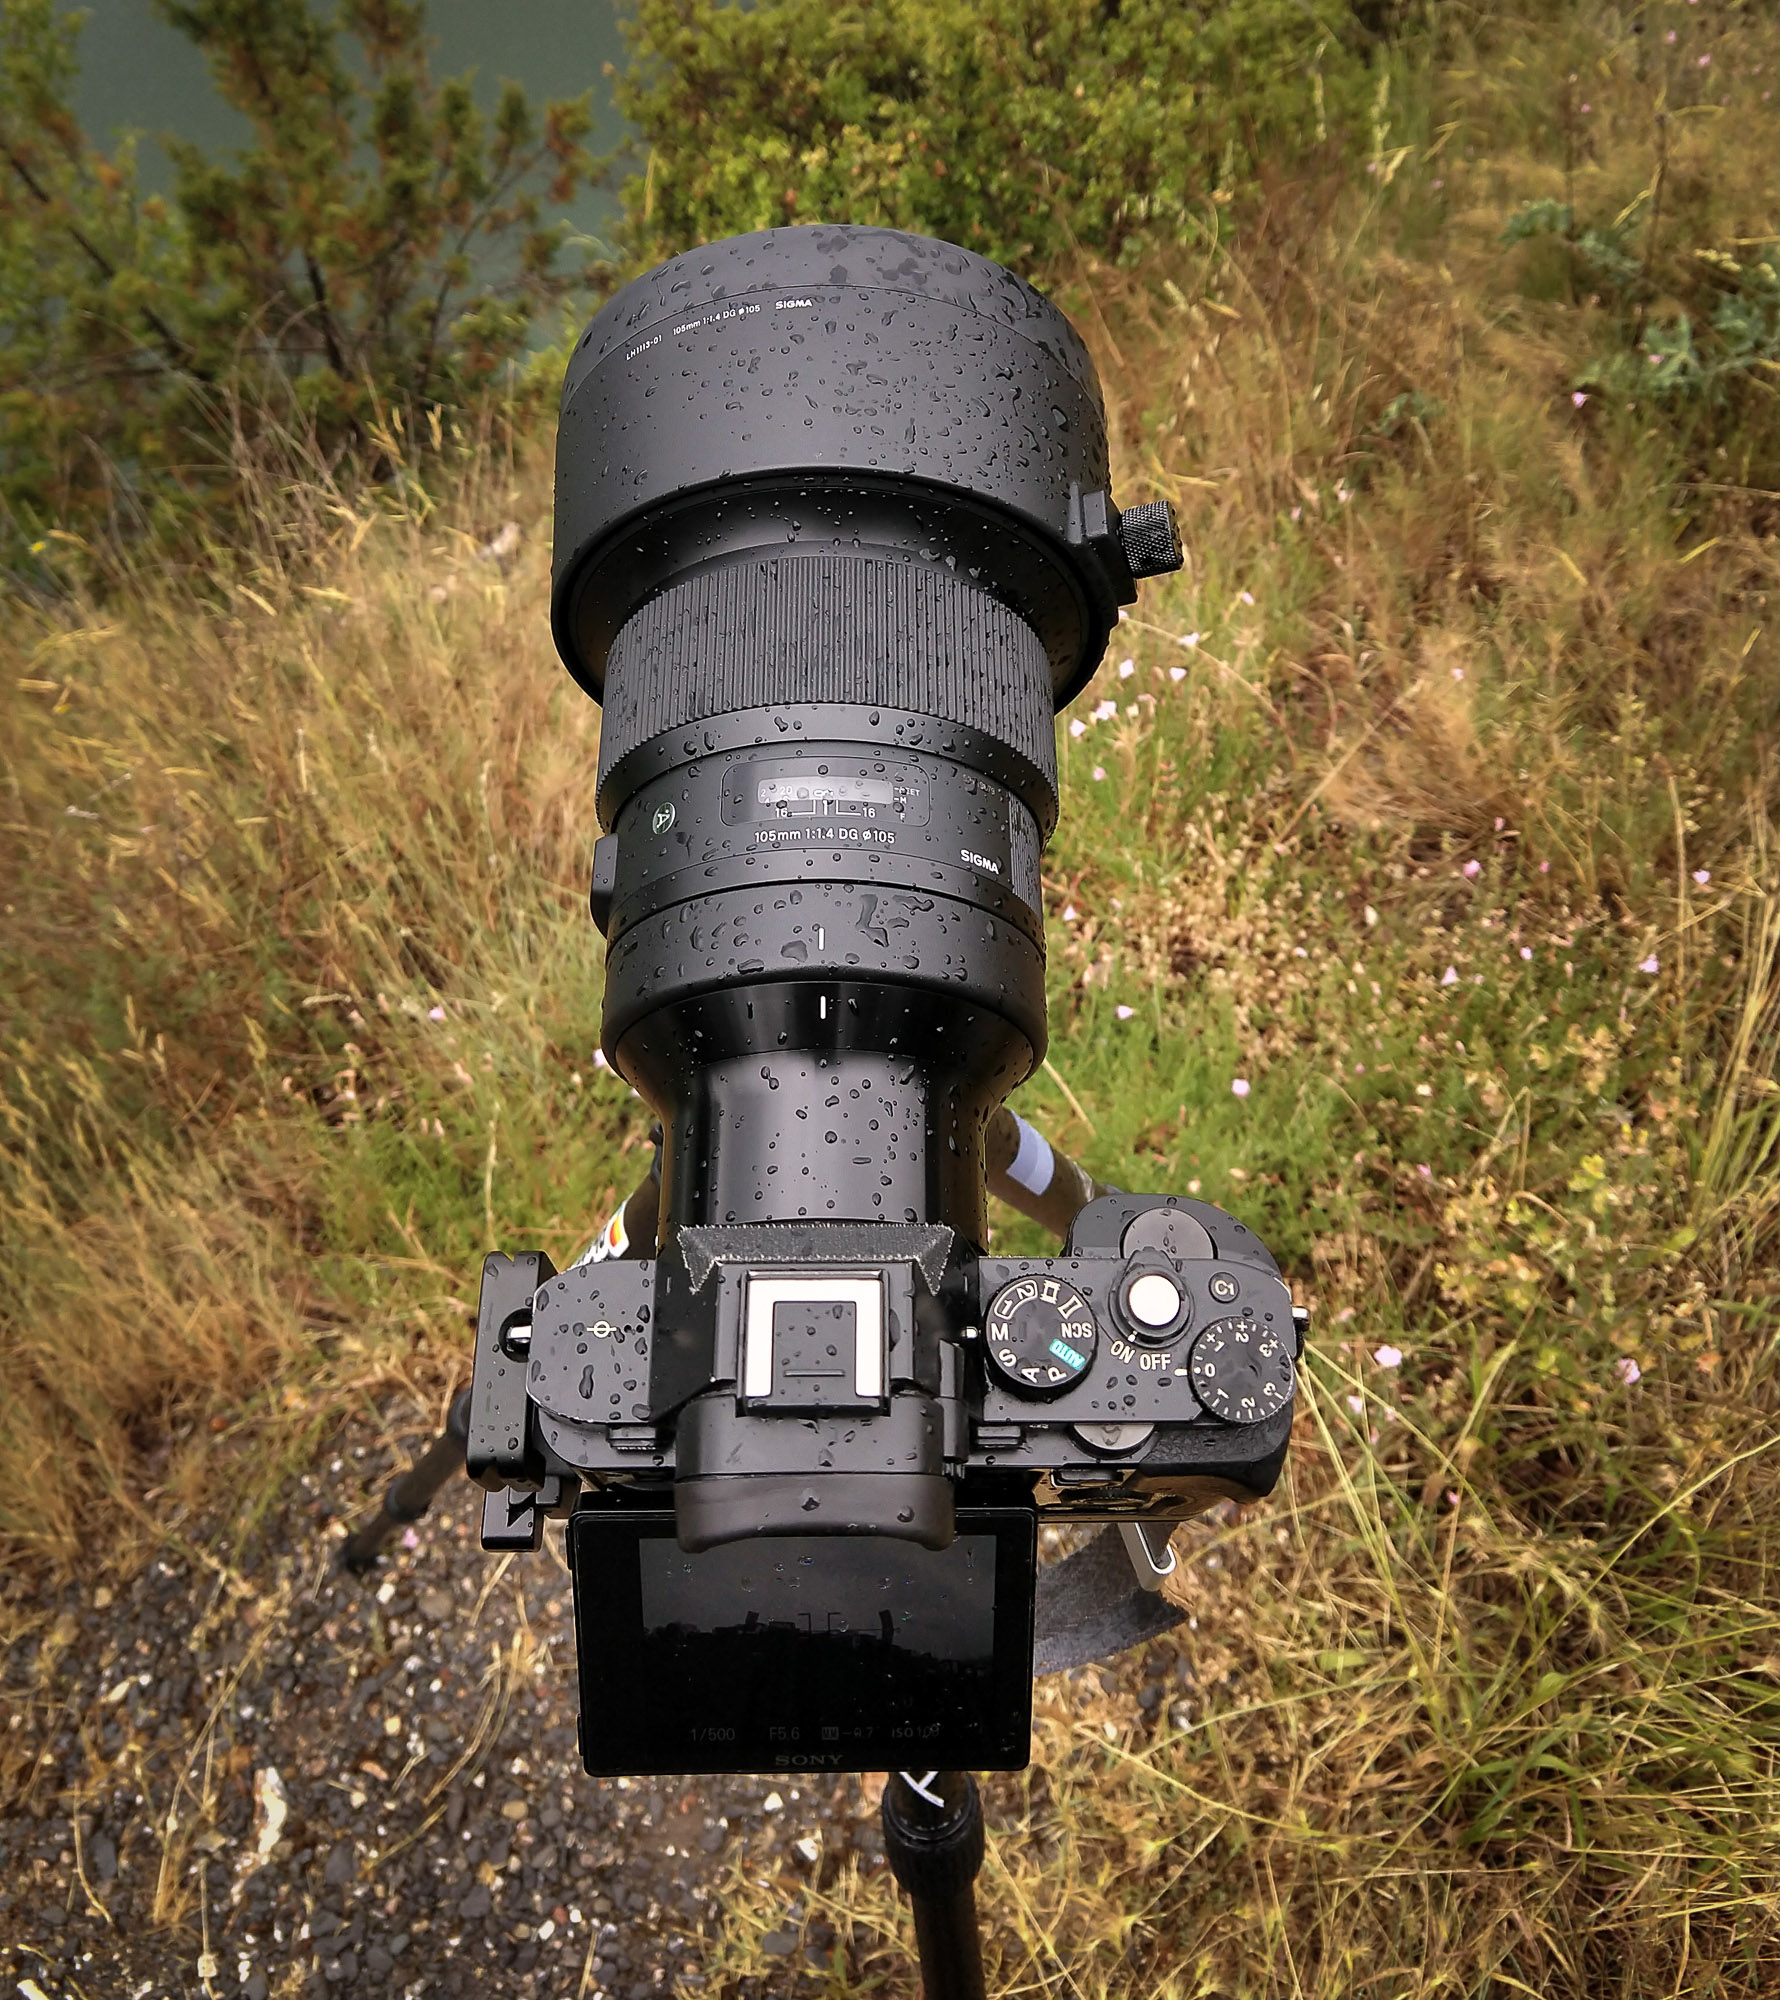
For astrophotography in particular, I recommend a “fast” lens, meaning it has a large aperture (low f/number). Most camera systems have some fairly fast lenses of f/2.0 or lower. The lower the f/number, the larger the lens’s aperture, the more light that the lens can gather for any given exposure and the lower the level of noise in the photo. Fast lenses also allow us to moderately stop down to reduce vignetting and increase sharpness. My lens of choice is the Sigma 105mm f/1.4 Art, particularly for its very fast f/1.4 aperture, minimal vignetting and excellent sharpness.
Below is a list of exceptional modern medium telephoto lenses that I recommend for their low f/numbers, in no particular order:
- 85mm-90mm Lenses
- Rokinon/Samyang 85mm f/1.4 (B&H / Amazon)
- Rokinon/Samyang 85mm f/1.4 AF (B&H / Amazon)
- Rokinon SP/Samyang 85mm XP f/1.2 (B&H / Amazon)
- Rokinon 85mm f/1.8 (APS-C) (B&H)
- Tamron SP 85mm f/1.8 (B&H / Amazon)
- 100-105mm Lenses
- 135mm Lenses
Any of the above lenses would be an excellent choice for shooting large format panoramas. Many of the lenses from Sigma, Rokinon/Samyang, and Zeiss are available in multiple camera system mount options.
Panorama Stitching Software – PTGui Pro
PTGui stands for “Panorama Tools Graphical User Interface” and it’s the most widely used and recommended piece of software in the panorama photography community. It was originally developed to utilize the code from the open-source Panorama Tools (PT) and, as its name defines, put it into a graphical user interface (GUI). Now, PTGui Pro uses its own powerful code that provides multiple capabilities for projection, frame manipulation, frame matching, stitching, HDR and lens correction.
As of right now, PTGui Pro is the only complete panorama stitching software currently available that has successfully stitched most of my very large night panoramas. I’ve tried Adobe Photoshop, Adobe Lightroom Classic, Microsoft ICE, Hugin, and AutoPano Giga. PTGui is arguably the best, with the exception of a few features in AutoPano Giga, which is no longer being developed. PTGui’s ability to pre-align images to a pre-defined grid pattern and shooting order helps greatly with rough alignment.
When automatic alignment isn’t perfect the user can match custom control points between exposures. With good alignment, PTGui Pro is also nearly always perfect at seamless blending. Most of all, PTGui Pro is the fastest panorama alignment and rendering software I’ve ever used. It leverages the use of discrete video cards using OpenCL for faster processing and that makes it very efficient with resources, very fast to perform alignment, and very fast at rendering huge panoramas, even in the gigapixel range. I’ll be using PTGui Pro for my tutorial samples below.
Note that the major differences between PTGui and PTGui Pro are that the Pro version includes capability for HDR panorama, custom masking, exposure and vignetting correction and viewpoint correction for correcting offset nadir shots. I personally think the built-in capability for exposure and vignetting correction, as well as custom masking are extremely useful tools so I recommend the Pro version over the regular license of PTGui. If you want, you can download a trial version of PTGui Pro to follow along with the tutorial below.
Pre and Post-Stitching Processing Software
For making pre-stitch exposure and color corrections and for performing adjustments to the final stitched photograph, a raw photo editor is essential. I personally use Adobe Lightroom Classic for most of my pre and post-stitch photo editing and that’s what I’ll use in my examples.
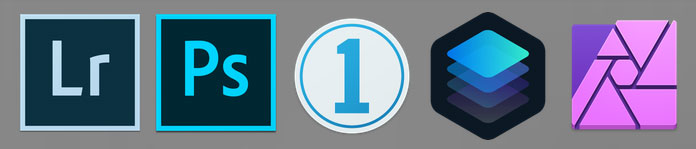
Most main-stream raw editors should be able to perform the same tasks. Here’s a short list of raw editors that I enjoy using. All of them can handle most of the pre and post-stitch tasks that I recommend:
As a side note, while Capture One Pro and Luminar are suitable for pre-stitch edits to individual frames of a panorama, I’ve found both to be much slower when attempting to handle very large files like a large format panorama. They will work, but in my experience Adobe Photoshop, Affinity Photo, and Lightroom Classic run considerably faster when editing large format panoramas.
Note that Lightroom Classic has an image size limit of 65,000 pixels per side, or a max resolution of 65,000px*65,000px=4.225 gigapixels. Affinity Photo has an image size limit of 256,000 pixels per side or 62.5 gigapixels. Adobe Photoshop has an image size limit of 300,000 pixels per side or 90 gigapixels. For more information on file size limitations, check out Aaron Priest’s article on the subject.
Large Format Astrophotography Panorama Camera Settings
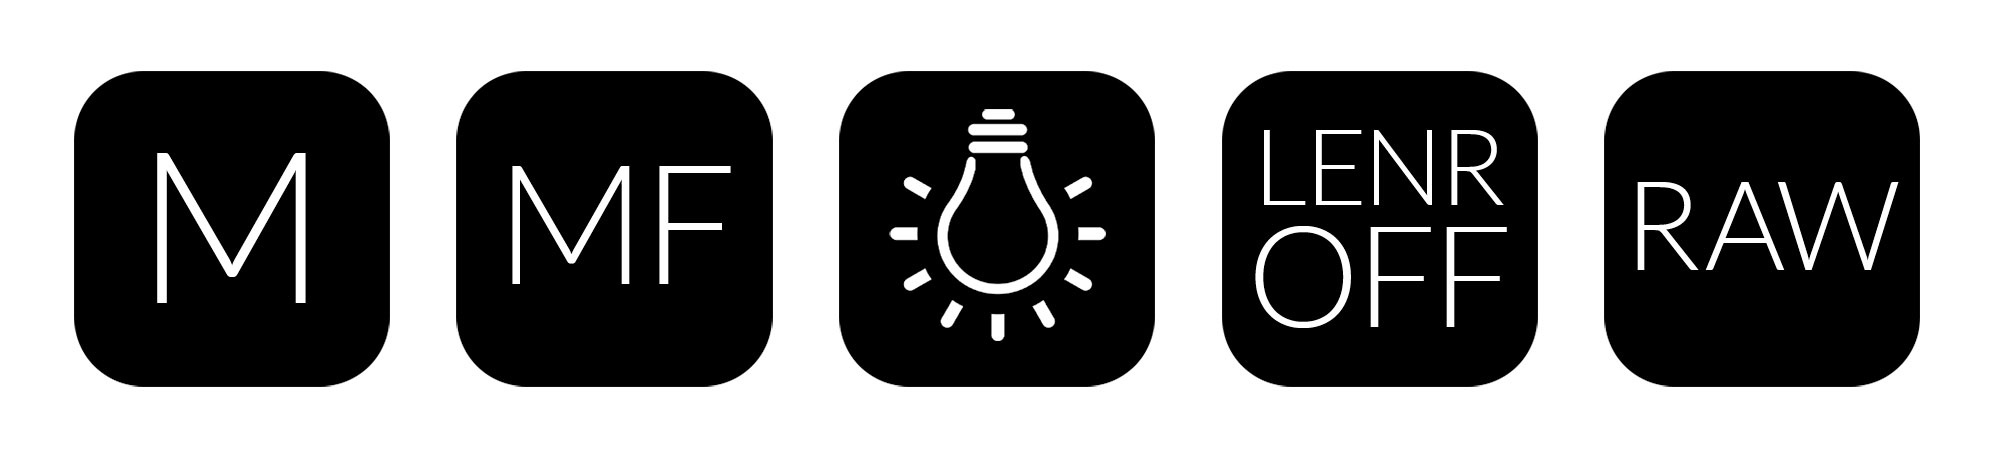
Manual Exposure
We don’t want our exposure to change between shots so manual exposure mode is essential. For most dark sky astrophotography conditions, the following settings should work for most medium telephoto lenses:
- Shutter: 2-5 seconds
- Aperture: f/2-f/2.8
- ISO: 1600-12800
Obviously, these settings will vary depending on the conditions, the equipment you’re using, and you’re own preferences.
Shutter Time
For astrophotography, you can calculated a recommended shutter time by using our basic exposure calculator or advanced shutter time calculator, but 2 to 5 seconds is usually long enough to capture adequate light with a long fast lens. That range is also not so long that the stars will streak too much across the sky.
Aperture
If you’re shooting at night with a fast lens like an 85mm f/1.4, it’s tempting to use the lens at a low f/number like f/1.4, but I don’t always recommend it. It’s usually better to stop down a couple stops, to f/2 or f/2.8. Stopping down increases sharpness, reduces aberrations, and reduces vignetting. Minimizing vignetting in camera will greatly help with stitching later. The more you can stop down (to a higher f/number), the less vignetting there will be. An f/1.4 lens stopped to f/2.8 will almost always have less vignetting than an f/2.8 lens shot wide-open at f/2.8.
ISO
ISO performance is very dependent on the camera body. The range of ISO 1600 to ISO 12800 is usually pretty safe. I don’t encourage using a very low ISO as it can actually be noisier than a higher ISO when shooting in dark conditions on certain cameras. Check out my guide on choosing the correct ISO for astrophotography on your camera.
Manual Focus
Autofocus rarely works well in dark sky conditions, and we don’t want our focus to change between exposures so manual focus is absolutely necessary. It’s important to decide, before shooting, where your focus point will be. In landscape astrophotography, the focus point will usually be near infinity where the distant elements of the composition, such as the stars in the night sky, are the point of critical focus.
If you’re having trouble focusing on the stars, we designed a tool called the SharpStar2 and you can check out our complete tutorial for techniques on how to focus on the night sky. Keep your camera set to manual focus and avoid touching the focus ring for the duration of shooting the panorama. It might also be helpful to tape the focus ring. I often carry a small amount of gaffer tape for this reason.
Manual White Balance: Tungsten/Incandescent or Daylight
Like exposure and focus, we don’t want the white balance to change between exposures, so it’s best to use a manual white balance setting. I usually set mine to the daylight (sun) setting. If you want your photos to look less yellow/orange straight out of camera, use the tungsten/incandescent (lightbulb) white balance setting.
Long Exposure Noise Reduction: Disabled
Shooting large format panoramas is time consuming and we need to try to be able to shoot all the frames of the panorama as quickly as possible, without interruption. Long exposure noise reduction, while mildly helpful for reducing fixed-pattern noise, causes each exposure to take twice as long. I think the benefits of being able to shoot faster greatly outweigh the small noise reduction benefit of this setting, so I highly recommend disabling long exposure noise reduction.
Shoot Raw
Raw files contain more data and have greater dynamic range for post processing than .jpeg files. They also allow white balance to be changed later in the computer. Large format panoramas can require a lot of post processing so I highly recommend shooting in your camera’s raw file format for the best results.
Other Settings
- Disable in-camera lens corrections
- The vignetting and distortion correction profiles built into your camera are usually not as good as the corrections that we can perform in post-processing.
- Disable image stabilization
- If you’re shooting on a tripod, image stabilization might drift during long exposures, causing blurry photos. Usually, it’s best to disable it.
Large Format Astrophotography Panorama Shooting Tips and Techniques
Pre-determine your pan/tilt index angles for 50% overlap
Adequate overlap of frames is essential to ensuring a successful final stitch. It also allows the stitching software to cutout the edges of each frame which are the areas most likely to have lens aberrations or vignetting. Use of an indexing panorama head can greatly help to ensure consistent overlap.
Before you start shooting, calculate the number of degrees you should pan and tilt between shots for about 50% overlap between frames. The angles are dependent on your camera, lens and whether your camera is mounted in portrait (vertical) or landscape (horizontal) orientation. I’ve written a simple calculator that determines how many pan or tilt degrees to sweep your camera between shots for any given kit. You can also enter your desired output to estimate the resulting resolution of your panorama:
Once you’ve determined the degree values needed for your panorama, set your indexing head so that it sweeps that amount between each shot. These angles are also helpful for entering into PTGui’s panorama stitching software, so remember the angles for later.
If you’re not using an indexing panorama head, the easiest way to perform proper overlap unguided is to note a central element present in your current frame and to sweep to your next framing by placing that previously central element of your last frame just outside the edge of your next frame.
It’s possible to use less than 50% overlap. As you learn the capability of your gear and stitching software, it can be helpful to slightly reduce overlap in order to reduce the total number of frames necessary to cover any given field of view, but at a higher risk of potential stitching errors. I’ve successfully used about 30% overlap on certain panoramas and PTGui claims to be able to stitch with as little at 10%. If you’re just starting, shoot 50% overlap for the best results, especially with astrophotography panoramas.
Landscape or Portrait?
In the case of multi-row panoramas, if your overlap is consistent, the orientation of the camera doesn’t really matter. For any given final field of view for a multi-row panorama, either orientation will require about the same total number of photos. You might find that you prefer one orientation over the other, depending on your panorama head, lens, or camera design.
After trying both orientations for my setup, I found out that I usually prefer the landscape orientation because my camera’s LCD screen on my a7S only tilts for that orientation. That said, shooting in portrait allows me to shoot with less total number of rows in my panorama.
Pre-visualize your desired frame, include more than you need
Look at your scene and try to imagine all the elements of the scene that you desire to include in your final frame. The imaginary box that surrounds and includes all those elements define the shooting area of the panorama.
Make sure that you include all those elements, plus a little more, to allow for cropping of the final panorama. In my example above, I thought I included plenty of extra frames for the crop, but got real close on the bottom right corner. Most panorama stitches will require cropping of the extreme corners of the image (usually because the projection will stretch the corners) so make sure to include more than you think you’ll need in the panorama.
Level your tripod’s panning axis
Before you start shooting, level your tripod’s horizontal panning axis as best you can. This will ensure that each row sweep of the panorama aligns nicely with the next.

I recommend a tripod leveling base as a nice way to quickly and precisely level the panning axis, even if the tripod legs are not perfectly level. I currently have a tri-wheel leveling base, but I’m considering changing to a tripod that has a built-in half-ball style leveling base for reduced weight, extra stability and less overall gear.
Double check your focus
Since we need to shoot with manual focus, always take a test shot and review the image under magnification to verify that the image is in focus before you begin shooting your mosaic of exposures. Check out our focusing tutorial for more tips.
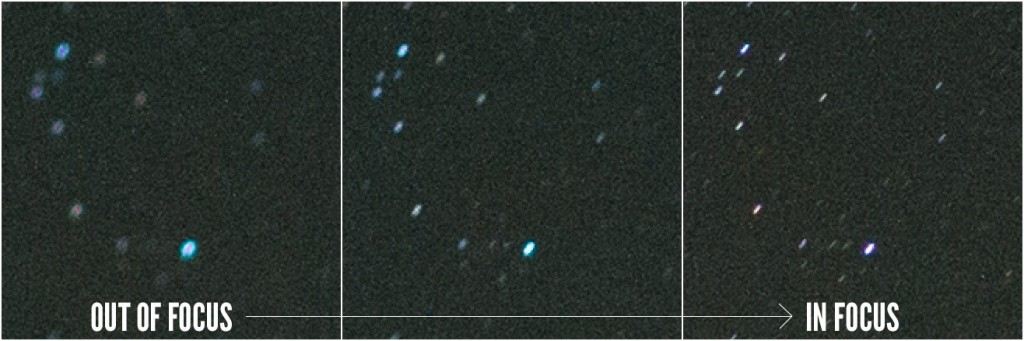
Once you’re doubly sure the shot is as sharp as possible, be careful to not handle the focus ring of the lens during the shooting process.
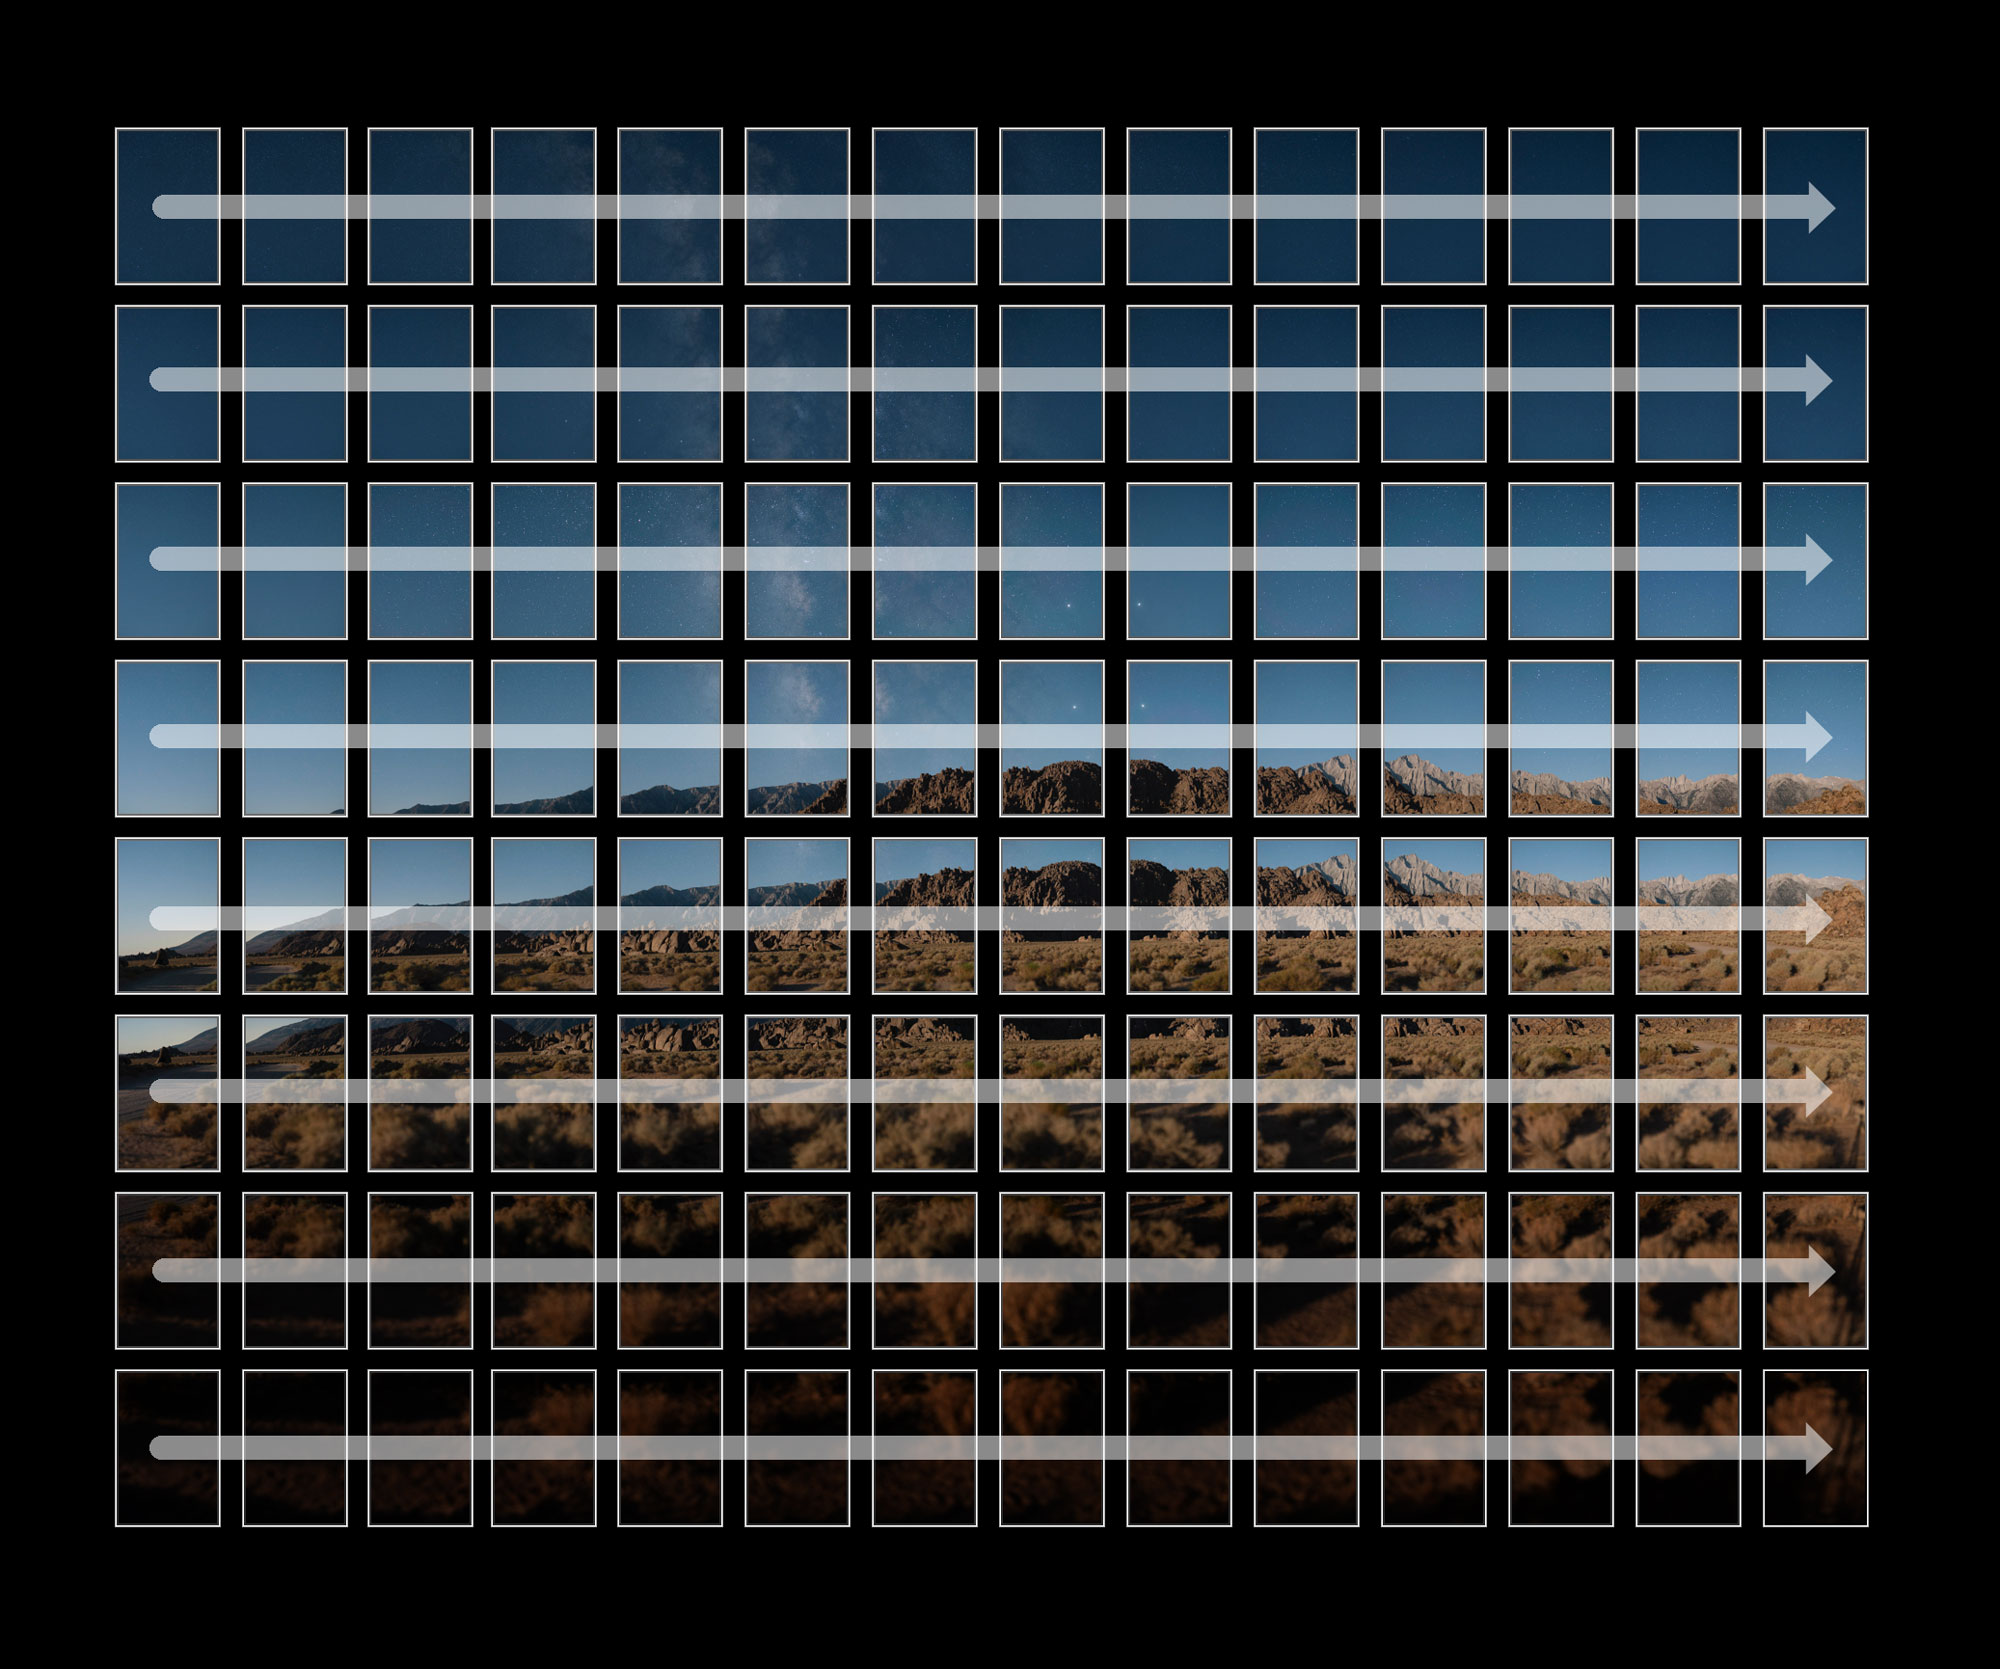
Shoot in rows
There are several different approaches to panorama shooting, but I prefer to shoot one row at a time, starting from the top left corner. In my experience, it’s preferable to shoot one horizontal row of photos at time, rather than shooting in vertical columns.
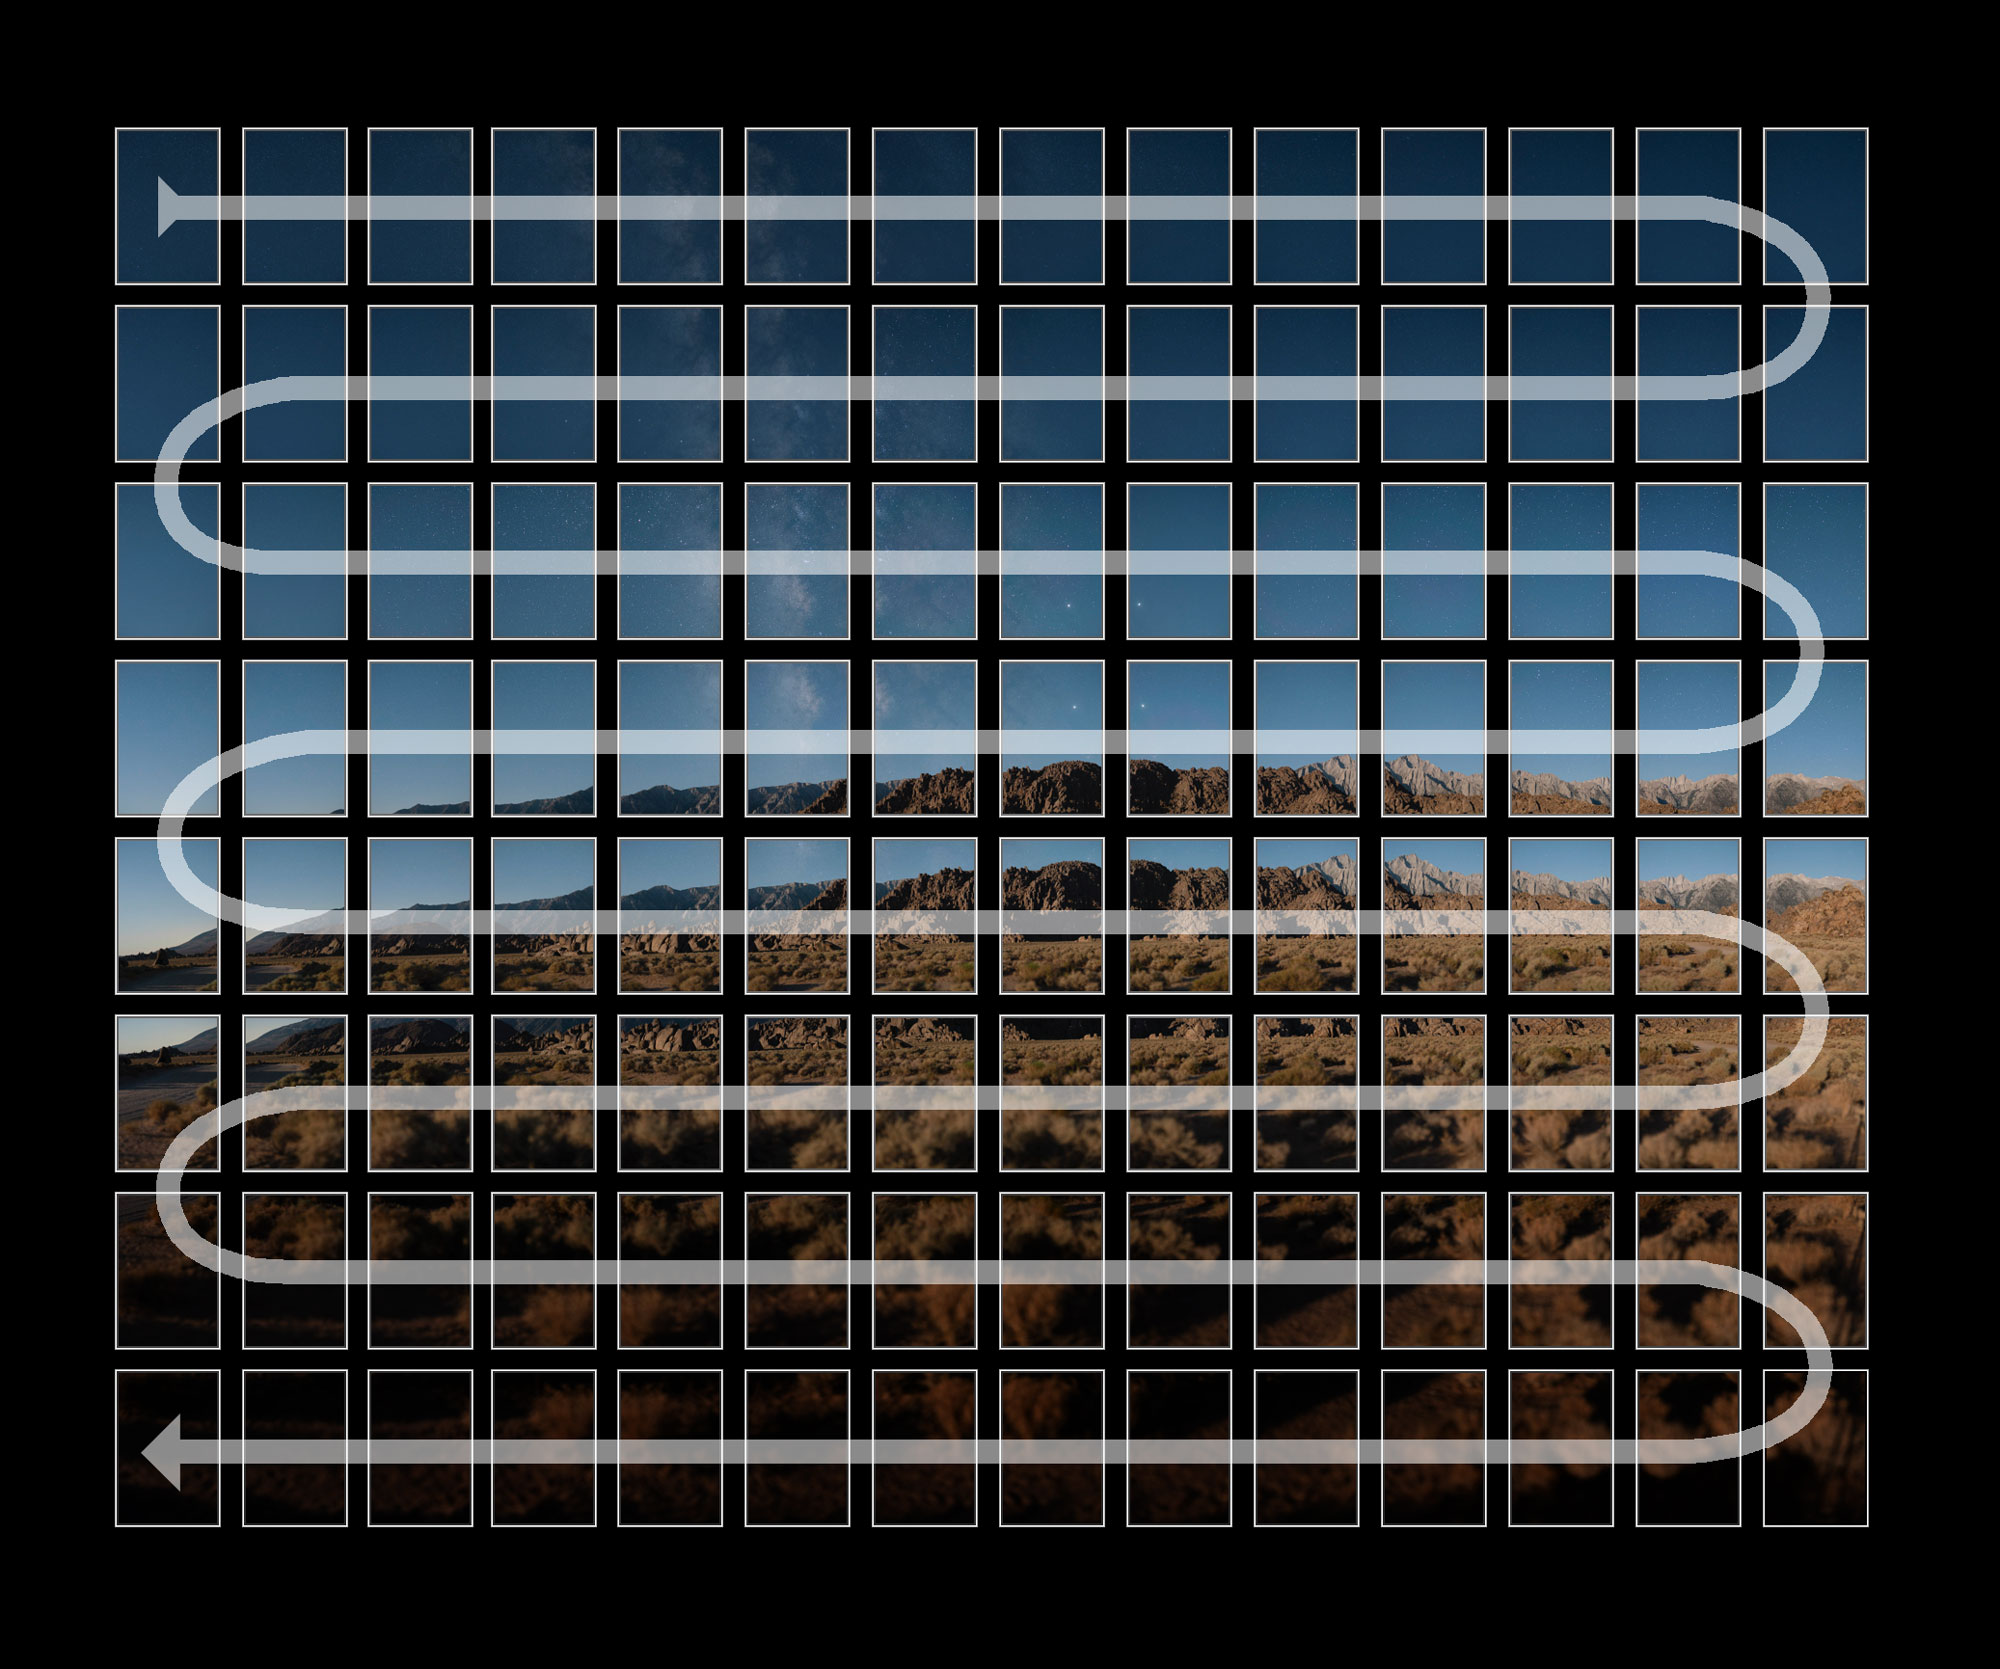
Horizons, either literal or perceived, tend to be a present element in most scenes and so they become an automatic guide by which we can direct the shooting of a sweep of frames. This makes it easier to make panoramas manually, handheld and with or without the assistance of a panorama head.

To minimize necessary camera movements and speed up the shooting process from row to row, shoot in a snake-like or zig-zag motion. I recommend starting in the top left corner of your imaginary desired frame, sweeping right for the first row, then moving down and sweeping left for the next row, and so on.
If lighting conditions are changing due to the moon rise/set or sun rise/set, it may be helpful to shoot every row in the same direction. This will equalize the amount of time between photos from row to row to make for a more consistent gradient of light after the final stitch. But since this method requires more total camera movement, I don’t recommend using it most of the time.
Count each exposure out loud
This might sound ridiculous, but unless you’re using an automatic panorama robot, you should count each and every exposure of each row out loud. If you have 10 frames per row, count each exposure until you reach 10, before resetting back to 1 for the next row.
Seriously out loud: “click, 1, click, 2, click, 3, click, 4, click, 5, click, 6, click, 7…”
A single missed exposure in a group of more than a hundred can ruin the possibilities of a successful stitch and waste your time. I’ve messed up more panoramas than I want to admit by forgetting to count. Try to not make the same mistake.
More astrophotography panorama shooting tips
- Allow at least 1 second between frames, after moving your panorama head and before actuating the shutter for the next shot to allow any vibrations in the tripod to settle.
- Use a remote trigger or cable release to actuate the shutter without touching the camera or tripod. Since large format panoramas require a medium telephoto lens, each exposure is much more susceptible to camera shake.
- Some cameras have the option for “bright monitoring” or a similar function that can help framing by artificially brightening the viewfinder at night. Consider enabling it while shooting to keep track to framing and to help ensure proper overlap.

When you’ve finished shooting for the night, you should have a nice large collection of frames, ready to import to your computer for stitching and processing.
Large Format Astrophotography Panorama Pre-Stitching Tips and Techniques
Pre-Stitch Processing: Vignetting Correction
Now that we have a big collection of panorama frames we can import them into Adobe Lightroom Classic or your favorite raw editor for a few pre-stitch edits.
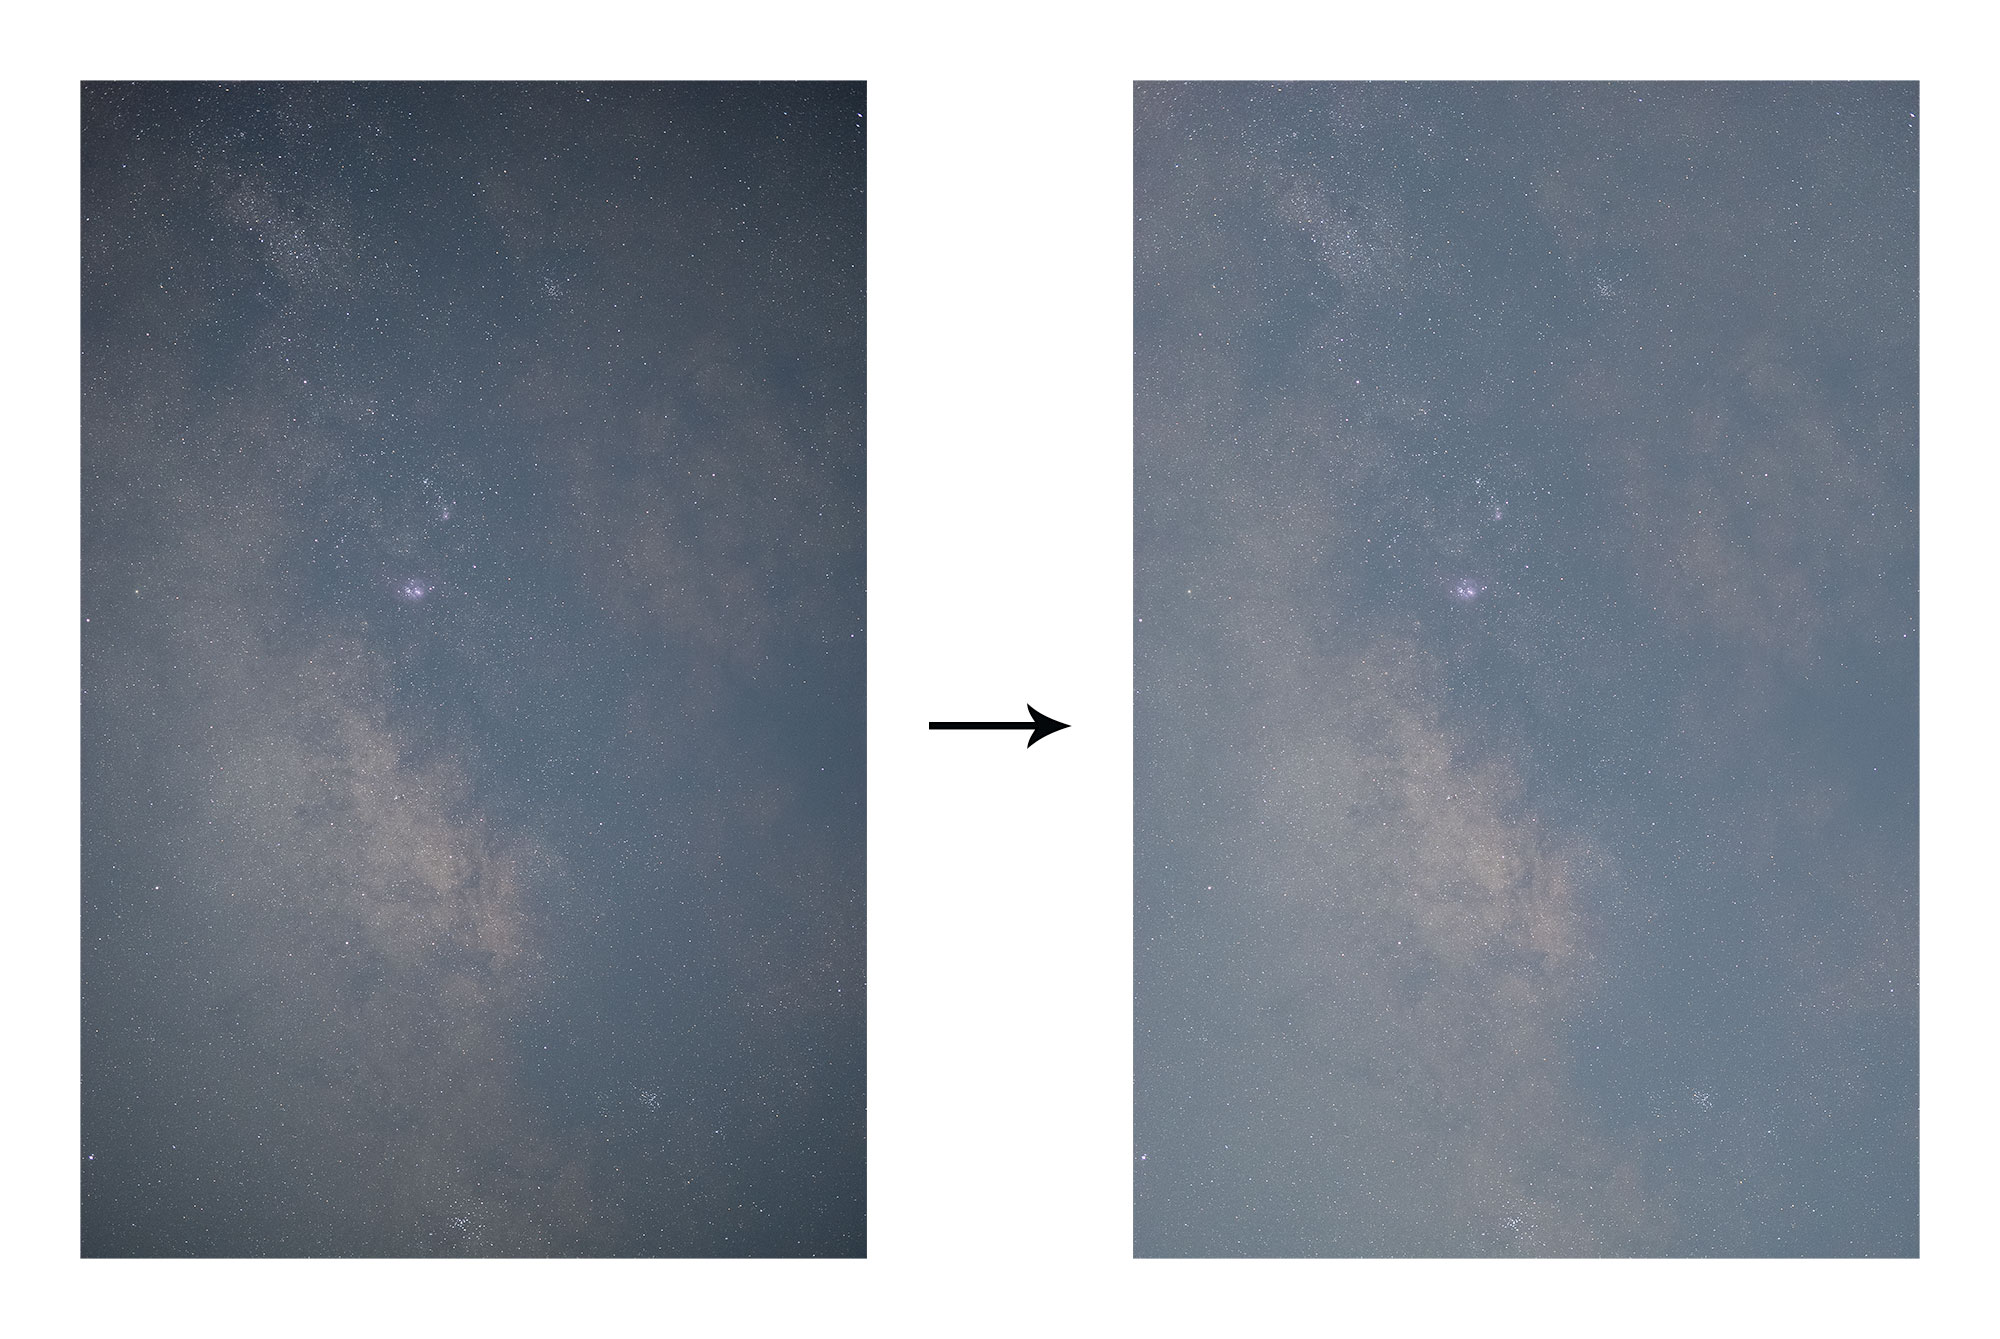
One of the most important edits that can be applied to individual panorama frame before they are stitched is vignetting correction. Usually, our images will have dark corners due to light fall-off at the periphery of the image called vignetting. Even with built-in vignetting correction in PTGui Pro, the presence of vignetting in your source images can cause a panorama to show darker areas along stitch seams, breaking the illusion that the final image is seamless.
No vignetting correction 
Just stitcher vignetting correction 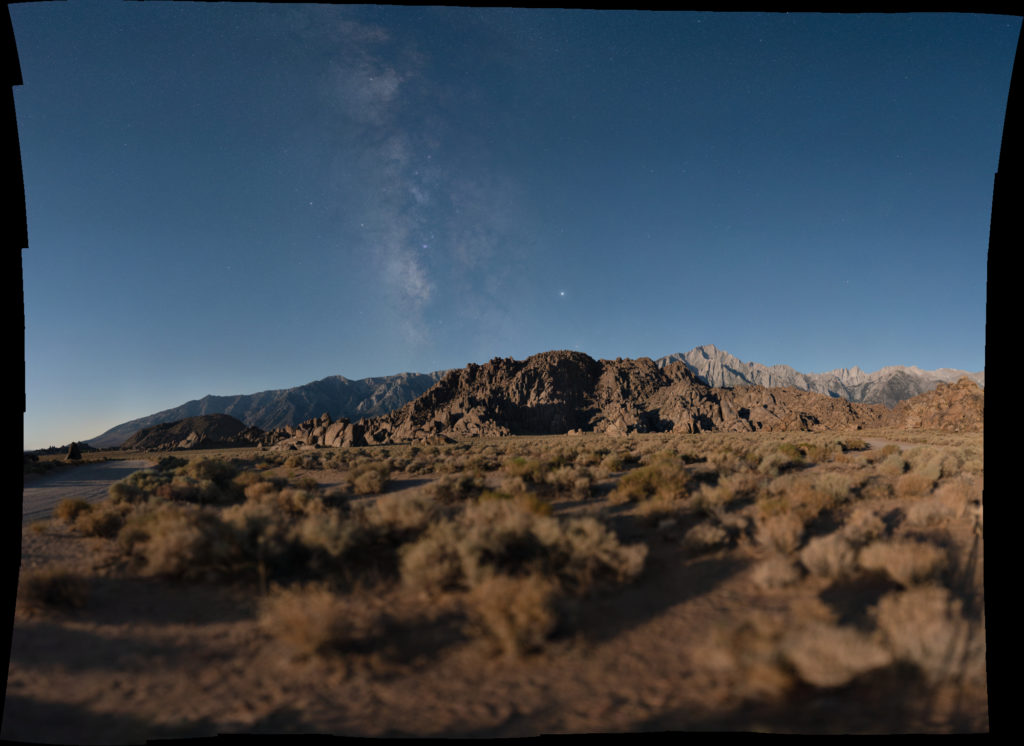
Pre-stitch and stitcher vignette correction
Vignetting correction is also especially necessary on exposures that were made with a lens shot wide-open. In my example, I’ll be using photos shot at f/1.4, just to show an extreme, hard to correct case of vignetting.
Raw editor lens profile corrections
Raw editors like Adobe Lightroom Classic offer a database of custom lens profiles that can be applied to raw photos to correct for vignetting. These profiles can also usually be adjusted for the amount of vignetting correction applied. Before we import our photos into PTGui, it’s helpful to apply vignetting correction to the images in Lightroom Classic first.
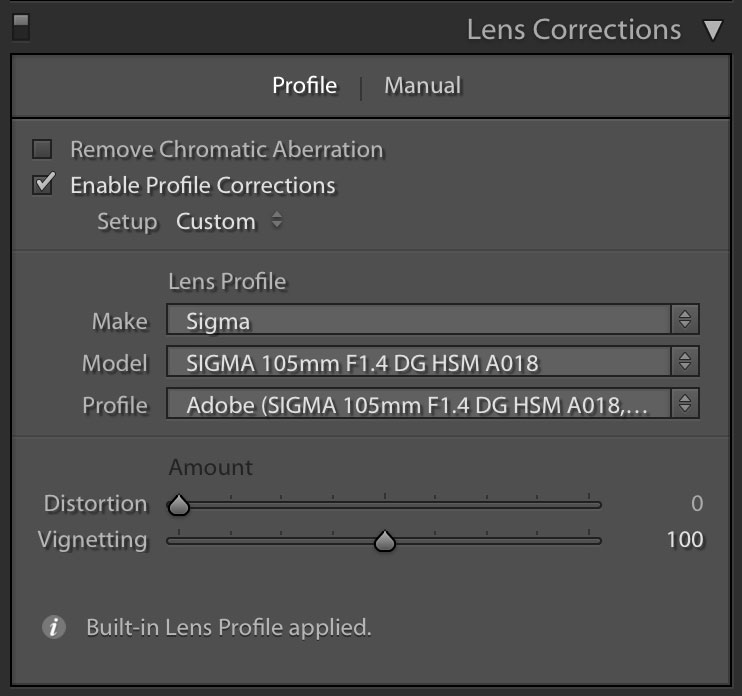
Since there’s at least some level of dynamic control for these corrections in Lightroom, they’re a much better option than using in-camera corrections.
Note that I only recommend using these corrections for chromatic aberration and vignetting. I don’t recommend using your raw editor’s distortion correction for your panoramas. You’ll notice that in my example above, the “Distortion” slider is set to zero. Most panorama stitchers do a better job at compensating for lens distortion and PTGui doesn’t recommend using distortion correction before importing photos.
Most of the time, using just Lightroom’s lens profile vignetting correction is adequate. If you find that your panorama is still showing noticeable dark areas, or uneven brightness from vignetting, consider manually adjusting the Lens Correction vignetting settings.
Sync All Photo Edits

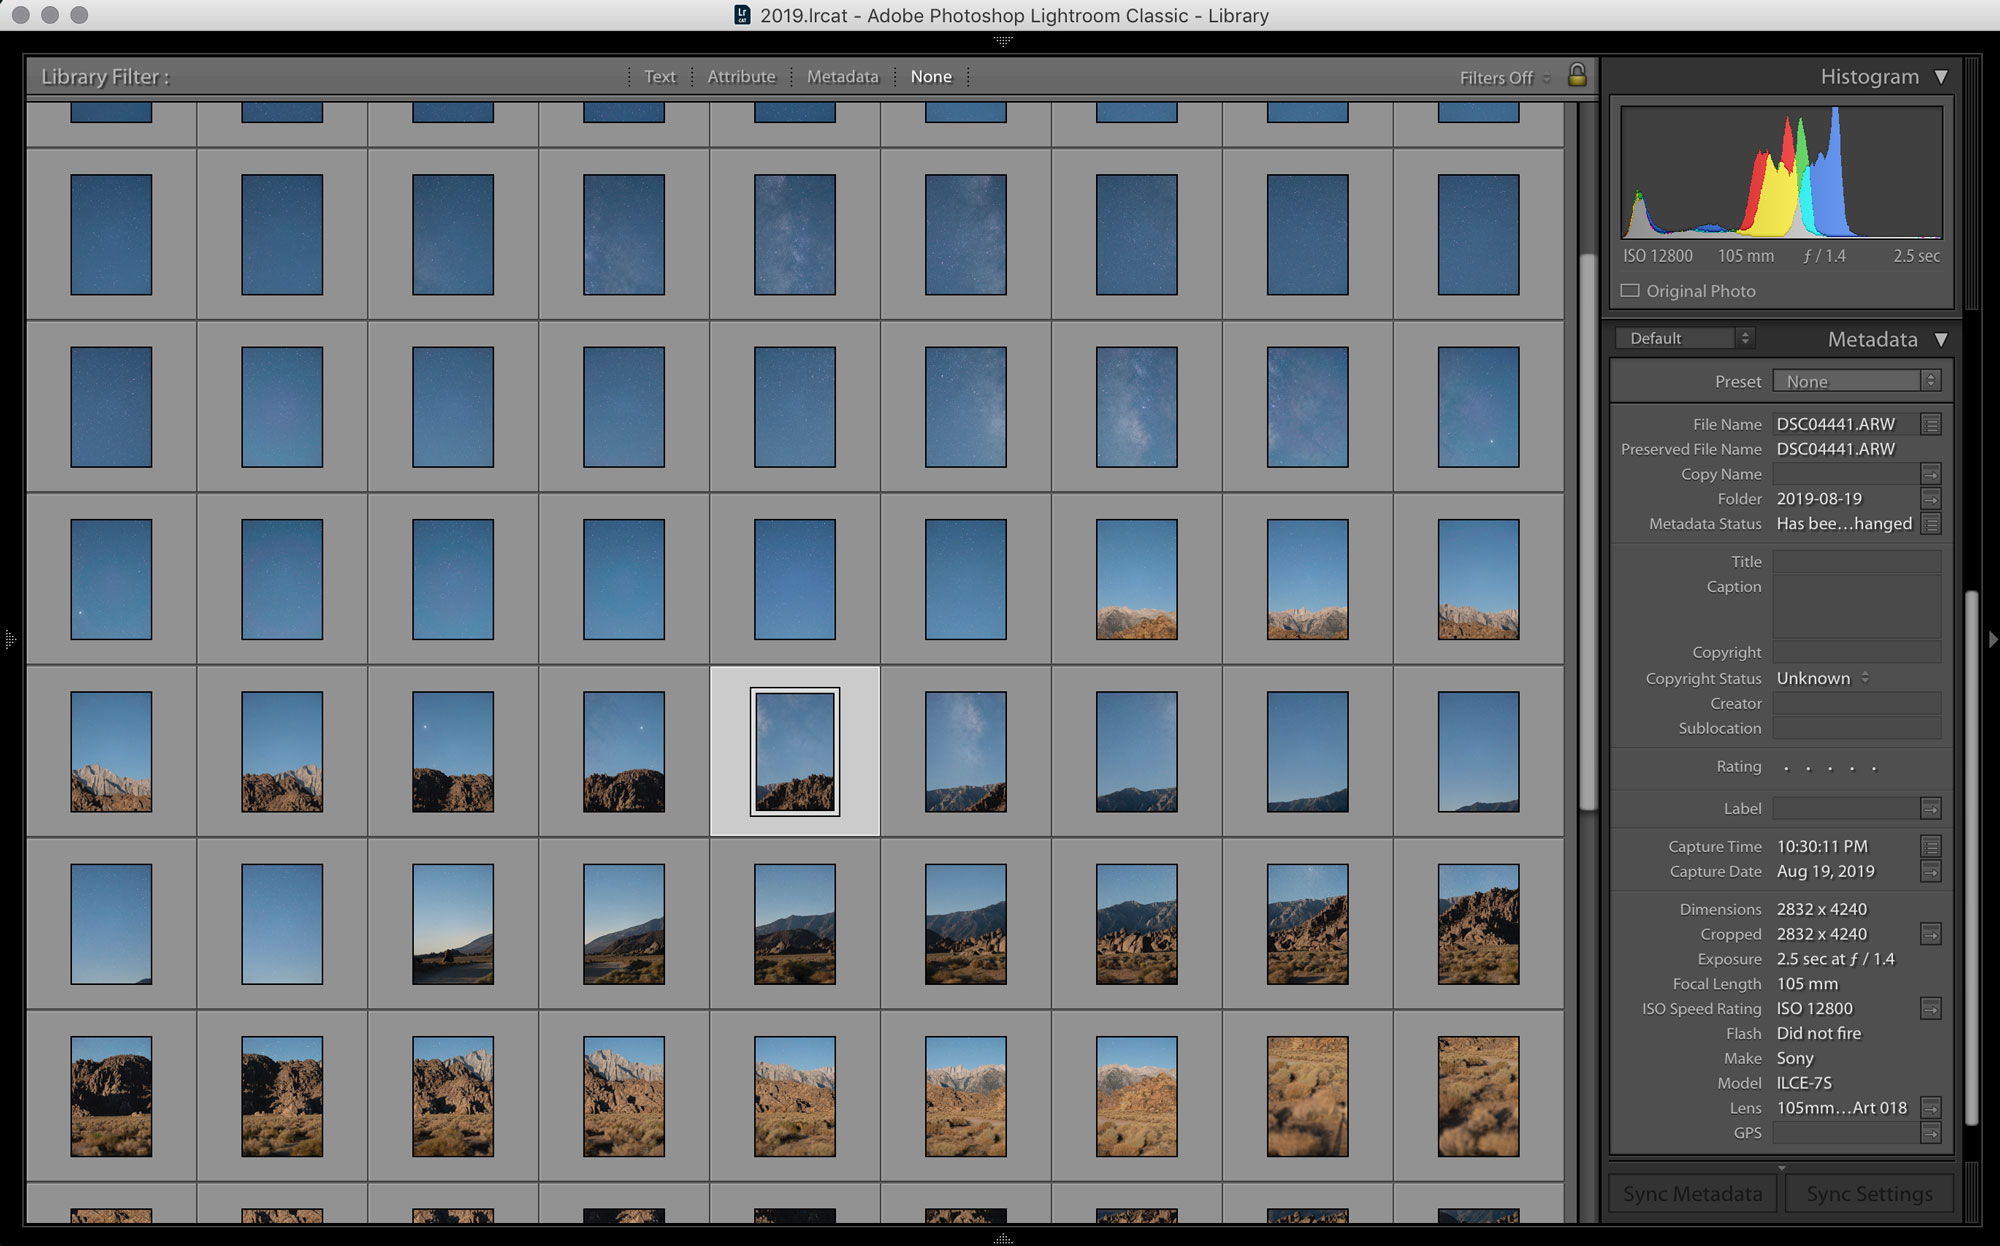
Once one image is corrected for vignetting, the edit must be copied and applied to all of the image frames that compose the panorama. In Adobe Lightroom Classic, it’s as simple as selecting all of the raw frames of your panorama, and syncing them with the one that has already been corrected using the “Sync Settings” button.
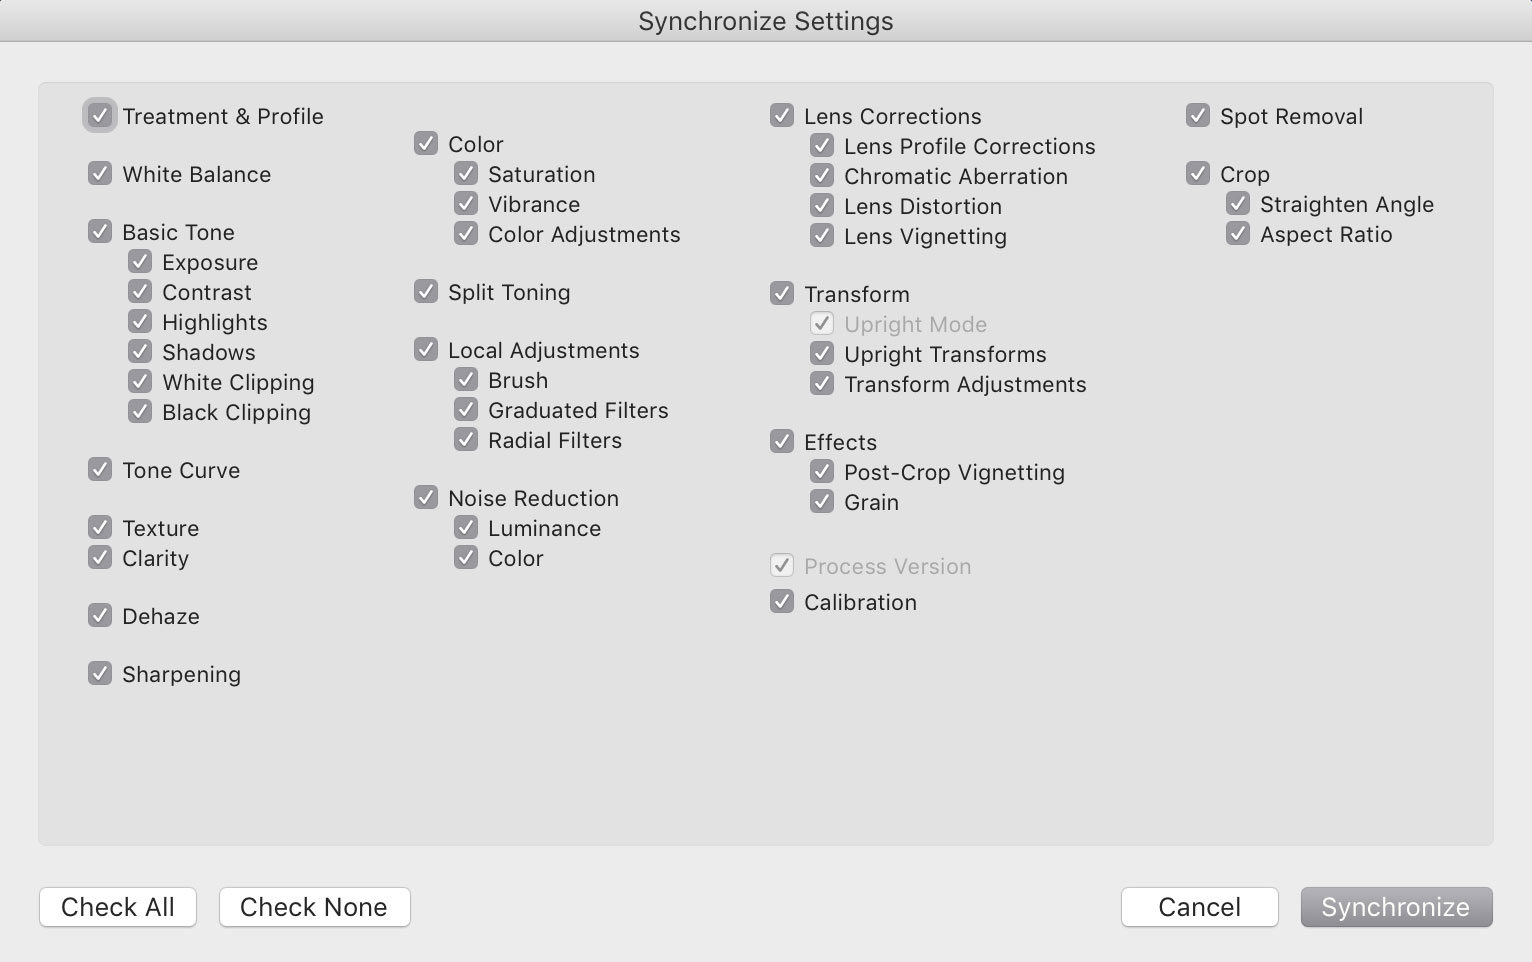
Be sure that all of the checkboxes are selected, and click “Synchronize” to make all of the photos match.
Other Optional Edits
Now at this point, we’re ready to export to PTGui, but you can also take the liberty of making other optional edits. Just make sure to sync any edits you make between all of the photos in your panorama.
- White Balance
- If you’re not satisfied with your white balance straight out of the camera, adjust it to taste and synchronize all your panorama photos.
- Exposure, Shadows, Highlights, Whites, Blacks
- Depending on the conditions, exposure or equipment, some of your images could be overly dark looking. Feel free to increase your exposure, recover highlights, or lift shadows as you desire. Don’t be too heavy handed with the Shadows, Highlights, Whites and Blacks sliders, however, as they can vary from one frame to another, even if synchronized. Be sure to synchronize all your panorama frames between each edit you make, and check several different frames of the panorama to see how the edit affected the whole batch.
- Detail: Noise Reduction
- I personally think Lightroom Classic’s default color noise reduction is too heavy handed so I usually dial it down from 25 to about 5.
Remember that we can always make more global edits to the final panorama later, so don’t worry too much about the perfect amount of contrast or saturation. Definitely don’t worry about local adjustments like graduated filters. We’ll do all those later.
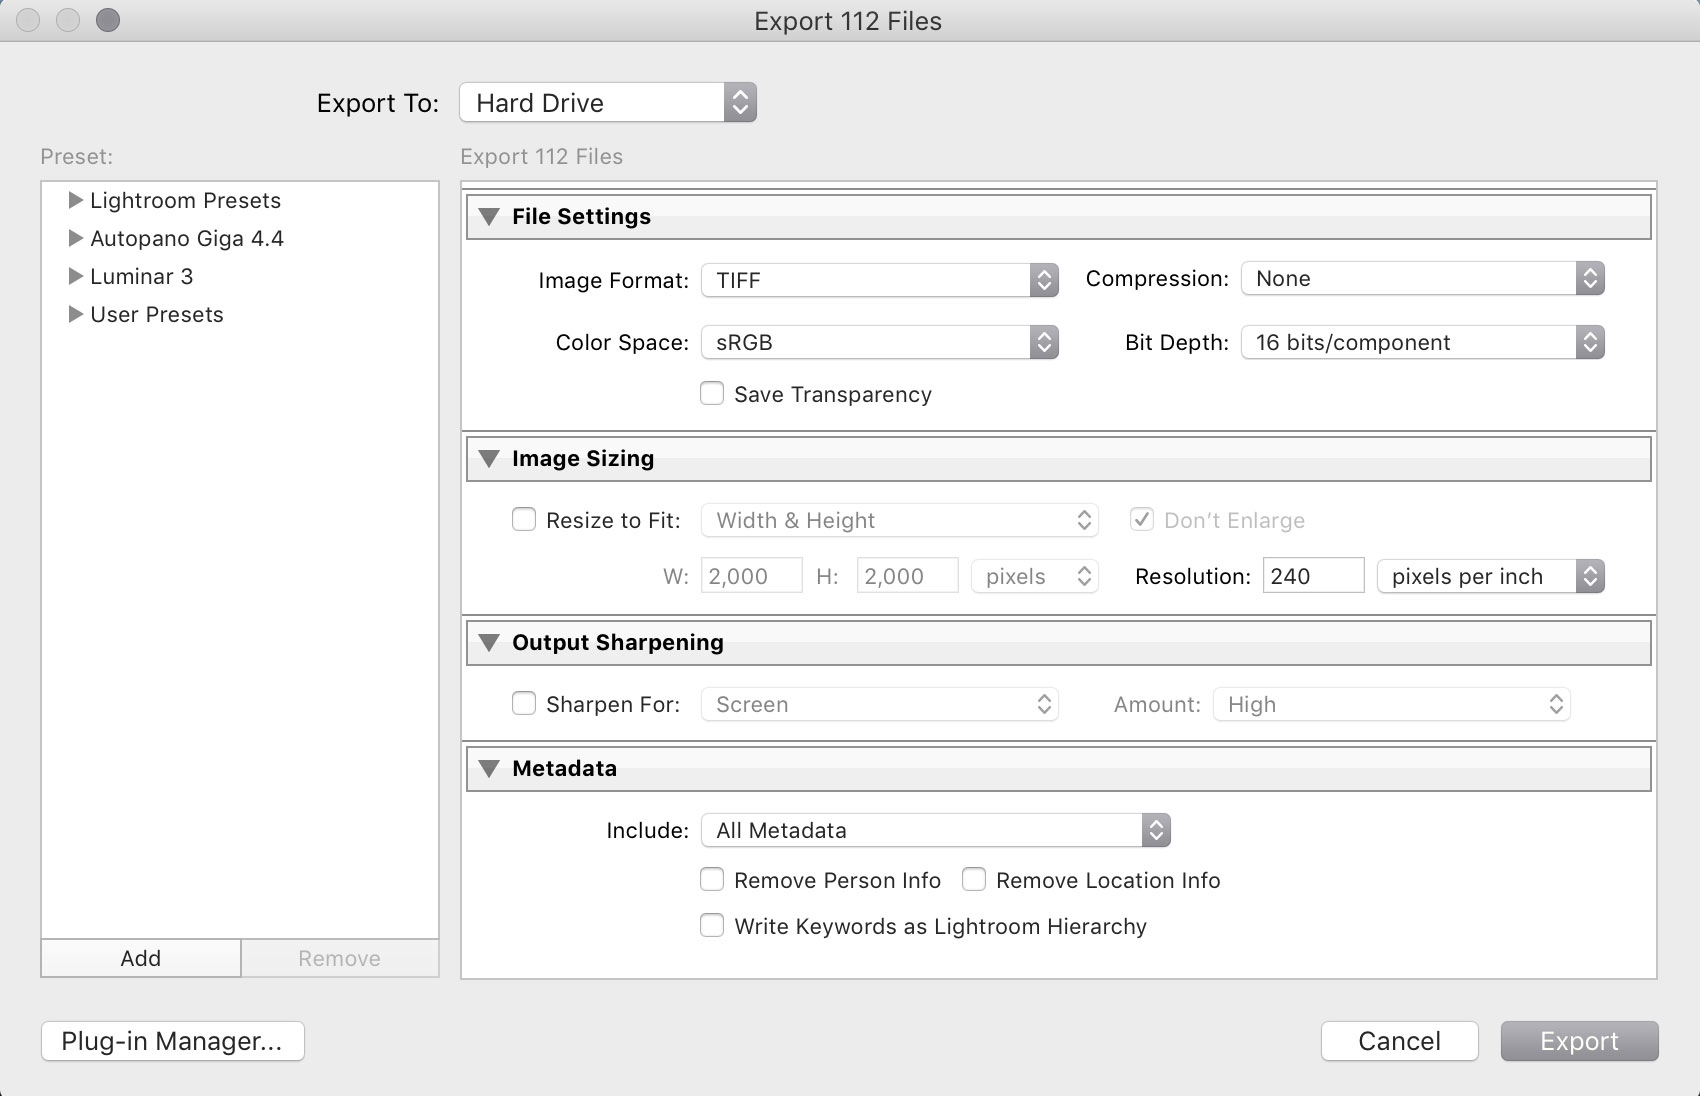
Export for Stitching

Once we’ve made our basic corrections to vignetting and synchronized the frames, we can export all of the photos to 16 bit/component .tiff files. I recommend exporting all your files as 16 bit so that the files maintain roughly the same dynamic range as a raw file.
Large Format Astrophotography Panorama Stitching in PTGui Pro
If you’d like to follow along in PTGui Pro, you can download some low-resolution .jpgs of my source files here. If you don’t have PTGui Pro yet, you can download a trial version. Here are the basic steps we’ll cover for stitching a panorama in PTGui Pro:
- Importing photos into PTGui
- “Align to Grid” and auto alignment
- Adjusting the panorama
- Exposure correction and blending
- Projection method selection
- Rendering the panorama
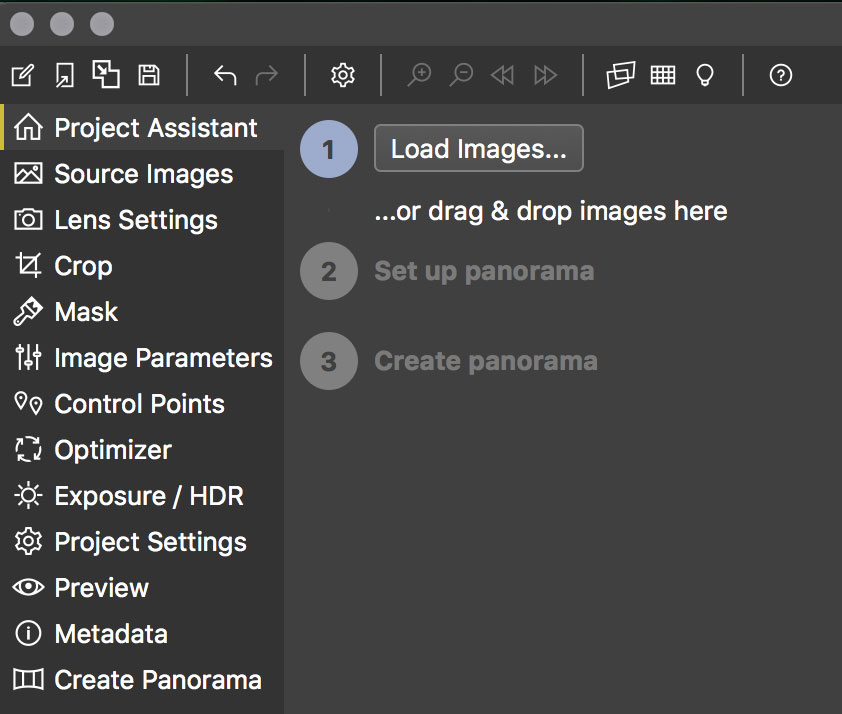
Importing photos into PTGui
The first step of using PTGui is to simply import all of the photos by pressing the “Load Images…” button and selecting all of the .tiff files that you exported from Lightroom.
Align photos with “Align to Grid” and automatic alignment
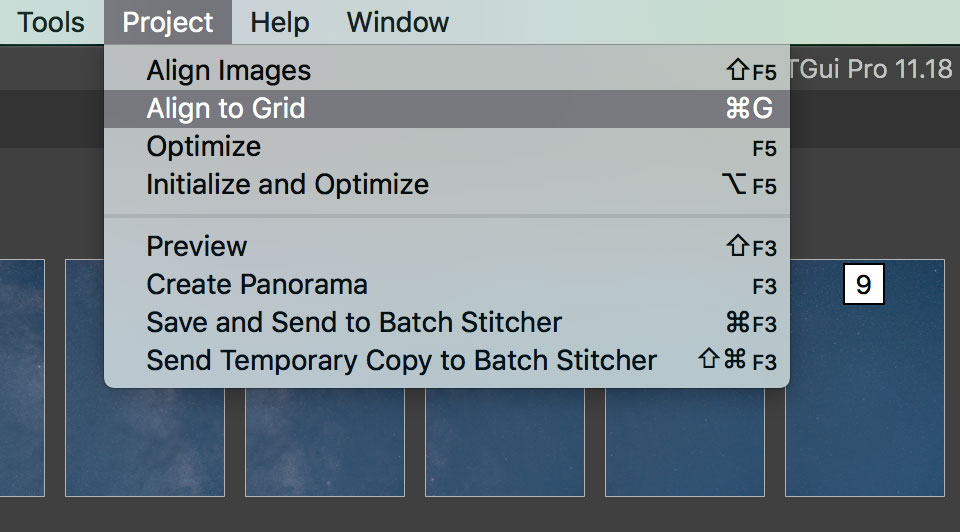
Since we shot the panorama with regular indexed angles between each shot, the best way to ensure super fast alignment is to first use PTGui’s “Project>Align to Grid” (Command/Ctrl + G) tool.
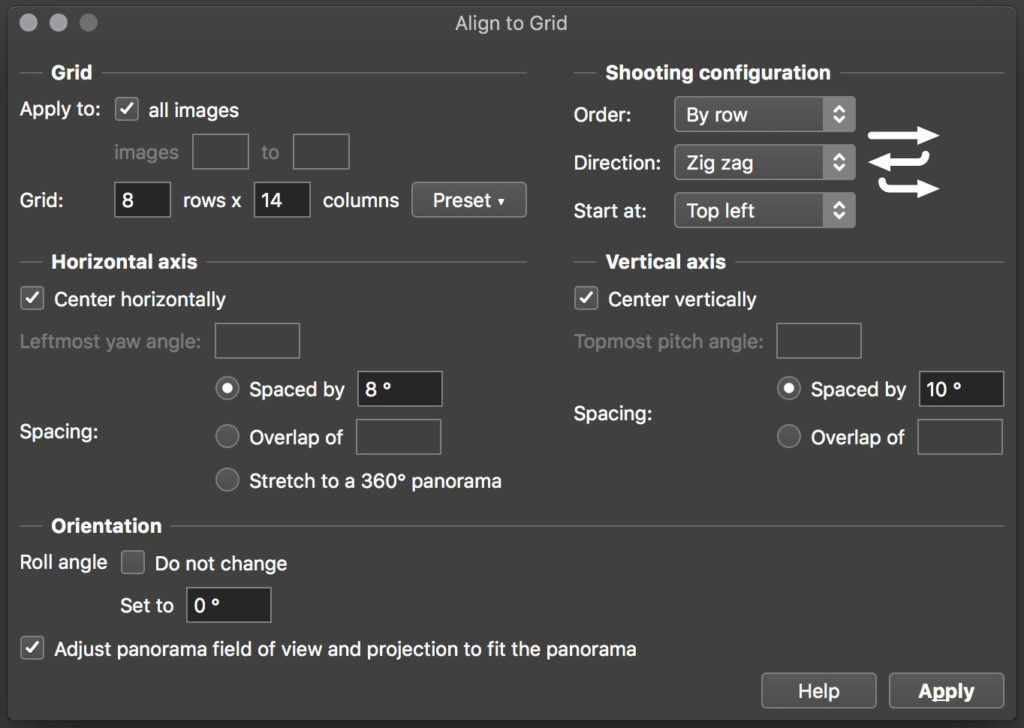
Then, we can enter the shooting parameters relevant to our panorama. I shot my panorama in 8 rows and 14 columns via a zig zag pattern with 8° detents on the horizontal rotator and about 10° angles vertically.
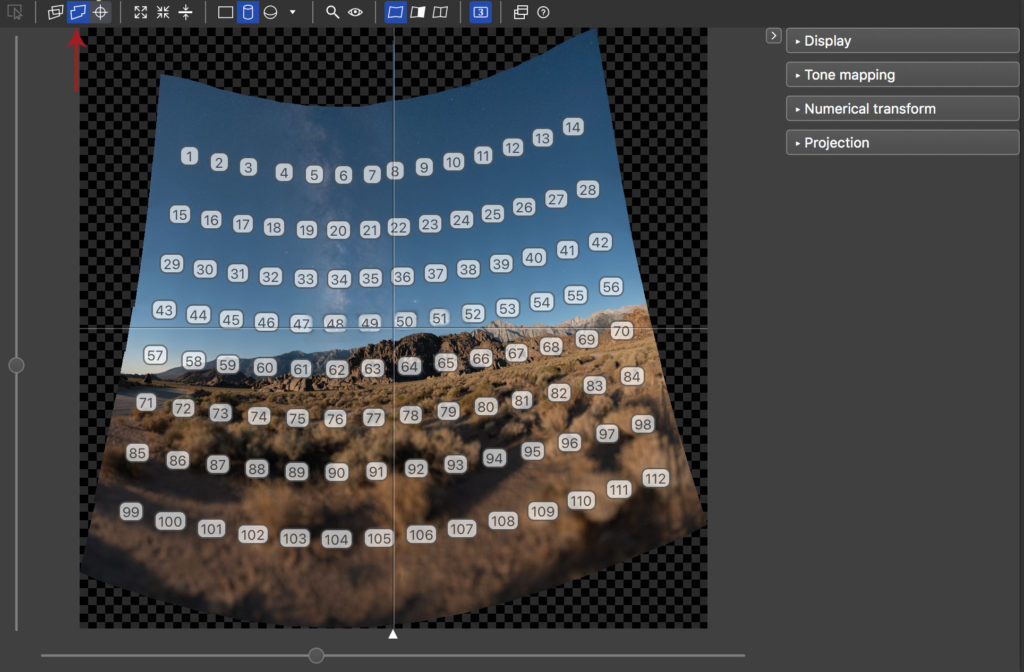
After entering all of the shooting the parameters of the panorama, click “Apply”. At this point, you can preview the roughly aligned Panorama by opening the Panorama Editor (Command/Ctrl + E), or you can choose to perform a final, precise auto alignment by clicking the “Align Images” button (Shift + F5) in the main Project Assistant window.
Once the Images are aligned, PTGui will open the Panorama Editor window (again Command/Ctrl + E) and show a preview of the panorama. Even if your rough grid alignment wasn’t perfect, and even if PTGui wasn’t able to find control points between some images, it usually automatically adjusts the images proportionally relative to the grid you originally defined, which makes alignment of blank areas of sky relatively painless. If you see some misaligned frames, manually adding control points might be necessary. You can check for images without control points (orphaned images) by choosing “Tools>Control Point Assistant”. While it’s nice to have control points on all images, it’s not explicitly necessary if you’ve shot and aligned the images to a grid.
Adjusting the Panorama
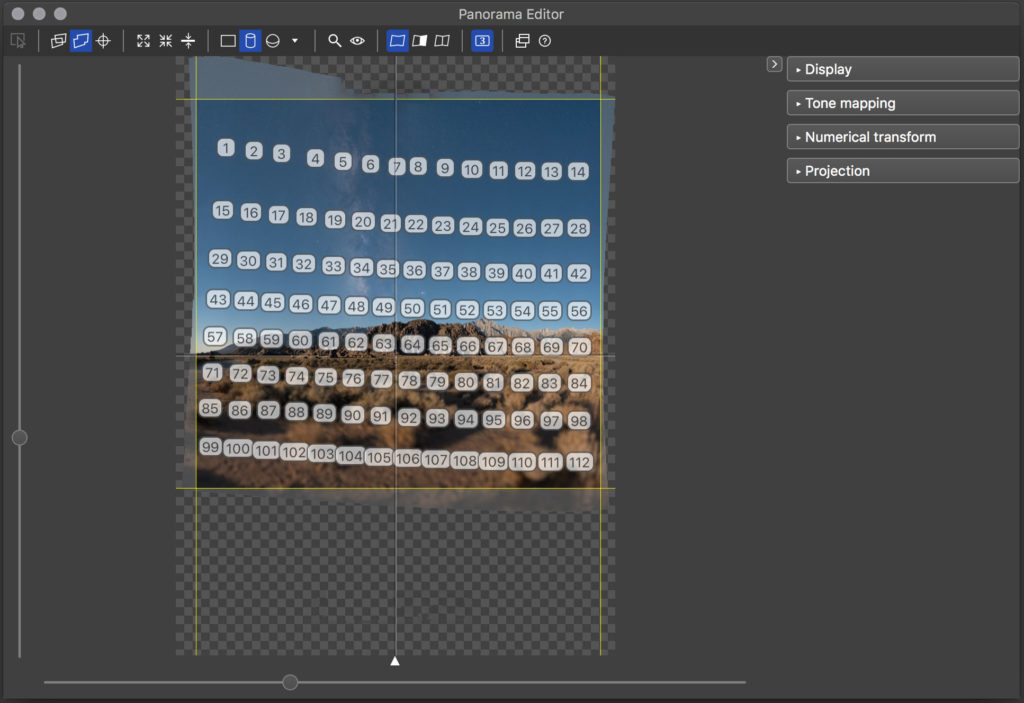
At this point, it’s likely that the panorama will need some adjusting in the frame. You can use the “Edit Panorama” button on the top tool bar to drag the panorama into place by clicking and dragging with the left mouse button, or rotate the panorama by clicking and dragging with the right mouse button.
After straightening the panorama, we can crop the edges by dragging each in from the edge of the work area. The yellow lines indicate the crop that will be used when rendering the final panorama.
Exposure correction and blending
The final step before rendering the panorama is to optimize the exposure to better blend the frames together. This feature is only available in PTGui Pro, under the “Exposure / HDR” section. It’s as simple as clicking “Optimize now!”.
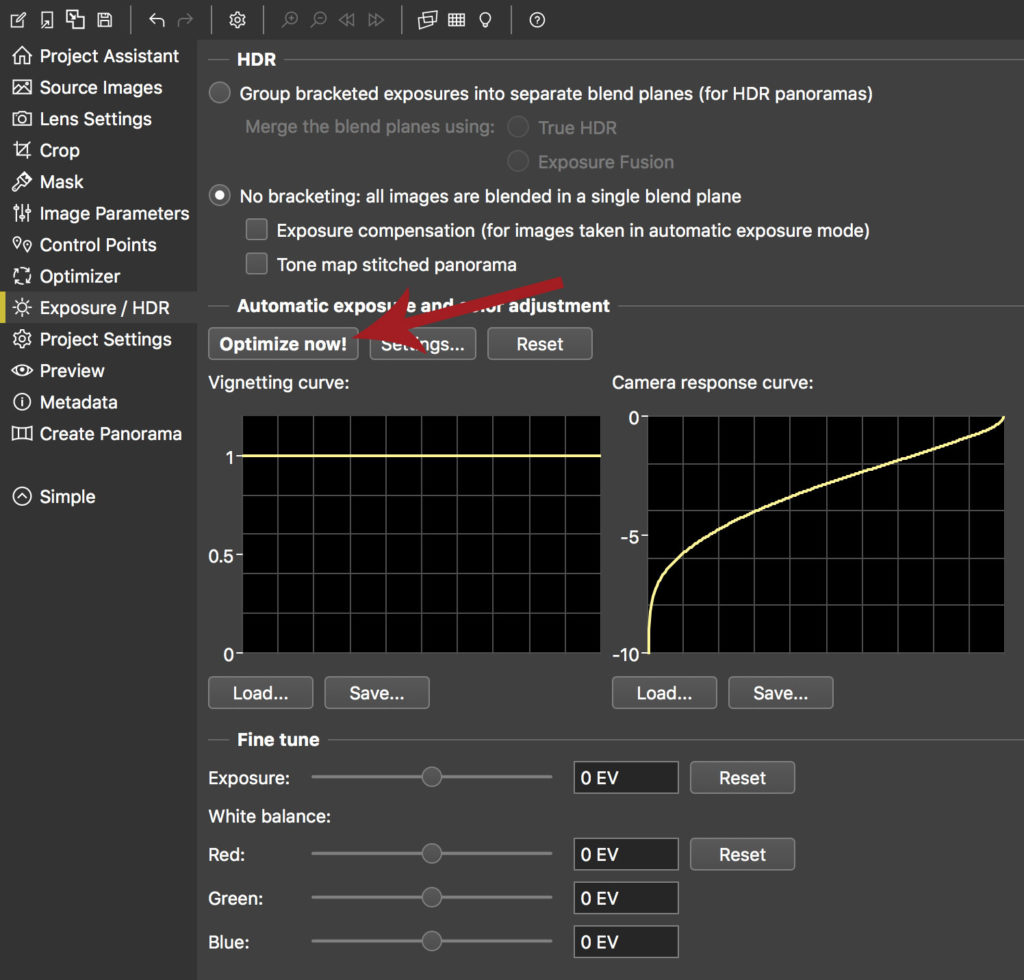
The exposure optimizer in PTGui will analyze all the frames and create a custom exposure and vignetting profile to ensure smooth gradients across the whole panorama. This step is helpful even if we already made pre-stitch vignetting corrections.
Before Exposure Optimization 
After Exposure Optimization
Projection method selection
When stitching a panorama, there are many different projections methods that are possible to choose from. Ultimately, the software needs a way to project the spherically shaped panorama as a flat plane. Different projections yield slightly different results.
In the Panorama Editor (Command/Ctrl + E), you can change projections of your panorama by selecting different projections from the drop-down arrow in the top toolbar.
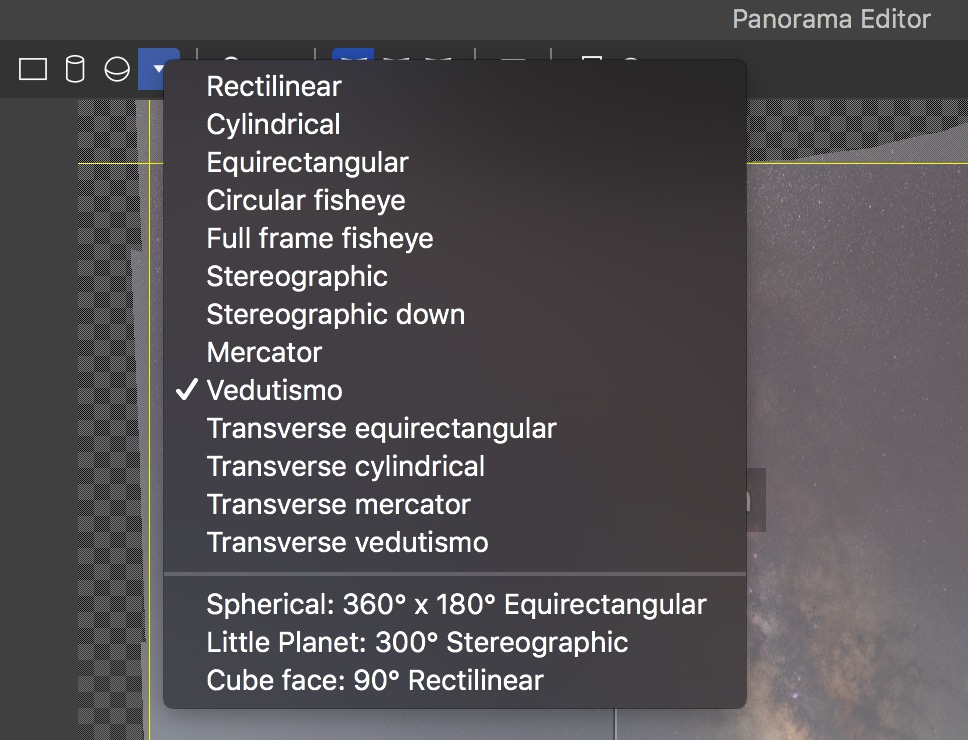
The default projections in PTGui are Rectilinear, Cylindrical and Equirectangular and there are other alternative projections like Sterographic, Fisheye and Mercator. I often suggest trying several different projections to see which one works best with any given panorama.
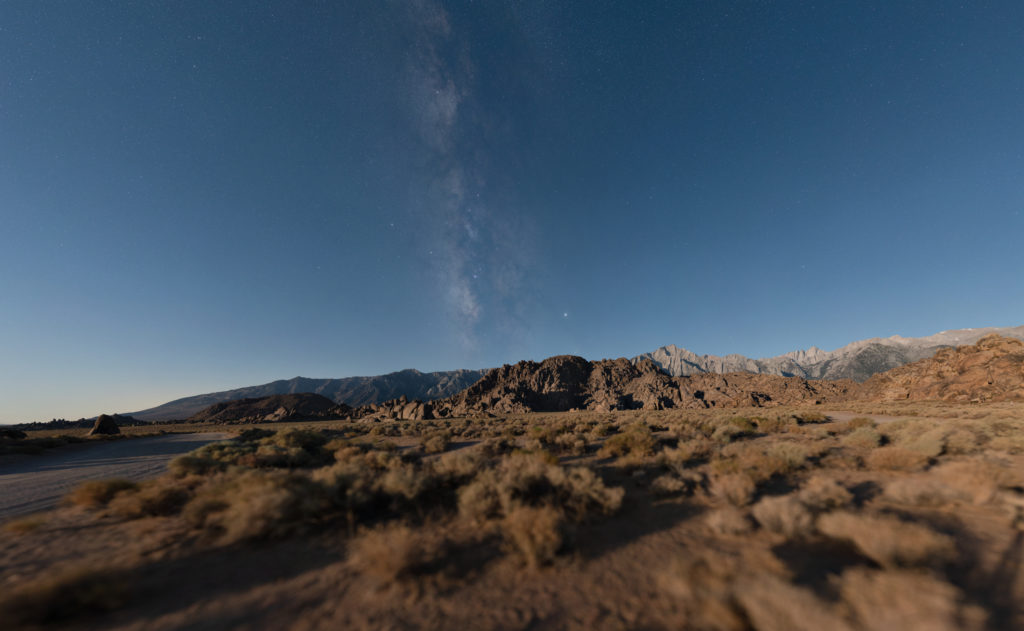
Rectilinear 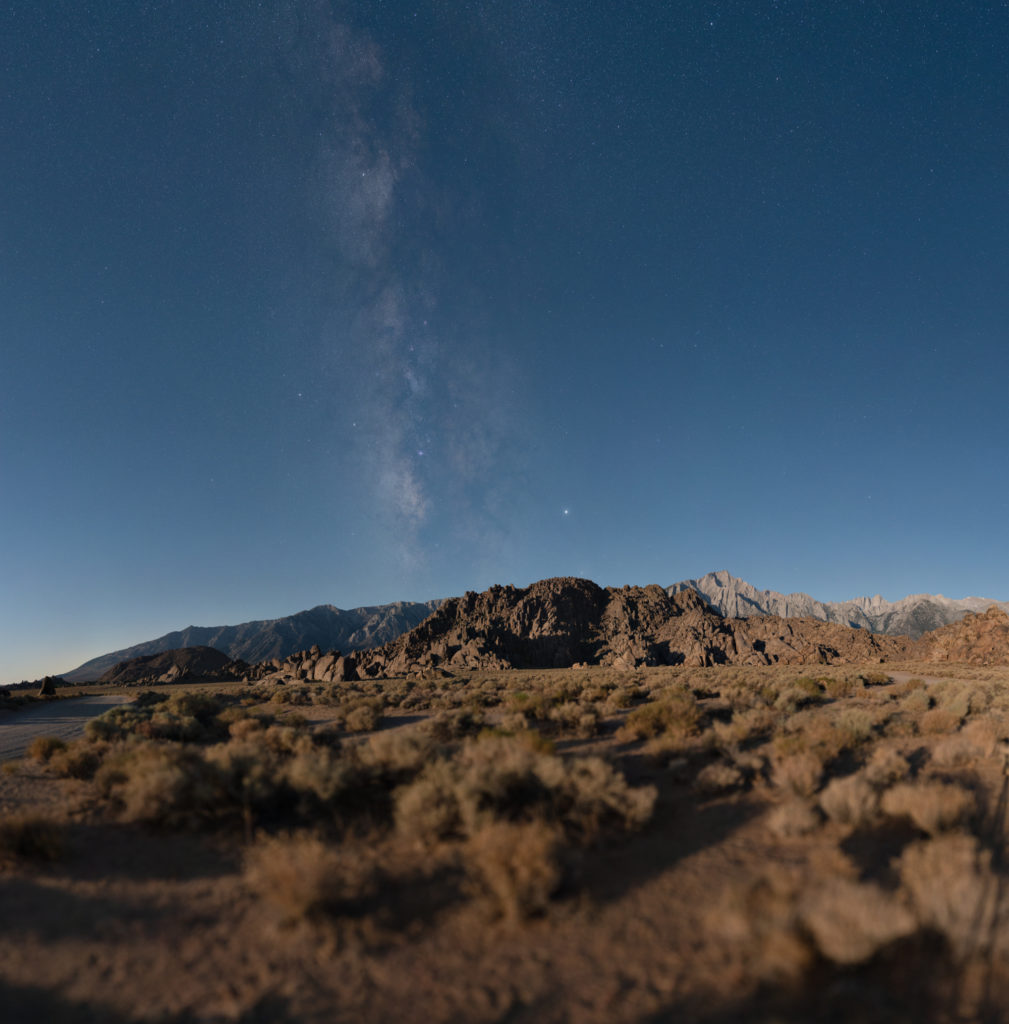
Cylindrical 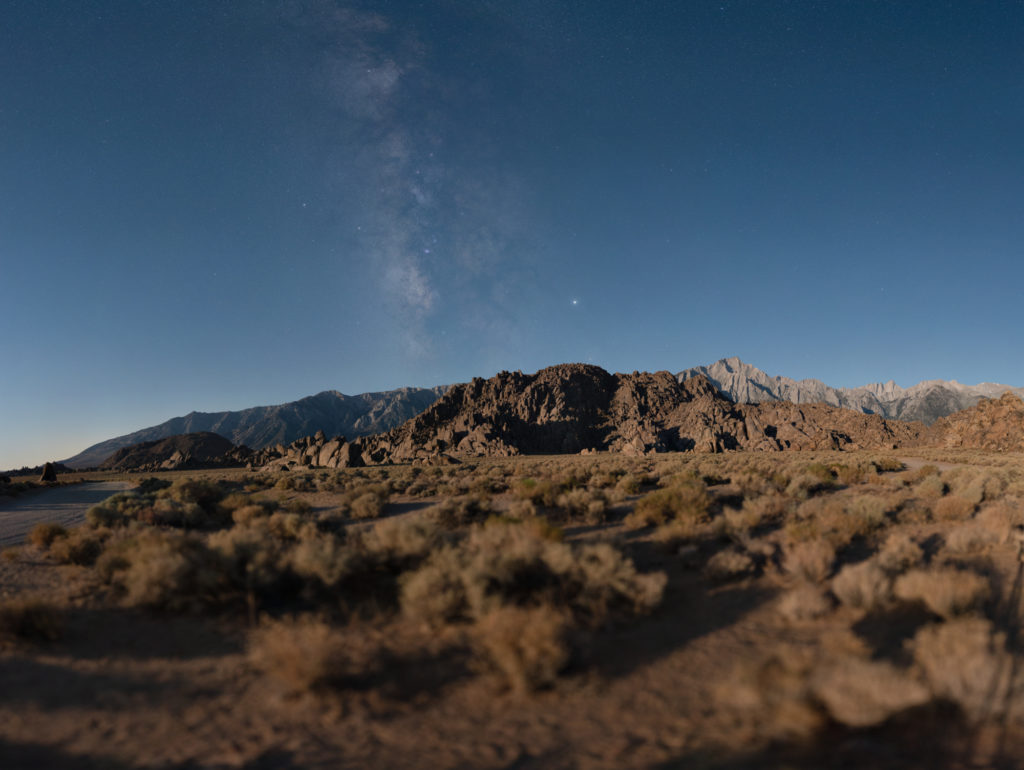
Equirectangular 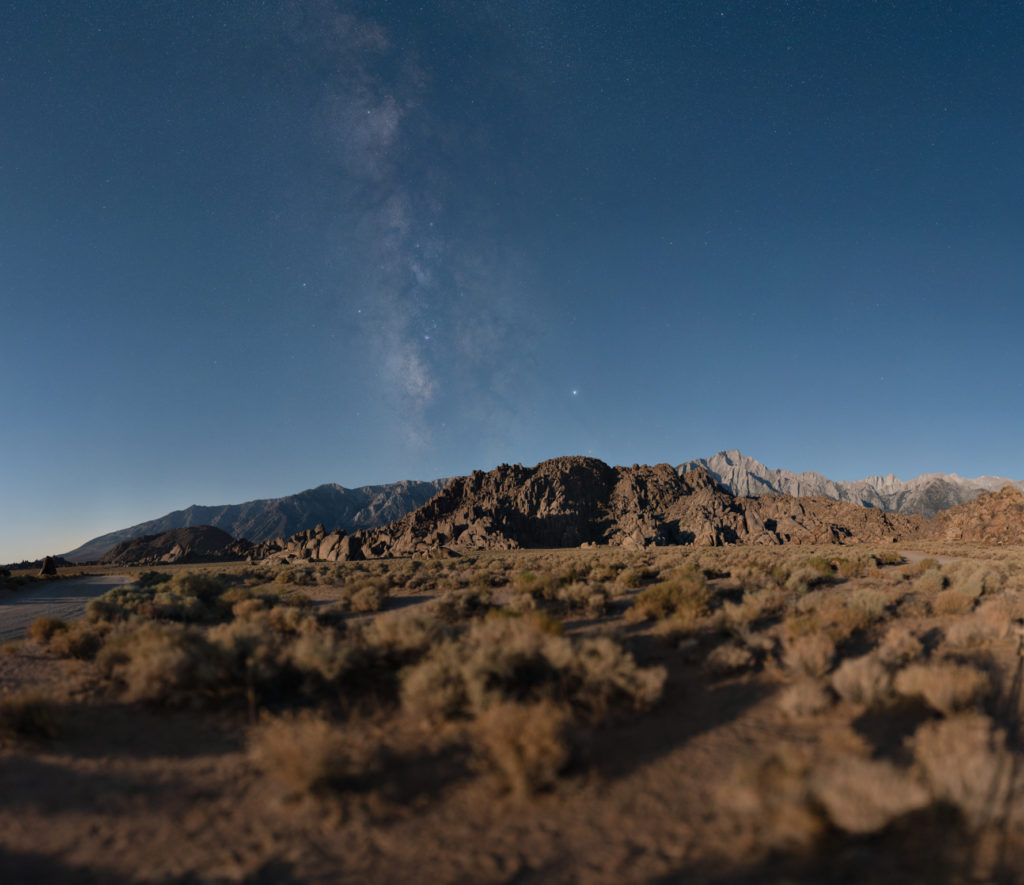
Mercator 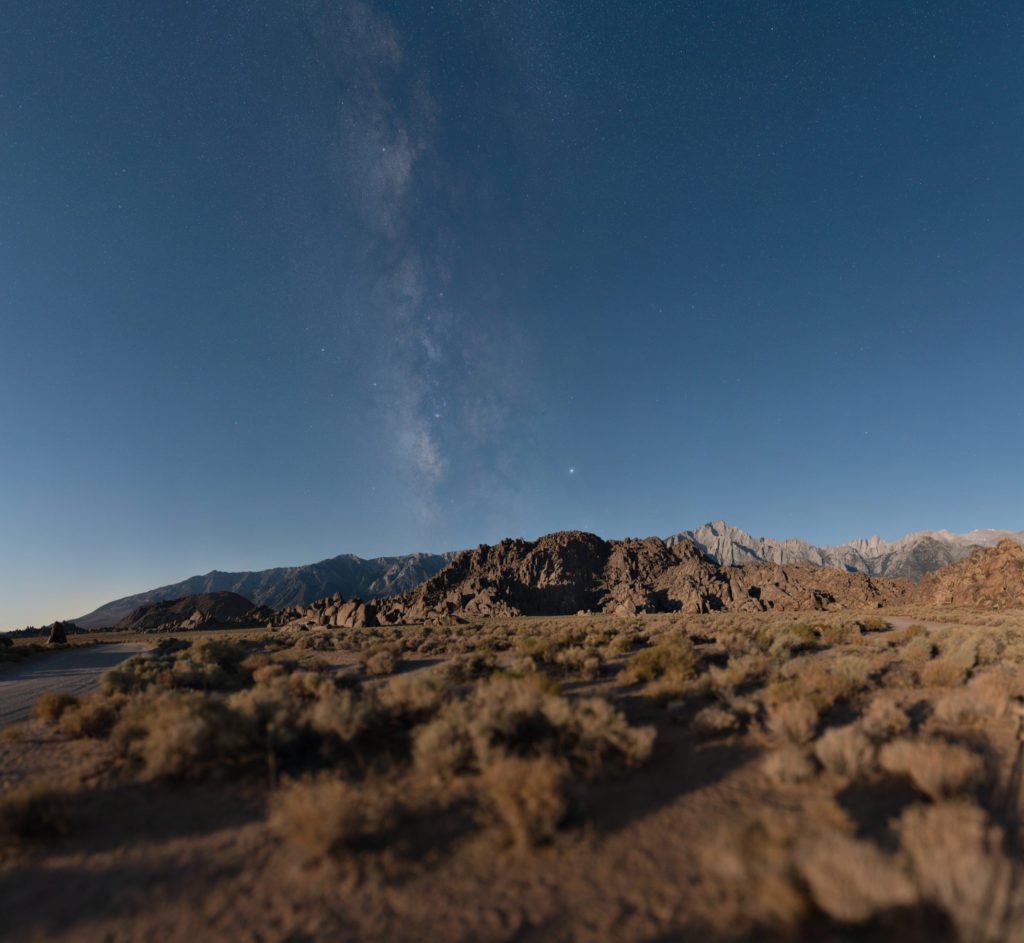
Vedutismo 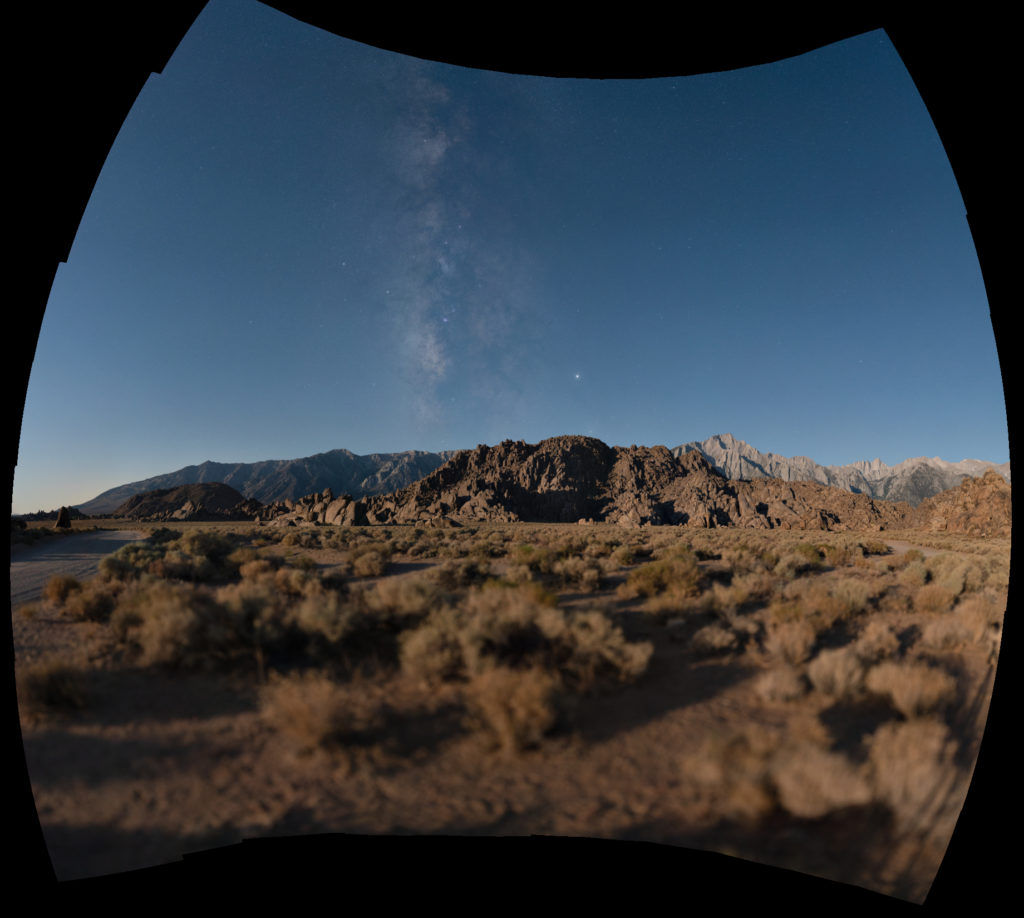
Fisheye
Rendering the panorama
Once you’re happy with your panorama projection, we should be ready to render the final panorama by opening the “Create Panorama” section on left of the main project window.
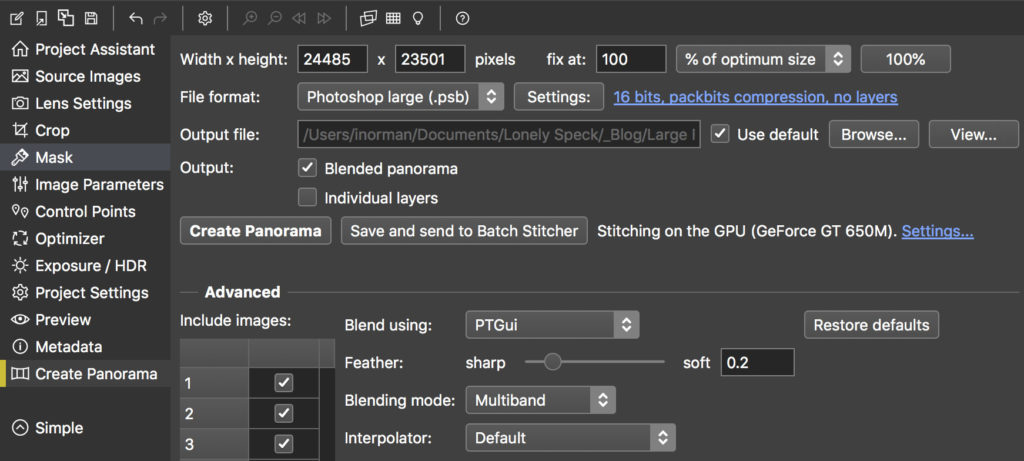
Here, we have options for our output file, how large we’ll want it to be (the initial export of my panorama is 24485px*23501 or 575 megapixels) and what file type to save it as.
TIFF
If you want to be able to edit your panorama in Lightroom Classic, I recommend exporting as 16 bit .tiff. Just know that .tiff files are limited to 4GB. If you export as a .tiff and the file size exceeds the limit, it won’t be openable. If you need to export as .tiff, you might need to reduce the resolution of the panorama to fit the file size limit.
PSB
For extra large panoramas, the .psb file type has a much higher size limit and is great for exporting gigapixel panoramas. Just know that .psb files are not editable in Adobe Lightroom Classic and must be opened in Photoshop or a similar editor like Affinity Photo. If you want to be able to keep a huge 4+ GB .psb files in your Lightroom catalog, you can use this great tip from Sean Bagshaw to link a .psb file to a lower resolution .tiff that gets imported into Lightroom.
When you’ve decided on your export settings, simply click “Create Panorama” to render the file to the defined output file location.
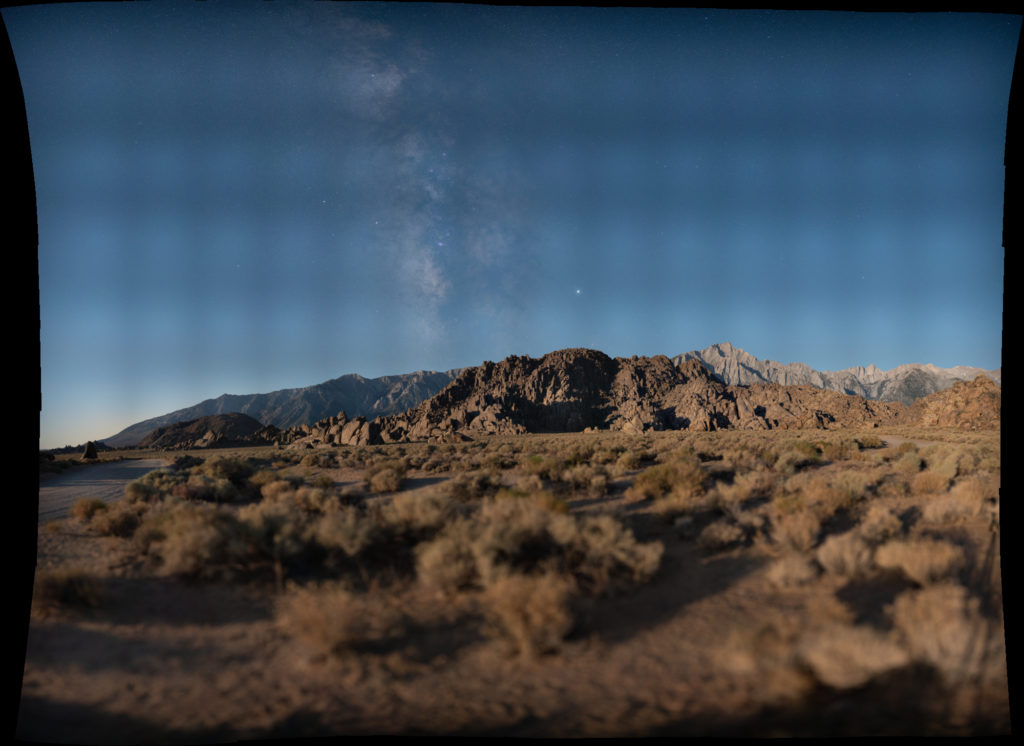
Final Edits
At this point, you should have a massive resolution photo, seamlessly stitched and ready for further edits. The photo can be edited as you desire in your favorite image editor. If you’ve exported to a small enough .tiff for Lightroom, check out our tutorial on basic dark sky Milky Way processing in Adobe Lightroom.
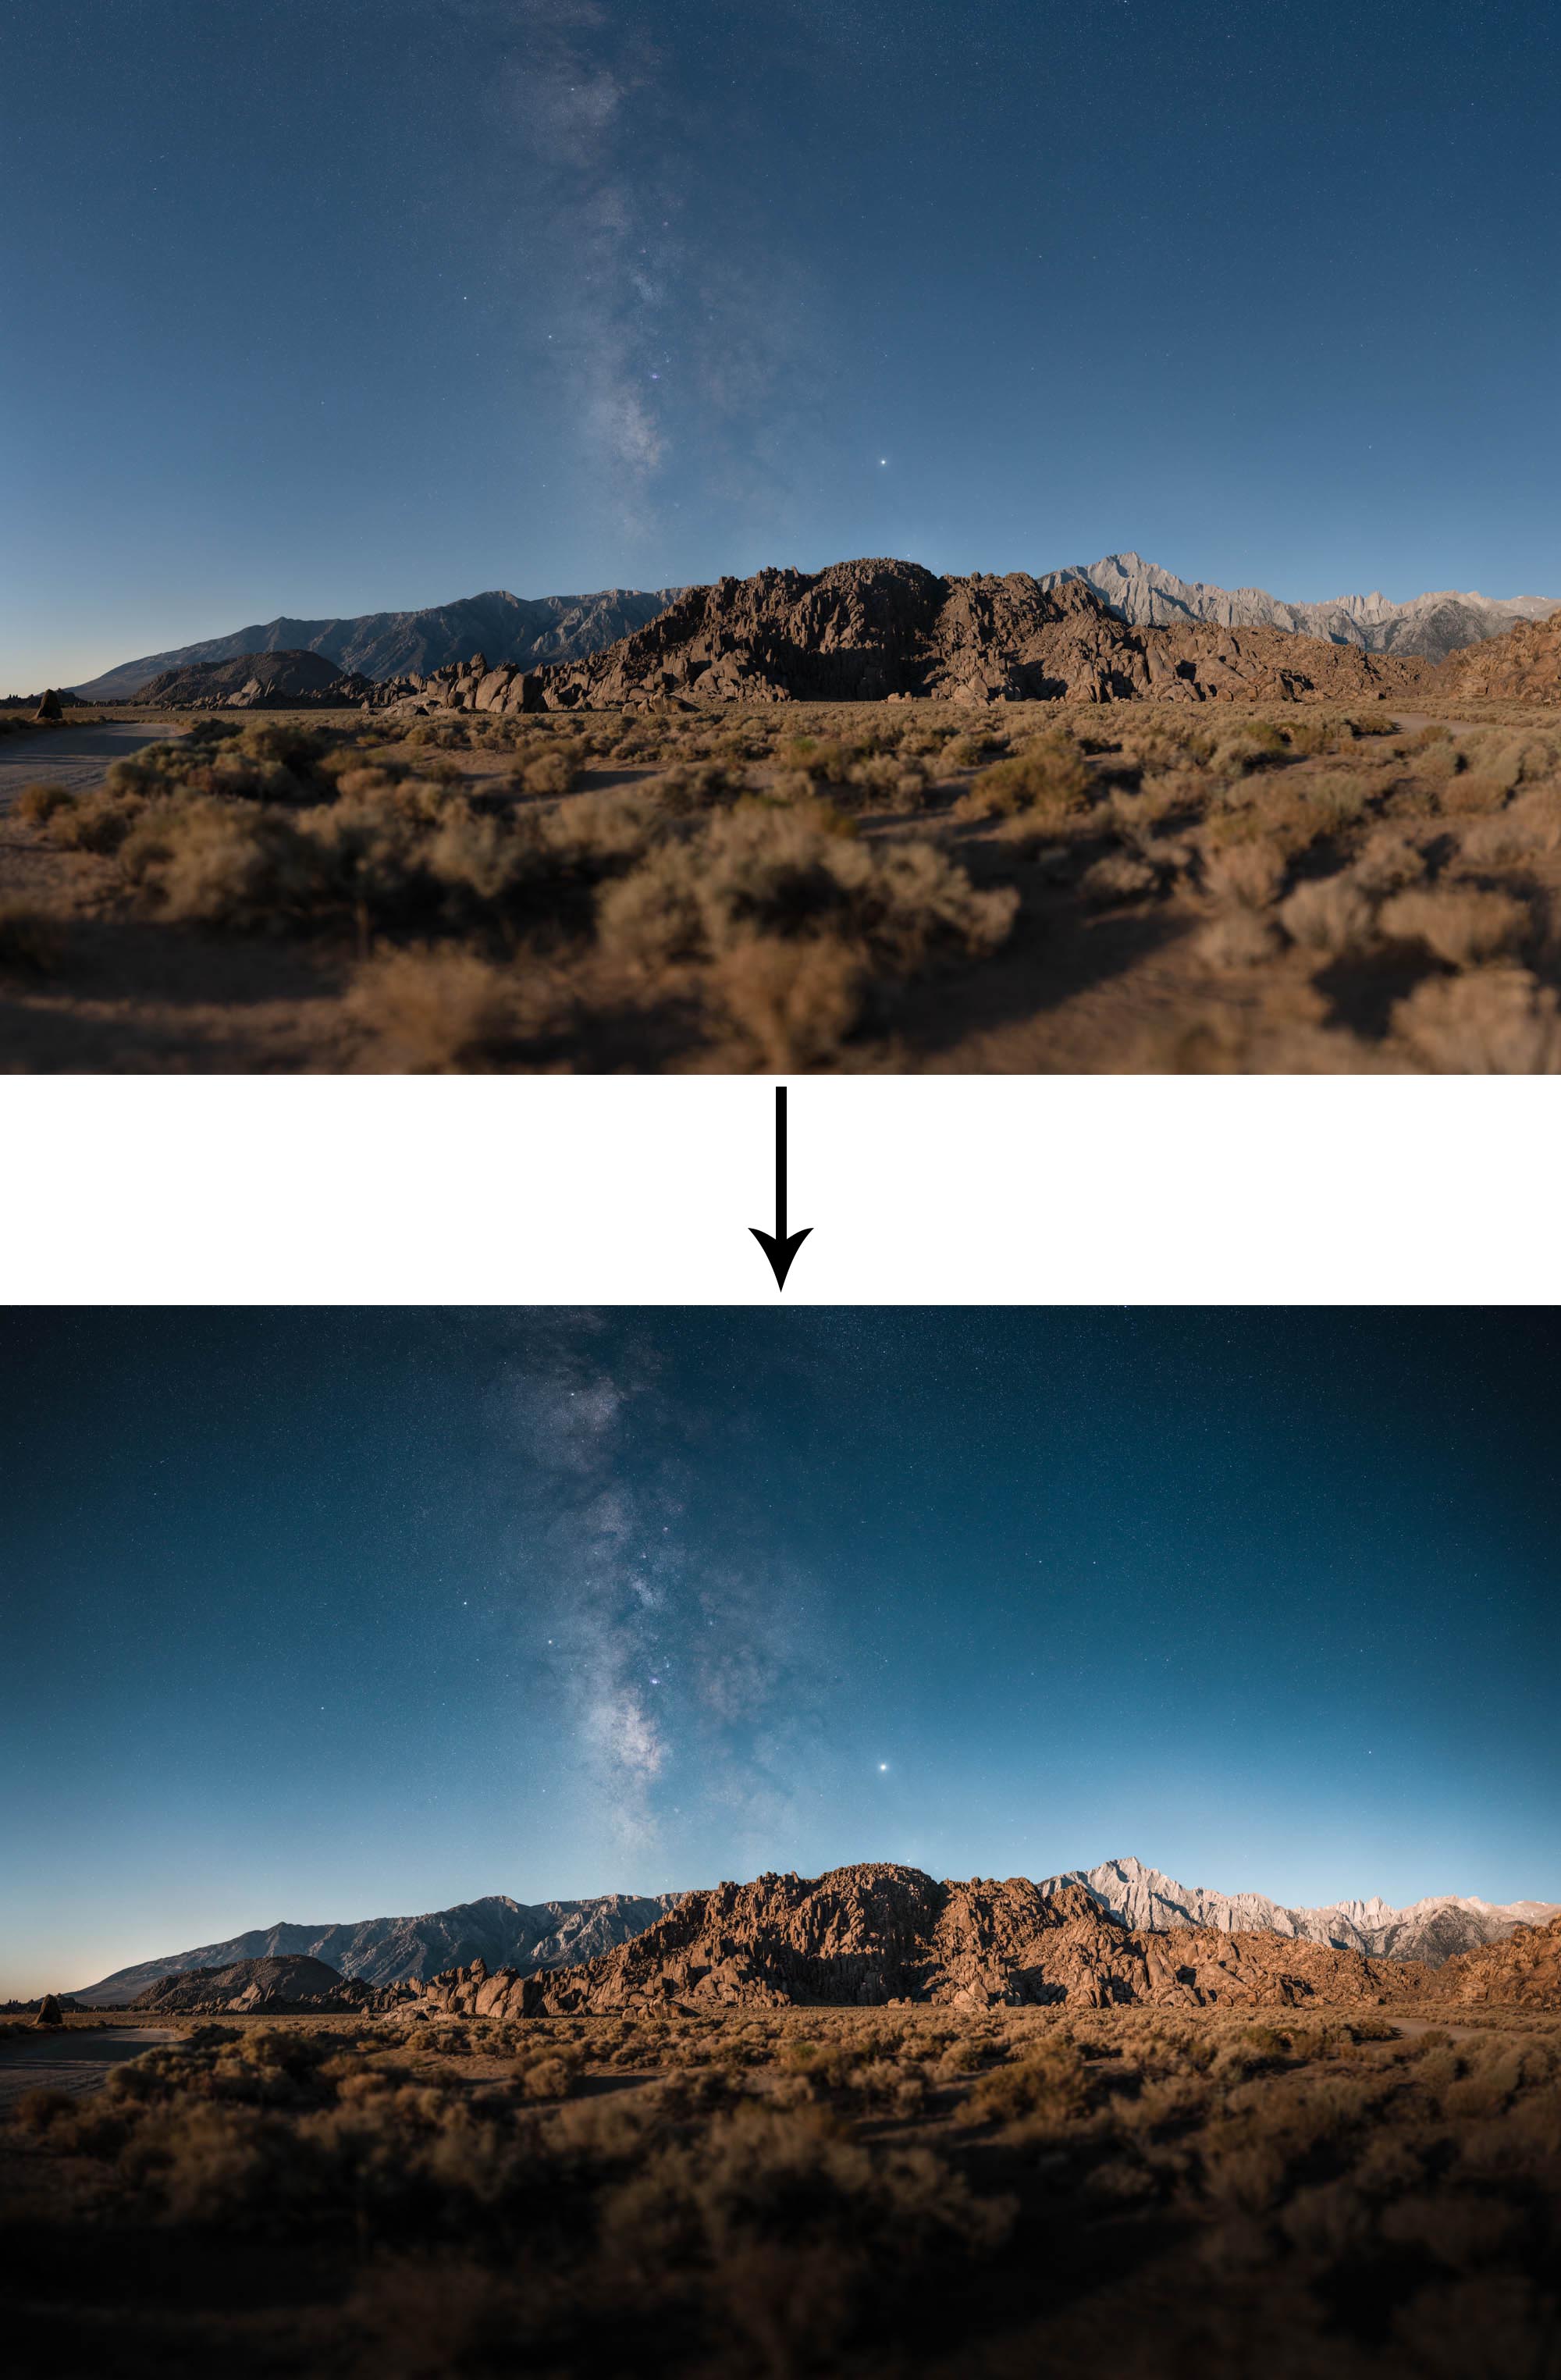
For my edit on our example photo, I added some curves, contrast clarity and simulated vignetting with a few graduated filters as well as the post-crop vignetting tool in Adobe Lightroom Classic. If you want to check out some 100% details again from the full resolution 400 megapixel photo, click on the zoomable areas in the image below:
[devvn_ihotspot id=”129867″]
That marks the end of this basic tutorial on large format astrophotography panoramas. I hope it was helpful! If you have any questions or suggestions, chime in on the comments below.
More Online Panorama Resources and Inspiration
Thanks
I want to give a shoutout to my good friend, Paul Wilson, for turning me on to large format panorama stitching. Paul is an expert in digital large format photography and has been a huge help in answering some of my first questions when starting this massive project. Check out his work on VAST, Instagram and Facebook.
Disclosure
We are a participant in the B&H Affiliate Program which also allows us to earn fees by linking to bhphotovideo.com. We are a participant in the Amazon Services LLC Associates Program, an affiliate advertising program designed to provide a means for us to earn fees by linking to Amazon.com and affiliated sites.
Learn Astrophotography
Astrophotography 101 is completely free for everyone. All of the lessons are available on the Lonely Speck Astrophotography 101 page for you to access at any time. Enter your email and whenever we post a new lesson you’ll receive it in your inbox. Updates will be sent out only periodically, usually less than once per week.
[email-subscribers namefield=”NO” desc=”” group=”Lonely Speck Newsletter”]
Help us help you!
Believe it or not, Lonely Speck, along with North to South make up our full-time jobs. It’s been an amazing experience for us to see a community develop around travel and learning astrophotography and we’re so happy to be a small part of it. I have learned that amazing things happen when you ask for help so remember that we are always here for you. If you have any questions about travel or photography or just want to share a story, contact us! If you find the articles here helpful, consider helping us out with a donation.
[button font_size=”16″ color=”#136e9f” text_color=”#ffffff” url=”https://www.paypal.com/cgi-bin/webscr?cmd=_donations&business=lonelyspeckblog%40gmail.com&item_name=These+tips+help+keep+lonelyspeck.com+running.¤cy_code=USD&source=url” target=”_blank”]Donate[/button]
Thanks so much for being a part of our astrophotography and travel adventures.
-Ian and Diana
Bravo!!! Great Info Share!!! You were my first find for Milky Way capture info long ago. After seeing Rainbow Milky Ways I got into pano this year. Your setup is well built. For those with small pockets the Manfrotto Befree 500 Fluid Video Head Flat Base with leveling base will hold a 600mm lens. But using my SEL1224G or SEL1018 @ 12mm in full frame mode. For automation I also found the old Syrp Genie Panorama rig (not to take the fun out of counting and needs to be charged up). The one thing great about PTGui is magnifying on each panel and linking things like stars in each, it will do a good job but you may need more links to get a better pano. I shoot over the Atlantic dark sky and have to link the stars by hand when doing the upper row or ship and buoy lights on the bottom row – This one tool is only in PTGui, it takes some time and you have to know the star patterns but you get better line adjustments.
My only question, I only have done 14 or 16 total images, how do you make up for star movement and placement over the time it takes. I mean what you have done is Awesome, but time and movement???
you are the f*cking man. thank you for sharing this! i hope to try this some time. how do you align the stars to the horizon or mountain edge with the constant movement of the milky way?
Ian, great article as always! Your panos inspired me to do a couple recently myself (with a 50mm FF equivalent). Loved some of your daytime panos from Iceland! For the really long focal lengths, have you tried stacking astro panos? I’d imagine taking so long to acquire the full image would make stitching difficult. I’m still shooting on a crop sensor, so stacking is generally highly beneficial.
Masterful. Should breath new life into my Fuji X-T1.
Now for achieving multiple focus points for larger effective DOF, in case you want the foreground to be sharp as well. 😛
That is an entirely new article, and one I plan on attempting!
Think twice about the A7R IV. Both the A7R II and III have lower noise at 42 megapixels. And the cost savings will pay for a very sturdy tripod. Personally the A7R II is a steal at its current price.
Ultimately, upgrading to a new body is a low priority for me in this project. There are other techniques that I will probably be practicing, such as blending exposures (longer for foreground, etc.) or focus stacking, that will contribute a whole lot more to the final image than upgrading my camera.
With a large format technique, noise become less of specific concern because of the large aperture lens being used. Pixel for pixel there might be slightly more noise, of course, when using a higher resolution camera, but each exposure as a whole will still be really close in total noise.
Ultimately, the biggest reason I would want to use a higher resolution body is to better handle different projections. Since all projections need to somehow stretch the pano onto a flat plane, it usually results in a lower true pixel density at the top and bottom of the photo when compared to the middle. Having more pixels to start with may help balance the visual difference.
This is probably the most comprehensive astro pano tutorial I have ever seen. I’ve just scrolled through the whole thing and there is an immense amount of information to absorb and put into practice. You certainly appear to have covered it from every angle leaving no stone unturned.
Well done Ian and Diana!
Thanks Jono! The funny thing is that this is just the basic guide. We cut out a bunch of content to try and keep it simple and it still turned out to be a beast of an article. There are more large-format related articles coming that deep dive into some of the details on the technique.