

ISO is one of the three major exposure settings in the exposure triangle of a digital camera. Of the three: shutter time, f/number, and ISO, it is ISO that is probably most misunderstood. Even more so than f/number. In fact, it is a common misconception that higher ISO settings will cause images to be noisier. In fact, the opposite is often true. Wait, what?
That’s right, higher ISO settings alone do not increase image noise and higher ISOs can even be beneficial to low-light photography. In this post, I talk about the craziness surrounding ISO settings, how ISO actually affects exposure and how to find the optimal ISO setting on your camera for astrophotography.
Introduction
This article is the first of three articles in the Astrophotography 101 course about optimizing exposure. Futures articles on shutter time and aperture f/number will follow. Learning how to optimize exposure settings is one of the most helpful skills when attempting astrophotography. “What exposure settings should I use?” is probably the most common question I get. For beginners who are new at trying astrophotography with their regular digital camera and lens, I usually recommend starting with my Milky Way Exposure Calculator. That calculator will provide an excellent starting point when making your first attempts at shooting the night sky.
Once you’re comfortable making your first exposures, the next thing I recommend learning about exposure is how to optimize your ISO setting. That’s what this article is all about. To begin, here are a couple of glossary items that will hopefully help:
ISO
In digital photography, ISO is a standard (specifically ISO 12232:2006) for exposure brightness developed by the the International Organization for Standardization (ISO). Different camera sensor models have different sensitivities so we need some way to correlate them so like exposures yield like brightnesses. Some people pronounce each letter (aɪ-es-o) but that’s technically incorrect according to the organization for which it stands. It’s correct (and easier) to just say it like the two syllable word aɪso.
Signal
Signal is the part of the photograph that we want. Light is signal. Signal is the image. Without the signal (without light), we can have no image. The more light that we can gather, the more signal we have. In general, the more signal, the higher the quality of the photo.
Noise
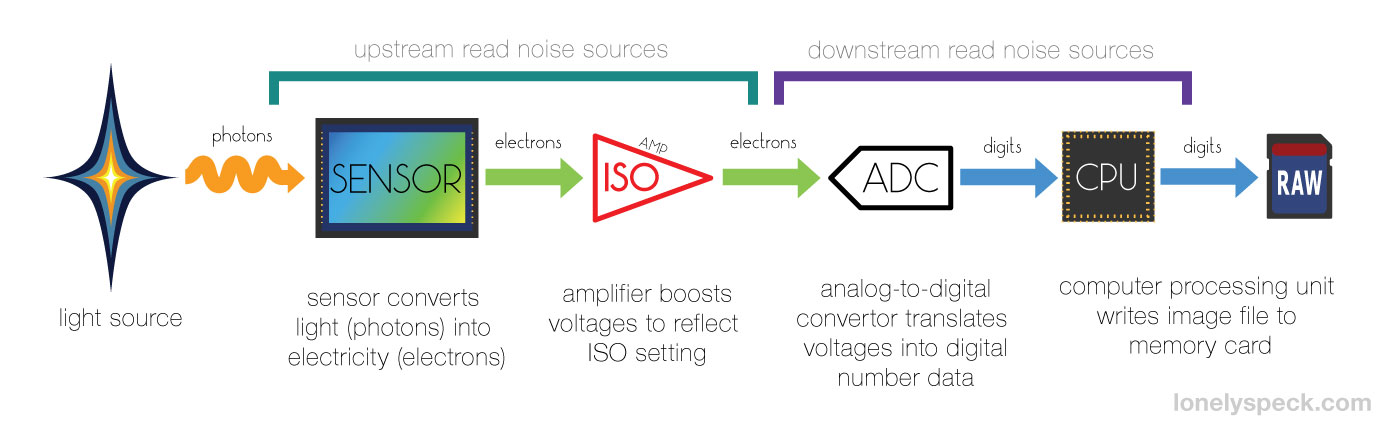
Noise is the part of the photograph that we do not want. Noise is interference appearing as speckled grain that obscures the signal and thus the details of the photograph. Noise is usually generated by heat or imperfections in the behavior of the electronics of our digital cameras. Some noise is random with every shot (shot noise) and some noise is produced consistently by the camera’s sensor (upstream read noise) or produced by the electronics after the sensor’s signal has been amplified (downstream read noise). In general, the more noise, the lower the quality of the photo.
Signal-to-Noise Ratio (SNR)
The ratio of signal to noise in an image. The higher the signal-to-noise ratio, the higher the quality of the image. More light = more signal = good. More noise = bad. Collecting more light is the best way to increase signal-to-noise ratio.
Dynamic Range
The full range of light of a scene, from the darkest darks to the brightest brights. A high dynamic range scene has extremely bright highlights (such as the sun) and extremely dark darks (such as a fully shadowed black rock). A low dynamic range scene has relatively uniform light across the scene where the brightest parts of the image are not much brighter than the darkest parts of the image. Cameras only capture a limited dynamic range of light. If the dynamic range of a scene is high enough, anything outside the range of the camera’s sensor will either be blown out to pure white (in the case of very bright areas) or crushed to pure black (in the case of very dark areas). In general, a camera sensor capable of capturing a higher dynamic range of light is more desirable.
A disclaimer: I’m an engineer, but I’m formally and primarily trained in mechanical engineering. I have some relevant experience, but electrical and computer engineering isn’t my main mode of expertise. My intention with this article is to simplify these concepts in a way that hopefully makes sense to a larger, non-technical audience. If you’re familiar with this topic and you see any glaring mistakes in this article, please feel free to let me know.
Also, all of the points made in this article apply to RAW image files. It’s very important to shoot astrophotos in RAW format to preserve the best data collected by the sensor. Don’t start complaining when you try any of the tests in this article on your JPEGs. Also, much of the benefit of optimizing ISO selection applies primarily to low-light shooting (like astrophotography) where we have a relatively small amount of signal competing with the various noise sources that encroach upon our photographs.
ISO is Amplification or Gain
It’s a (very) common misconception that increasing ISO increases the sensitivity of a camera sensor. ISO doesn’t change sensitivity. Increasing ISO simply increases the brightness of a photo by amplifying the sensor signal. In the electronics world, amplification is sometimes called “gain.” Like we can “gain” weight if we increase our eating, we can “gain” brightness if we increase our ISO.
ISO doesn’t change sensitivity.
ISO in no way affects how much signal (light) the camera can collect. If we actually want more sensitivity with a camera, we need to either increase shutter time or aperture size (lower the f/number).
Higher ISOs Don’t Increase Noise
OK, to the main point: Higher ISOs won’t increase the visible noise in a photo.
Read that again, realize that it contradicts what you probably think you know about ISO and then let me elaborate:
All other things being equal, a higher ISO will do the following:
- A higher ISO will increase the brightness of an image
- A higher ISO will decrease the total dynamic range of the image
- And, in many cases (like astrophotography), a higher ISO will actually decrease the visible noise
OK, I know what you’re thinking: “How come when I use a higher ISO, I get more noise?!” Here’s why:
For most imaging situations, photographers will usually use P (Program), A/Av (Aperture Priority/Aperture Variable), or S/Tv (Shutter Priority/Time Variable) modes on their camera. In these exposure modes, using a higher ISO setting will result in an image with more relative noise. What most people don’t realize is that the increase in noise is not because of the increase in ISO. The increase in relative noise when using a higher ISO in an automatic exposure mode (like P, A/Av or S/Tv) is actually due to the reciprocal decrease in shutter time or the decrease in aperture size as a result of using an automatic exposure mode. Most people are misattributing the increase in noise to the ISO when it’s actually caused by lower signal-to-noise ratio due to the shutter or aperture.
When setting a higher ISO on one of these autoexposure modes, the camera tries to achieve a neutral exposure and compensates for the increase in ISO by decreasing the amount of light entering camera. This reduction in light is done automatically by the camera by either decreasing the time the shutter is open (when in A/Av mode) or by using a higher f/number and thus decreasing size of the lens aperture diaphragm and letting in less light at a time (when in S/Tv mode), or by a combination of both (when in P mode).
So a reduction of light by the shutter or the aperture is the reason that the image appears noisier. It’s not noisier because of the higher ISO. This reduction of light is a reduction of signal and a reduction of signal yields an overall lower signal-to-noise ratio and thus a noisier photo.
How Do Shutter, Aperture and ISO Affect Noise?
A simple comparison test can show that relative noise levels are primarily affected by shutter and aperture and not affected nearly as much by ISO. In these tests, all settings are kept identical except the one that we wish to test which is adjusted by two stops. Then, in post processing, the images are equalized in brightness and compared.
Here’s what one of my complete test image looks like. It’s a RAW shot of Orion from a city suburb, made on a Sony a7S (my review) with the Zeiss 55mm/1.8 (also my review) lens:

How Shutter Time Affects Noise
- 8s, f/2.8, ISO 3200
- 4s, f/2.8, ISO 3200 (+1 stop in post)
- 2s, f/2.8, ISO 3200 (+2 stops in post)

Conclusion: shorter shutter time = less signal-to-noise ratio = noisier photo
How Aperture (f/number) Affects Noise
- 8s, f/2.8, ISO 3200
- 8s, f/4.0, ISO 3200 (+1 stop in post)
- 8s, f/5.6, ISO 3200 (+2 stops in post)

Conclusion: higher f/number = less signal-to-noise ratio = noisier photo
How ISO Affects Noise
- 8s, f/2.8, ISO 3200
- 8s, f/2.8, ISO 6400 (-1 stop in post)
- 8s, f/2.8, ISO 12800 (-2 stops in post)

Conclusion: higher ISO ≠ more relative noise
So of the three tests on my Sony a7S, shutter speed and aperture very obviously directly affect the apparent levels of noise in the photograph while ISO has nearly no effect. This is completely contrary to what many people would expect when they think about higher ISO.
In low-light photography, there is one aspect of ISO that can greatly affect the amount of perceived noise for any given ISO setting: downstream electronic noise. Let’s see how different types of cameras can be affected by downstream electronic noise.
ISO-Invariance and Downstream Electronic Noise
There are variations from sensor to sensor and camera model to camera model in how ISO affects low-light images. Understanding how your camera sensor behaves can help you find the optimal ISO setting for astrophotography. There are two fairly common configurations that we see in most modern digital cameras so we can split most cameras into one of two camps, ISO-variant and ISO-invariant.
ISO-Variant Cameras
Cameras use varied levels of analog amplification to adjust ISO. In a simplification of this case, the amplifier boosts the electronic voltage readout from the sensor by 2x for each ISO: 100, 200, 400, 800, 1600 and so on. Higher ISO means more amplification of the sensor output data.
After the sensor data is amplified by the ISO, it’s sent through some (downstream) electronics (such as an analog to digital convertor) to ultimately change our data from voltages into a digital file of numbers that’s readable by a computer. One of the distinct characteristics with ISO-variant cameras is higher contribution of noise from these downstream electronics.
If there is relatively little signal to begin with (e.g. in low-light situations), the lower ISO settings might not apply enough amplification for the voltages of the sensor data to overcome the contribution of electronic noise made by the downstream electronics. That means that in low-light situations like astrophotography, ISO-variant cameras will actually show more noise at low ISO settings and less noise at higher ISO settings. The Canon EOS 6D, still one of my favorite choices for a DSLR for astrophotography, is highly ISO-variant and actually shows its best low-light noise performance at ISO 6400 and higher!
Most Canon DSLRs are highly ISO-variant. There are a few exceptions to the Canon lineup that are not as ISO-variant including the new Canon EOS 5D Mark IV and the Canon EOS 80D.
ISO-Invariant Cameras
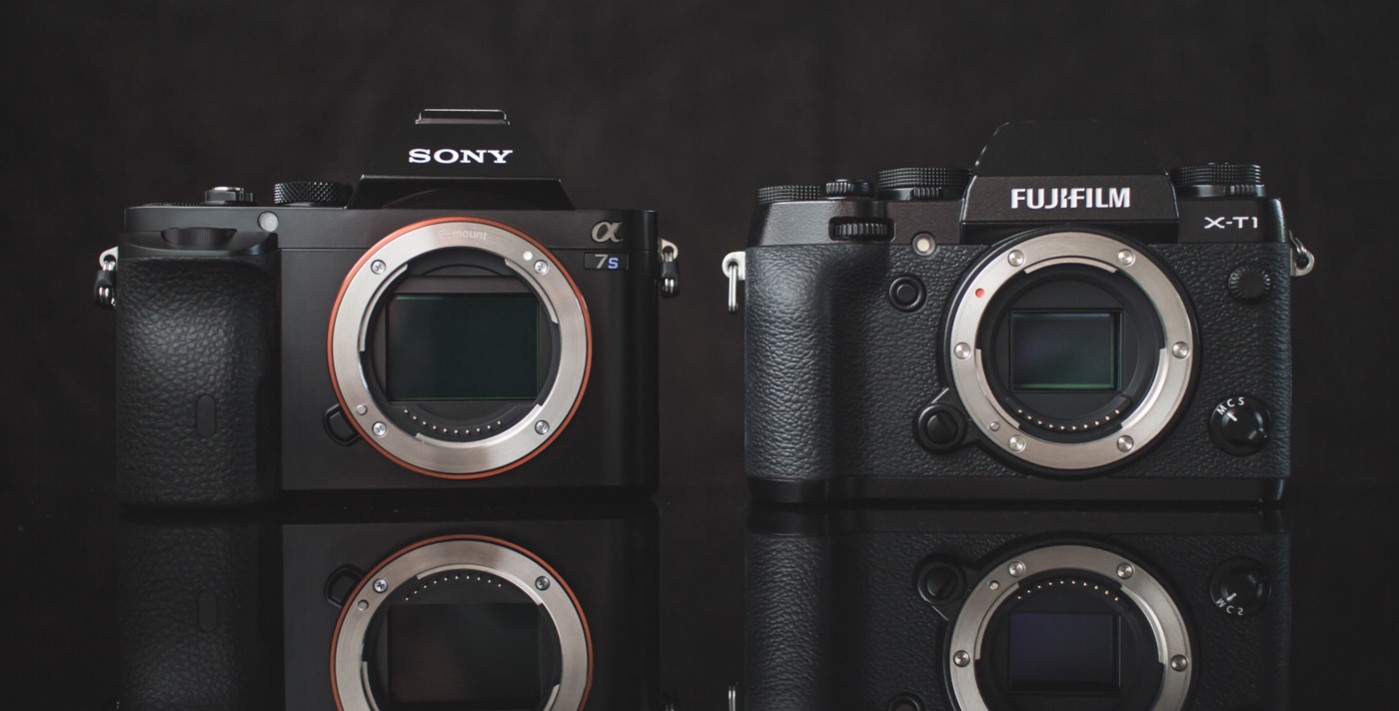
ISO-Invariant cameras have lower downstream read noise such that in low-light shooting conditions, the signal to noise ratio stays more constant as ISO settings change. In a simplification of this case, the sensor data is already amplified above the minimal contribution of downstream read noise sources before being converted to a digital signal. The result is a camera with low ISOs that tend to have less shadow noise and less of a variation between ISO settings. Most of these types of cameras are considered relatively ISOless or ISO-invariant. One camera that shows a great example of ISO-invariance is the Fujifilm X-T1. An example of the X-T1’s ISO-invariance test is available at the end of the article.
Notes and Exceptions
Okay, it’s not all black and white: many ISO-variant cameras eventually act like an ISO-invariant camera above a certain high ISO setting. Above some threshold ISO, these cameras fully overcome their noisy downstream electronics and show minimal difference in signal-to-noise ratio with higher ISOs. Most Canon cameras act this way above about ISO 1600. Knowing what that threshold ISO setting is can help us achieve the best low-light performance.
Similarly, many ISO-invariant cameras may have one or two distinct jumps in gain that will affect the overall read noise contribution to the image. In this case, there may still be a threshold ISO above which it is beneficial to shoot in low-light conditions. The Sony a7S acts this way with changes from approximately ISO 100 to 200 and 1600 to 3200. The Sony a7S’s best low-light performance is actually around ISO 3200 and above. Otherwise, the differences between ISO settings in low-light conditions on the a7S is relatively minimal.
Ultimately, both configurations achieve the same goal of brightening the photo to correspond with the particular ISO setting but the end result can be quite different, especially when shooting in low-light scenarios. ISO-invariance is a distinct enough trait in the behavior of a camera that dpreview.com has added an ISO-invariance test to most of their latest camera reviews. I personally think it’s very helpful to know how a camera acts in order to find out where it will perform best in low-light photography.
ISO vs. Dynamic Range
One of the distinct negative aspects of using too high of an ISO is reduced dynamic range. The more that we amplify the data that makes up a digital image, the more that we risk brightening it so much that it blows out the brightest parts of the image to pure white and loses detail in those parts of the image.
In the dynamic range test below, I made exposures of the star Antares at the highest ISO settings of my Sony a7S using the same exposure settings and varying only the ISO. As the ISO increases, the star appears to get larger because it’s being gradually more and more overexposed with each higher ISO. In practice, with the Sony a7S, the reduction in dynamic range doesn’t become too much of an issue until about ISO 51200 and higher but the difference in each stop is still apparent.
As a side-note, notice how similar most of the ISO settings between 1600 and 204800 look to each other in terms of noise, especially relative to the Canon EOS 6D sample above. The Sony a7S is a fairly, although not completely, ISO-invariant camera, at least between ISO 3200 and ISO 51200.

In my experience, except for the brightest stars, blowing out any part of an astrophoto to the point where we’re losing a lot of data is very, very rare. The bigger risk of using too high of an ISO in landscape astrophotography occurs when there is a larger, brighter (usually artificial) light source in view of the shot such as a street lamp, light pollution from a nearby town or your buddy’s headlamp.
Since we lose a little bit of highlight data with each higher ISO, choosing the optimal ISO for astrophotography is a little bit of balancing act between using a higher ISO for better noise performance (especially in the case of an ISO-variant sensor) or a lower ISO for better dynamic range.
Finding the Optimal ISO for Astrophotography: The ISO-Invariance Test
Stand back, we’re going to try science! In order to find the best ISO to use for astrophotography, I recommend doing an ISO-invariance test. Most of the samples shown in this article up to this point were made with an ISO-invariance test. It’s a super easy test to run: all we need to do is to take about 7-10 RAW photographs, one at each whole-stop ISO and then we match the exposure brightnesses in post processing. This test is easier to perform in a low-light scenario so I recommend doing this test outdoors at night or in a dimly lit room. Maybe make it an astrophotography trip.
If you’re performing this test while shooting the dark night sky, use my Milky Exposure Calculator to determine the shutter time and aperture setting. If doing the test in a dimly lit room, first use your camera’s (P) Program exposure mode at ISO 3200 to determine your shutter time and f/number.
Example: Canon EOS 700D
For my example, I’ll be testing out the Canon EOS 700D/T5i. Here’s a summary of the test:
- Shoot in dark conditions: a dimly lit room or outdoors at night
- Shoot in RAW file format!
- Use (M) manual exposure mode
- Set “daylight” white balance (just so it doesn’t drift)
- Disable all forms of noise reduction (Long Exposure NR, High ISO NR)
- Shoot one exposure at each whole stop ISO (100, 200, 400, 800, etc.)
- Keep all other settings the same, change only ISO
- Match exposures in post processing and compare
For my test on the T5i, here’s what the complete images looked like with the crop of the test area highlighted. I cropped the results of the test to a small area that included some midtones and some shadows.

Straight out of the camera, the crops of the RAWs looked like this:

In terms of noise, this comparison is deceiving because the brightnesses don’t match between exposures. In order to level the playing field, we need to match the brightnesses. To do so, I used Exposure adjustment slider in Adobe Lightroom to match all of the exposure brightnesses to the ISO 3200 exposure. The ISO 100 image was pushed all the way to the max +5EV setting on the Exposure slider, the ISO 200 +4EV, the ISO400, +3EV and so on…
![]()
Here’s the complete summary of how we match all the exposure brightnesses in Adobe Lightroom.
- ISO 100 gets pushed +5EV
- ISO 200 gets pushed +4EV
- ISO 400 gets pushed +3EV
- ISO 800 gets pushed +2EV
- ISO 1600 gets pushed +1EV slider
- ISO 3200 has no adjustments made
- ISO 6400 gets pulled -1EV
Another way to do this in Adobe Lightroom is to select all of the exposures, then highlight the ISO 3200 exposure and select Photo > Develop Settings > Match Total Exposures or press Command+Option+Shift+M (Ctrl+Alt+Shift+M).
Once equalized, here’s what the exposures look like:

Upon comparison of the exposures, it’s immediately apparent that the Canon EOS 700D/T5i is not completely ISO-invariant. It appears as if that the camera reaches its best low-light performance at ISO 1600 and higher. ISO 1600, 3200 and 6400 look almost identical meaning that the 700D might be ISO-invariant from ISO 1600 upwards. Below ISO 1600 is a different story: As the ISO lowers, image quality degrades until the point of being nearly unusable at ISO 100. In order to preserve some dynamic range, but still get the best low-light performance on the 700D, it’s clear from the results of the test that ISO 1600 is the optimal setting.
Example: Fujifilm X-T1
Just for comparison, I ran a separate ISO-invariance test on my Fujifilm X-T1, this time at 30 seconds and an aperture of f/2.8. The results are distinctly different from the Canon.

The difference is that there is no difference… between the ISO 200 setting (the lowest it goes on the X-T1) and the ISO 6400 setting, noise levels are identical. This means that the Fujifilm X-T1 is completely ISO-invariant. The noise levels across the ISO range don’t change in the slightest. This means that it doesn’t really matter which ISO you use on the Fujifilm X-T1 and the optimal setting might even be ISO 200 in order to preserve dynamic range.
That said, there’s also a little bit of impracticality if attempting to shoot astrophoto at ISO 200 as the image preview on the back of the camera would be very dark and evaluation of other important factors like focus and composition would be difficult at ISO 200. Luckily, we’re usually not risking too much dynamic range by bumping ISO up to a moderately high level, assuming there are no bright artificial light sources in the photo. So using ISO a slightly higher ISO might be the more practical choice, keeping in mind our tolerance for reduced dynamic range.
ISO Invariance Information Resources
There are two great resources checking the ISO behavior of most modern cameras if you don’t have the desire to perform these tests yourself:
- DPReview Image Comparison Tool: RAW DR: ISO-invariance
- DPReview’s ISO-invariance image comparison tool allows you to select any camera and each of its respective ISO settings, equalized for brightness and to view 100% close crops of a low-lit scene to compare noise levels for any given ISO setting. It’s a great way to find the best ISO for low light shooting on most cameras.
- Photons to Photos: Photographic Dynamic Range Shadow Improvement versus ISO Setting
- Photons to Photos’s shadow improvement graph allows you to see how much shadow noise improvement, in EV stops, relative to base ISO (e.g. ISO 100), you will see as ISO increases. ISO-invariant cameras like the Fujifilm X-T1 will have relatively flat curves, while cameras with high variation between ISOs will show a continually increasing curve as ISO increases. Note that their graphs are adjusted relative to base ISO for each camera, so it shouldn’t be used for comparing noise performance of one camera to another.
Conclusion
Contrary to popular belief, higher ISOs don’t create more noise and using a higher ISO can actually be beneficial when shooting in low-light scenarios, especially on cameras with ISO-variant sensors. Run an ISO-invariance test on your camera to determine the best ISO setting to use when shooting astrophotography. ISO behavior varies from camera model to camera model and testing out each ISO setting can help determine the best ISO to use for the best noise performance in your astrophotography.
It’s important to understand that ISO-variance or invariance doesn’t necessarily make a camera better or worse at low-light, it’s just different. Knowing how a camera behaves is an important step to achieving the best image quality.
More and more cameras manufacturers tend to be making their cameras more and more ISO-invariant, as they develop sensor technology with reduced downstream read noise and improved dynamic range at low ISO settings.
Do you know which ISO on your camera gives the best low-light performance? Do a test or look it up to find out!
Disclosure
We are a participant in the Amazon Services LLC Associates Program, an affiliate advertising program designed to provide a means for us to earn fees by linking to Amazon.com and affiliated sites. We are also a participant in the B&H Affiliate Program which also allows us to earn fees by linking to bhphotovideo.com.
Learn Astrophotography
Astrophotography 101 is completely free for everyone. All of the lessons are available on the Lonely Speck Astrophotography 101 page for you to access at any time. Enter your email and whenever we post a new lesson you’ll receive it in your inbox. We won’t spam you and your email will stay secure. Furthermore, updates will be sent out only periodically, usually less than once per week.
Help us help you!
Believe it or not, Lonely Speck is my full-time job. It’s been an amazing experience for us to see a community develop around learning astrophotography and we’re so happy to be a small part of it. I have learned that amazing things happen when you ask for help so remember that we are always here for you. If you have any questions about photography or just want to share a story, contact us! If you find the articles here helpful, consider helping us out with a donation.
[button font_size=”16″ color=”#136e9f” text_color=”#ffffff” url=”https://www.paypal.com/cgi-bin/webscr?cmd=_donations&business=lonelyspeckblog%40gmail.com&item_name=These+tips+help+keep+lonelyspeck.com+running.¤cy_code=USD&source=url” target=”_blank”]Donate[/button]
Thanks so much for being a part of our astrophotography adventure.
-Ian
*This article was edited on March 20, 2017. A previous version of this article incorrectly characterized certain aspects of ISO-invariance. This point has been corrected.
Wow. Great article, breaking the myth about ISO. Say I’m shooting under moonlight, I find that f2.0, 10 secs, ISO 3200 to be a good exposure on my Canon 6D, are you saying it is actually better to make it f2.0, 5 secs, ISO 6400? I’ve always thought reducing exposure time and increasing ISO increases noise.
No. It may be actually better to choose f2.0, 10 secs, ISO6400 and pull back the exposure in post by -1EV. But as you´re speaking of a moonlight scene, you may have be big bright lights in your image, so be careful when overexposing your image (dynamic range!).
” I’ve always thought reducing exposure time and increasing ISO increases noise.”
The reason for the increased noise in the image is the weaker exposure. You’re capturing less photons. The image is “dimmer”, (actually lower digital values in the raw data), requiring more “brightening” (increasing the digital values representing a pixel’s luminance). This brightening can be done in either the analogue or digital domains. Doing it in the analogue domain is used for the low-to-medium-ISO range, while digital amplification/multiplication is used for high ISOs.
Brightening after the Capture phase in a raw converter, i.e in the Rendering phase, is also performed digitally. In a camera shooting JPEG, capturing and then rendering are performed immediately, whereas, in raw shooting, these two phases are separated, allowing more flexibility.
There are two basic noise types (ignoring long-exposure sensor-heat-generated noise) : Electronic Read Noise (sensor, ADC) and Image/Photonic noise, aka “shot noise” , the SNR of which decreases with the square-root of the number of photons captured.) At low ISOs ADC noise dominates. At high ISO, sensor noise dominates. In weak exposures the shot noise SNR will be lower than for a strong exposure.
You generally use high ISO to compensate for the lower digital values in a weak exposure. Shot noise will be in the whole image. Read noise will be in the dark parts.
The optimum ISO setting is to use the lowest ISO where the sensor noise dominates the ADC noise in the Total RN (a quadrature combination of the uncorrelated/random electronic noise sources). Then the image is said to be “shot-noise limited”, and the perceived noiseyness of the image comes down solely to the number of photons captured by the sensor. Using any higher ISO than this when capturing the image is just wasting headroom, which is important for capturing the very brightest parts of the image, e.g. specular reflections off metal, even if the rest of the image is low-level.
” Image/Photonic noise, aka “shot noise” , the SNR of which ***decreases*** with the square-root of the number of photons captured.)”
I meant ” the SNR of which INCREASES with the square-root of the number of photons captured.)” . For example:
10,000 photons captured in a single pixel. SNR due to shot nosie is 100:1
40,000 photons captured in a single pixel. SNR due to shot noise is 200:1
Ian – If i can ask one more question in this topic (which is so fascinating!):
– Do noise characteristics change in predictable ways at higher ISO/noise levels(i.e., at a consistent EV and ISO 800 vs 3200 vs 12800 etc), or in certain light situations? By this I mean, are there situations that need higher color noise correction but not as much luminance noise correction, or vice versa?
I’m asking because I would like to know if there is more advanced strategy with dealing with noise in post processing. Currently I trial & error the levels of luminance vs. color noise reduction in Lightroom, but I would be interested to know if there is a more sophisticated way to think about it. For example, maybe shooting at high ISO in medium light (to get high shutter speed) has a different noise signature than high iso in the dark dark (for long exposures), and therefore we should concentrate on color noise in one situation and luminance in the other.
I hope that makes a little sense!
Great article Ian, very informative!
I have a question regarding ISO-invariant.
From what I understand, ISO-invariant cameras would let me shoot at any ISO and then I can edit the exposure later. Can I make advantage of this fact for HDR photography?
Instead of taking multiple photos at different ISOs, I can shoot only one photo then create exposure compensated versions on Lightroom. Btw, I use luminosity masks to create HDR photos, I don’t stack all the photos together.
Again, great work. Please keep it up 🙂
Hi Mostafa,
Yes, you can shoot at any ISO if the camera is ISO-invariant (like the Fujifilm Xt-1). I would suggest you set it at base ISO to get the highest dynamic range though.
When using these tests, don’t get confused that you can replace shutter speed/aperture with ISO. You always want to set shutter speed/aperture to let in as much light as you can while still getting a quality image and then you can set your ISO. If your camera happens to be fairly ISO-invariant, then base ISO would be a good choice to get the most dynamic range and the least amount of noise when brightened in post-processing.
It is in reality a great and helpful piece of info.
I’m satisfied that you just shared this useful information with us.
Please stay us informed like this. Thank you for sharing.
Ian,
Thank you very much for the response and the recommendations. I think one of the cheaper options will suffice, I especially like that the first option can be used as a monopod. I knew I should probably consider an L-bracket, thanks for pointing that out, I just didn’t realize how expensive those could be. The Q66 plus the L-bracket will do just fine.
Thanks again and keep up the great work,
Anthony
Excellent information well presented — Thank You!
I wonder if a lot of confusion about ISO settings comes from the good-ole film days, when ASA and ISO were often used interchangeably, and higher speed film really did have larger emulsion grains, thus a grainier image. We’d use Tri-X (ASA 400) for dim light, and either Pan-X (ASA 32) or 2415 Technical Pan for very fine grain imaging. Then exploiting either push or pull processing, we’d change the whole scene altogether.
I don’t currently use a DSLR for night-time imaging, but I often use a CCD camera on a permanently mounted observatory telescope. We tend to deal more with binning, pixel size, and local seeing conditions for deep sky imaging, as well as Nyquist sampling for planetary photography.
Is there a DSLR equivalent of binning? I need to learn more about how DSLR cameras work.
Thank you kindly,
Brad Vietje
Newbury, VT
The closest think to binning that I would know of is just downsampling. Not a technique that I typically use. Might be useful on very high resolution cameras.